




Cannabis nutrient deficiencies can appear as yellow leaves, brown spots, burnt edges, slow growth, or distorted new foliage, but these symptoms do not always mean the plant needs more fertilizer. Incorrect pH, nutrient lockout, overfeeding, watering problems, and unhealthy roots can all produce similar signs.
This guide explains how to identify common cannabis deficiencies, use a cannabis deficiency chart, and distinguish a genuine shortage from toxicity or poor nutrient uptake. You will also learn how to check pH and EC, recognize where symptoms begin, correct the most likely cause, and prevent cannabis nutrient deficiencies throughout each stage of the grow.
Key Takeaways
- Cannabis nutrient deficiencies can cause yellowing, brown spots, burnt edges, slowed growth, and distorted new leaves, but these symptoms may also be linked to lockout, toxicity, or environmental stress.
- Check where symptoms begin, as mobile nutrient deficiencies usually affect older leaves first, while immobile nutrient problems tend to appear in new growth.
- Test root-zone pH and nutrient strength before adding more fertilizer, since poor uptake can make a well-fed plant appear deficient.
- Correct one issue at a time and judge recovery by healthy new growth rather than expecting damaged leaves to return to normal.
- Prevent cannabis deficiencies by maintaining suitable pH, monitoring EC and runoff, adjusting feeding by growth stage, and keeping the root zone healthy.

- What Are Cannabis Nutrient Deficiencies?
- How to Diagnose Cannabis Nutrient Deficiencies Correctly
- Common Cannabis Nutrient Deficiencies and How to Fix Them
- Nutrient Deficiency, Nutrient Lockout or Nutrient Toxicity?
- How to Prevent Cannabis Deficiencies Throughout the Grow
- Conclusion
- Frequently Asked Questions About Cannabis Nutrient Deficiencies
What Are Cannabis Nutrient Deficiencies?
Cannabis nutrient deficiencies occur when a plant cannot absorb enough of one or more essential nutrients needed for healthy growth. This may happen because the nutrient is genuinely lacking in the growing medium, or because the roots are unable to absorb it due to incorrect pH, salt buildup, poor root health, or environmental stress.
The first signs usually appear on the leaves. Yellowing, brown spots, burnt edges, purple discoloration, or twisted new growth can all indicate a nutrient problem. However, these symptoms are not exclusive to deficiencies. Nutrient lockout, overfeeding, overwatering, pests, and temperature extremes can produce similar symptoms, making correct diagnosis essential.
As an experienced grower, one of the biggest mistakes I see beginners make is adding more fertilizer as soon as leaves change color. In many cases, the nutrients are already present, but the plant cannot use them. Learning how to diagnose cannabis nutrient deficiencies properly will help you solve problems faster, avoid unnecessary feeding, and keep your plants growing vigorously throughout every stage of their life cycle.
Grower Tip: Never diagnose a deficiency from a single leaf. Always inspect the entire plant, paying close attention to which leaves are affected first and how the symptoms are progressing.
What Nutrients Do Cannabis Plants Need?
Cannabis requires a balanced supply of macronutrients, secondary nutrients, and micronutrients throughout its life cycle. Each nutrient performs a specific role, and even a small imbalance can affect growth, flower production, or overall plant health.
The three primary macronutrients are nitrogen (N), phosphorus (P), and potassium (K), commonly displayed as the N-P-K ratio on fertilizer labels. Cannabis uses these nutrients in the greatest quantities to support leaf development, root growth, flowering, and water regulation.
Secondary nutrients include calcium, magnesium, and sulfur, which contribute to cell structure, chlorophyll production, enzyme activity, and overall plant function.
In addition, cannabis needs trace amounts of micronutrients such as iron, manganese, zinc, boron, copper, and molybdenum. Although required in much smaller quantities, deficiencies can quickly reduce plant health and lead to visible symptoms.
Nutrient requirements also change as the plant matures. Seedlings require only light feeding, vegetative plants demand higher nitrogen levels, and flowering plants benefit from a balanced nutrient profile that supports bud development while maintaining healthy foliage.
| Nutrient Group | Nutrients | Primary Function |
| Primary macronutrients | Nitrogen, phosphorus, potassium | Growth, roots, flowering, water regulation |
| Secondary nutrients | Calcium, magnesium, sulfur | Cell strength, chlorophyll production, enzyme activity |
| Micronutrients | Iron, manganese, zinc, boron, copper, molybdenum | Photosynthesis, nutrient metabolism, healthy new growth |
Grower Tip: More nutrients don't produce bigger harvests. Consistent feeding at the correct strength almost always outperforms overfeeding.
Cannabis Deficiency Chart
Before trying to identify a specific nutrient deficiency, compare your plant's symptoms with the quick reference chart below. While no chart can replace a full diagnosis, it provides an excellent starting point and helps narrow down the most likely causes.
Always remember that several cannabis nutrient deficiencies share similar symptoms. Use this chart alongside your pH readings, feeding schedule, and recent environmental conditions before making any changes to your nutrient program.
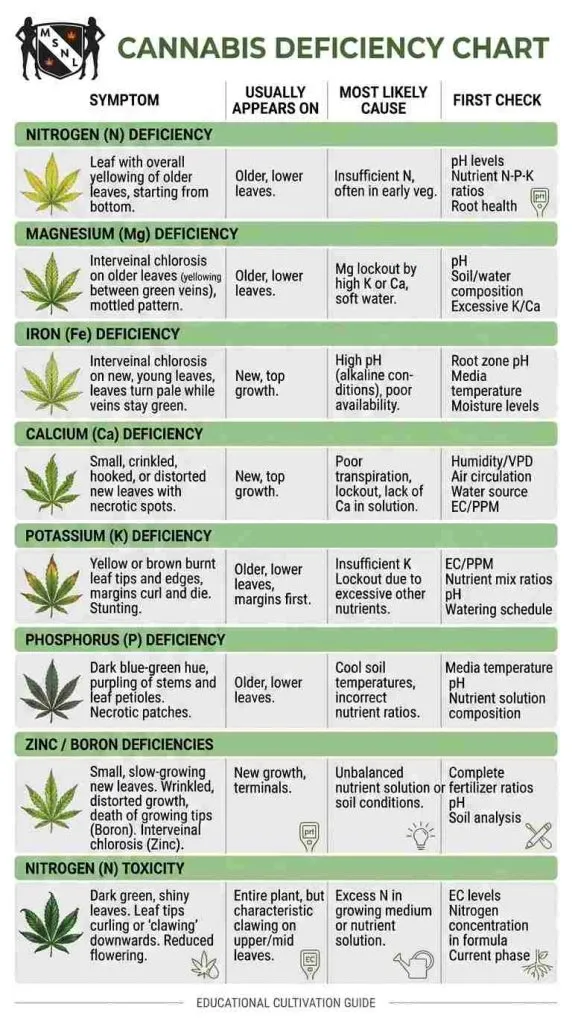
| Symptom | Usually Appears On | Most Likely Cause | First Thing to Check |
| Uniform yellowing | Older lower leaves | Nitrogen deficiency | pH and feeding schedule |
| Yellowing between green veins | Older leaves | Magnesium deficiency | Root-zone pH |
| Pale yellow new growth | New leaves | Iron deficiency | High pH |
| Brown or rust-colored spots | New growth | Calcium deficiency | pH and CalMag availability |
| Yellow or burnt leaf edges | Older leaves | Potassium deficiency | EC and nutrient balance |
| Dark leaves with purple or red coloration | Older leaves | Phosphorus deficiency | Root temperature and pH |
| Twisted or distorted new growth | Growing tips | Calcium, boron or zinc deficiency | Root health and pH |
| Dark green clawed leaves | Throughout the plant | Nitrogen toxicity | Reduce nutrient strength |
Grower Tip: This chart is designed to narrow down the possibilities, not provide a final diagnosis. Confirm the cause by checking where symptoms started, your root-zone pH, and recent feeding history before making any corrections.
How to Diagnose Cannabis Nutrient Deficiencies Correctly
Before adding more nutrients, take a systematic approach to diagnosing the problem. Many cannabis deficiencies produce similar symptoms, and issues such as incorrect pH, overwatering, nutrient lockout, or environmental stress can look almost identical. Following the steps below will help you identify the underlying cause and avoid making the problem worse.
Grower Tip: Resist the urge to feed more nutrients as soon as leaves change color. A careful diagnosis is almost always more effective than guessing.
Check Where the Symptoms Started
The first place symptoms appear provides one of the most valuable diagnostic clues.
Deficiencies involving mobile nutrients usually begin on older, lower leaves because the plant moves these nutrients into new growth when supplies become limited. Deficiencies affecting immobile nutrients are more likely to appear on young leaves and growing tips because these nutrients cannot be redistributed as easily.
| Where symptoms appear | Most likely nutrient group |
| Older lower leaves | Nitrogen, phosphorus, potassium, magnesium |
| New leaves and growing tips | Calcium, iron, sulfur, boron, zinc, copper |
This isn't a guaranteed diagnosis, but it quickly narrows down the possible causes.
Identify the Type of Damage
Next, identify the main symptom affecting the leaves. Different deficiencies often produce distinct patterns of damage.
| Symptom | Most likely cause |
| Uniform yellowing | Nitrogen deficiency |
| Yellowing between green veins | Magnesium or iron deficiency |
| Brown or rust-colored spots | Calcium or magnesium deficiency |
| Burnt or yellow leaf edges | Potassium deficiency |
| Purple leaves or stems | Phosphorus deficiency |
| Twisted or distorted new growth | Calcium, boron, or zinc deficiency |
| Dark green clawed leaves | Nitrogen toxicity rather than a deficiency |
Remember that these symptoms are only a starting point. Similar signs can also result from nutrient lockout, overfeeding, root damage, or environmental stress.
Grower Tip: Look at the whole plant rather than a single damaged leaf. The location and progression of symptoms are often more informative than the symptom itself.
Check Root-Zone pH Before Feeding
Incorrect pH is one of the most common causes of apparent cannabis deficiencies. When the root zone falls outside the ideal range, nutrients may be present but unavailable to the plant.
As a general guide:
| Growing medium | Recommended pH |
| Soil | 6.0–7.0 |
| Coco coir | 5.5–6.5 |
| Hydroponics | 5.5–6.5 |
Always test pH after mixing nutrients and, where possible, check the runoff or root-zone pH rather than only the water going into the pot.
Grower Tip: Correct pH before increasing nutrient strength. Many apparent deficiencies disappear once nutrient uptake is restored.
Review EC and Your Recent Feeding History
If pH is correct, review your feeding program.
Measure the EC of both the nutrient solution and the runoff. High runoff EC often indicates salt buildup or overfeeding, while a very weak nutrient solution may point toward a genuine deficiency.
Also consider what changed before symptoms appeared.
- Increased nutrient strength
- Added bloom boosters or supplements
- Switched nutrient brands
- Changed watering frequency
- Recently transplanted the plant
Small changes in your routine often explain why symptoms suddenly develop.
Rule Out Watering, Root and Environmental Problems
Finally, check that the problem isn't being caused by the growing environment.
Poor drainage, overwatering, underwatering, damaged roots, excessive heat, cold root temperatures, incorrect humidity, or excessive light can all reduce nutrient uptake or produce symptoms that resemble cannabis deficiencies.
Inspect the roots if possible, confirm the cannabis growing medium drains well, and make sure environmental conditions remain within an appropriate range for the plant's stage of growth.
Grower Tip: Make one correction at a time and monitor the new growth over the following week. Healthy new leaves are the best sign that you've identified the real problem.
Common Cannabis Nutrient Deficiencies and How to Fix Them
After ruling out pH, watering, and environmental problems, compare your symptoms with the deficiencies below. Focus on where the symptoms started and how they progress. Once you've identified the most likely cause, correct the underlying issue and monitor new growth rather than expecting damaged leaves to recover.
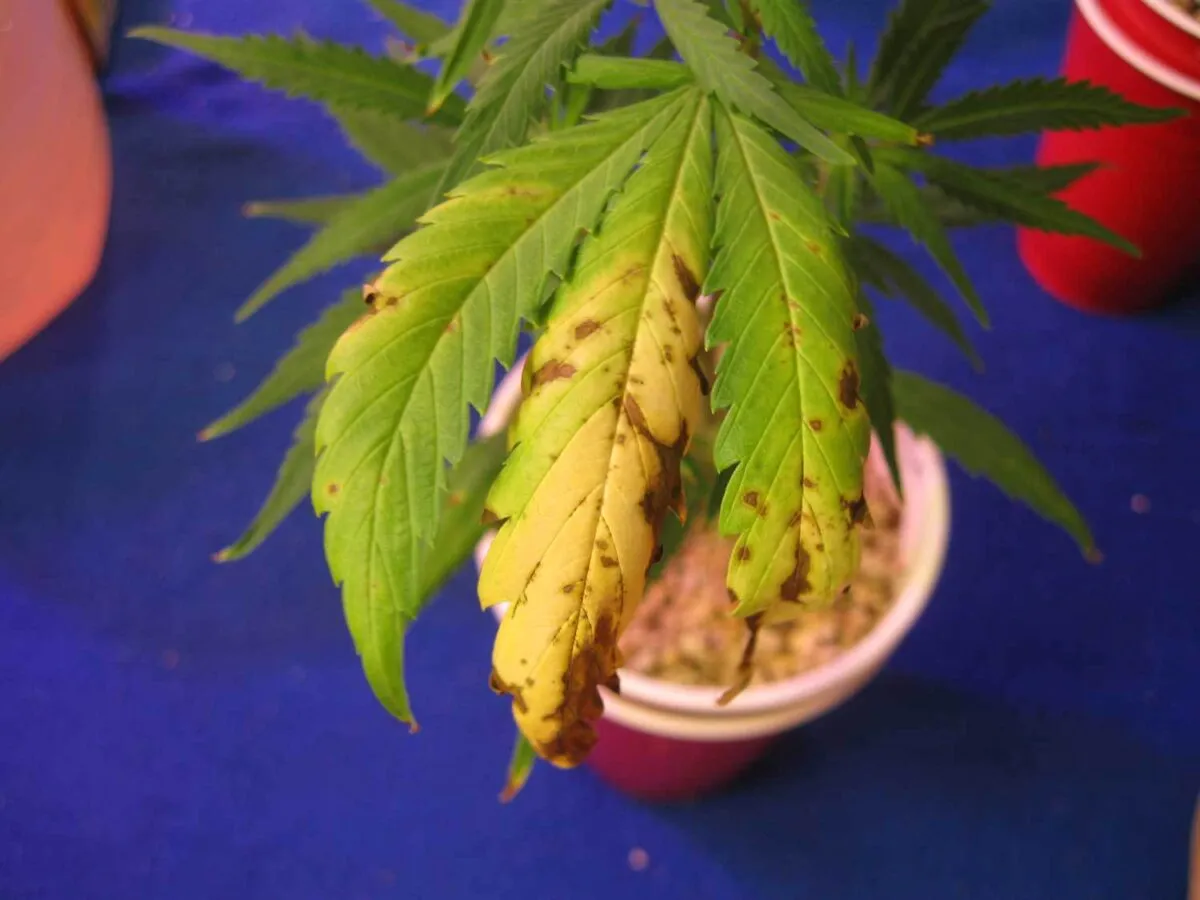
| Deficiency | Usually appears on | Main signs |
| Nitrogen | Older leaves | Uniform yellowing |
| Phosphorus | Older leaves | Dark foliage, purple or red coloration |
| Potassium | Older leaves | Yellow or burnt leaf edges |
| Calcium | New growth | Brown spots, distorted leaves |
| Magnesium | Older leaves | Yellowing between green veins |
| Iron | New growth | Pale leaves with green veins |
| Sulfur | New growth | Uniform yellowing |
| Zinc | New growth | Small, distorted leaves |
Nitrogen Deficiency
Nitrogen deficiency usually begins on older leaves, which gradually fade from green to yellow before drying and falling away. Plants often become pale overall and growth slows.
Common causes include insufficient feeding, incorrect pH, or depleted growing media.
Correct the problem by restoring the proper pH and using a balanced fertilizer containing nitrogen. Organic growers can also top dress with compost or worm castings, although results take longer.
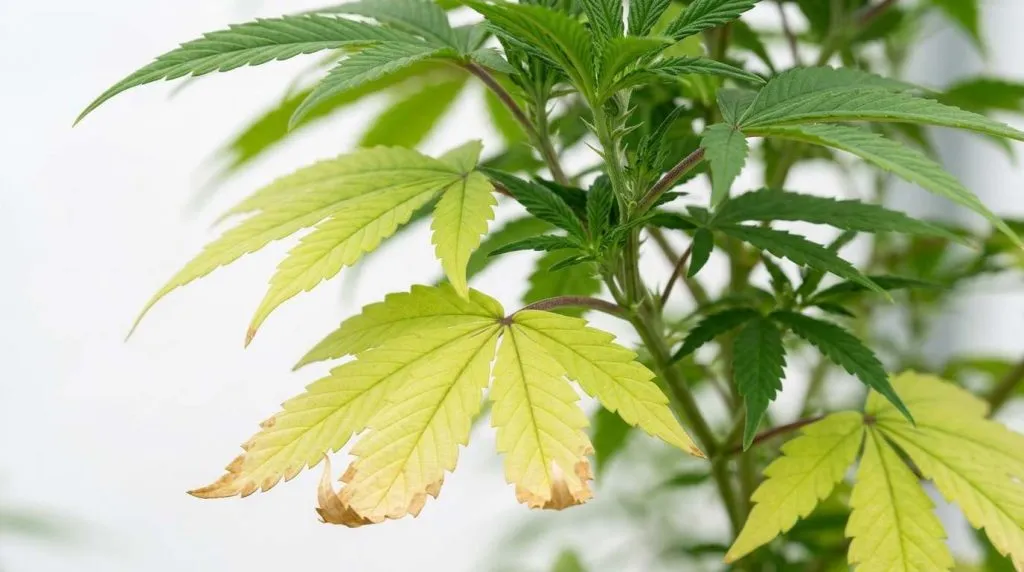
Grower Tip: Don't mistake the natural fading of older fan leaves late in flowering for a nitrogen deficiency.
Phosphorus Deficiency
Phosphorus deficiency commonly causes slow growth, dark foliage, and red or purple discoloration on older leaves. Severe cases may develop brown patches and dead tissue.
Low root temperatures, incorrect pH, and salt buildup are often responsible for reduced phosphorus uptake.
Restore the correct growing conditions before increasing phosphorus. If a deficiency is confirmed, use a balanced bloom fertilizer rather than repeatedly adding PK boosters.
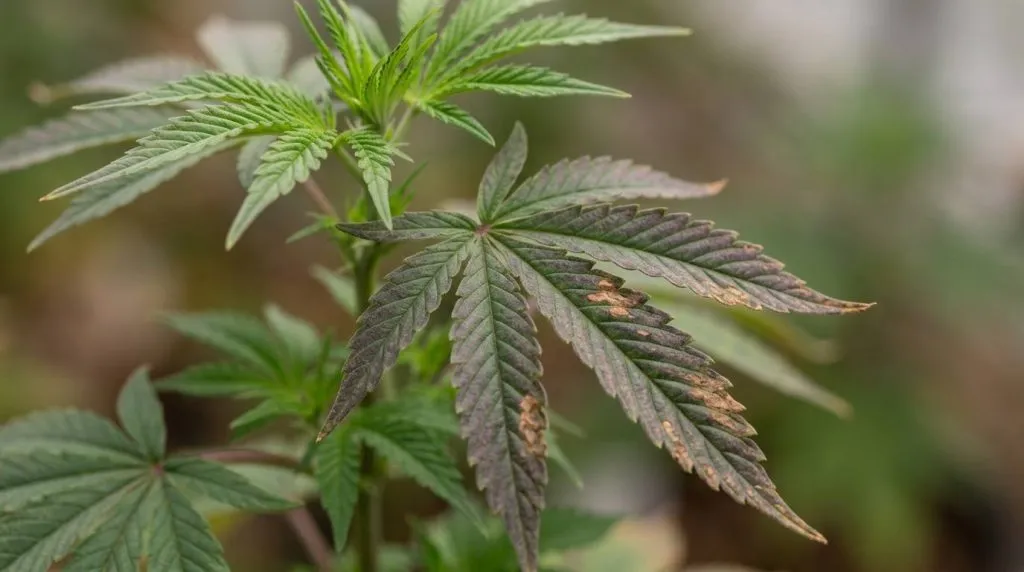
Grower Tip: Purple stems alone rarely confirm a phosphorus deficiency.
Potassium Deficiency
Potassium deficiency usually appears as yellowing along the edges of older leaves before the margins become brown and scorched. Leaves may curl and stems can weaken as the problem progresses.
Common causes include nutrient imbalance, incorrect pH, and salt buildup.
Correct the root-zone conditions first, then resume feeding with a balanced nutrient suitable for the plant's growth stage.
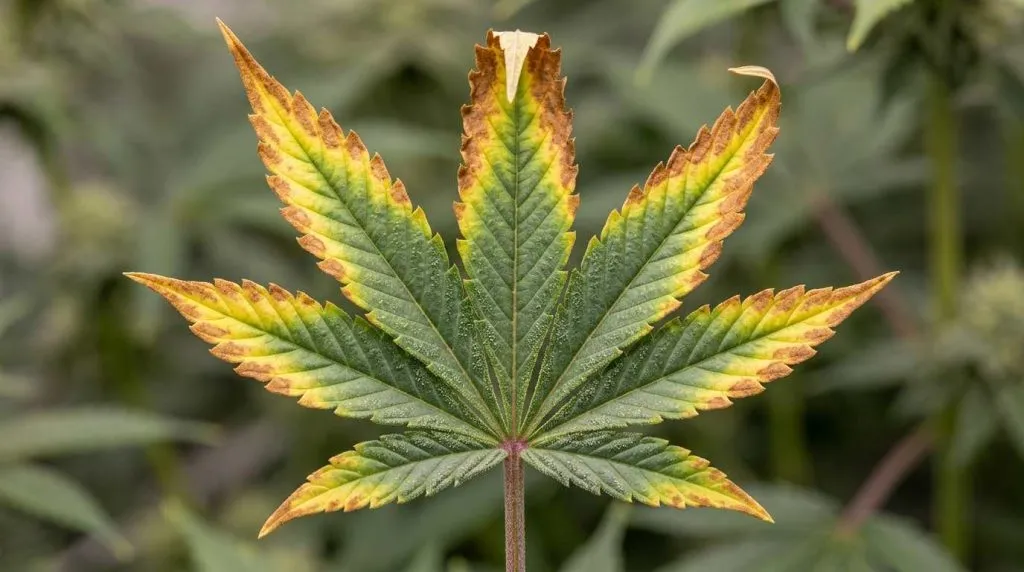
Grower Tip: Potassium deficiency affects the leaf margins, while nutrient burn usually starts at the leaf tips.
Calcium Deficiency
Calcium deficiency affects new growth first. Young leaves may develop brown spots, curled edges, and distorted or irregular growth.
It is especially common in coco, hydroponics, or when using reverse osmosis water, but poor pH and root health can produce similar symptoms.
Correct the pH, improve root conditions if necessary, and add a calcium supplement only if your nutrient program lacks sufficient calcium.
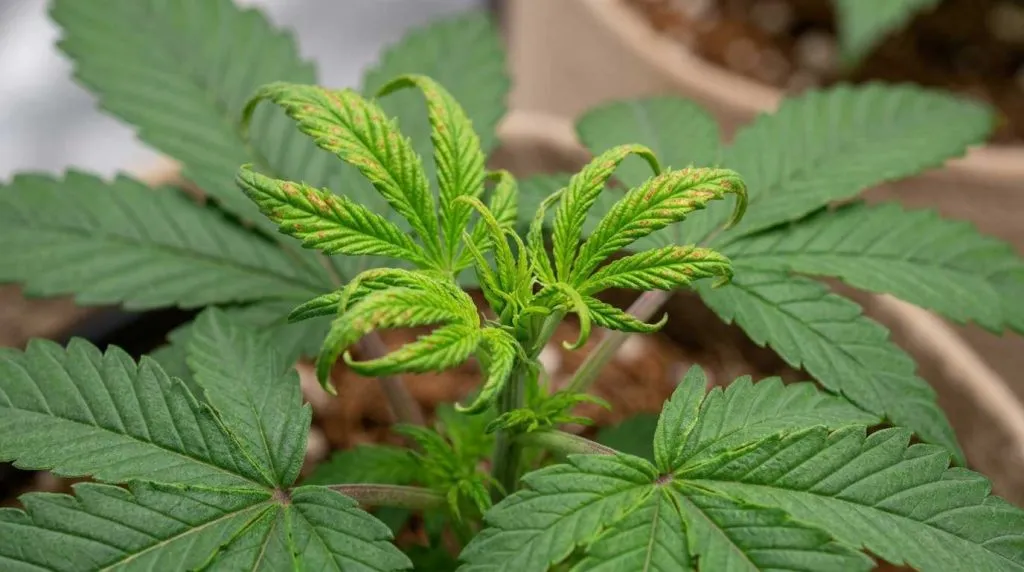
Grower Tip: Brown spots don't automatically mean your plant needs CalMag.
Magnesium Deficiency
Magnesium deficiency typically begins on older leaves with yellowing between the veins while the veins remain green. Rust-colored spots may appear as the deficiency progresses.
Incorrect pH, salt buildup, or nutrient imbalance commonly reduce magnesium uptake.
Once the root zone is corrected, supply magnesium using a balanced CalMag product or another suitable magnesium source.
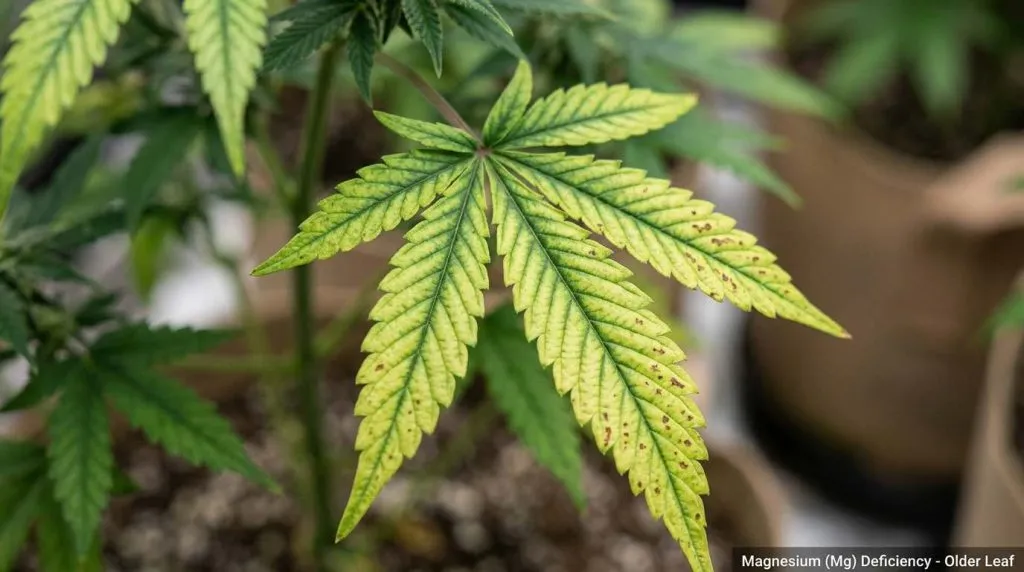
Grower Tip: New healthy growth is the best indicator that the problem has been corrected.
Iron, Sulfur and Zinc Deficiencies
These deficiencies generally affect young growth.
Iron deficiency causes pale yellow new leaves with darker green veins and is most commonly linked to high pH.
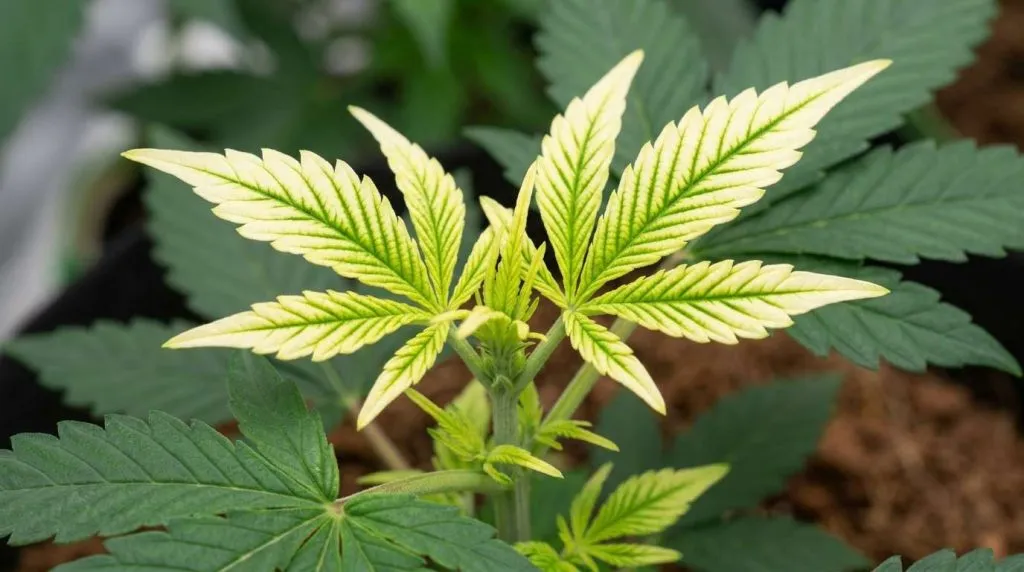
Sulfur deficiency produces a more even yellowing across new leaves and is usually associated with nutrient lockout or an incomplete feeding program.
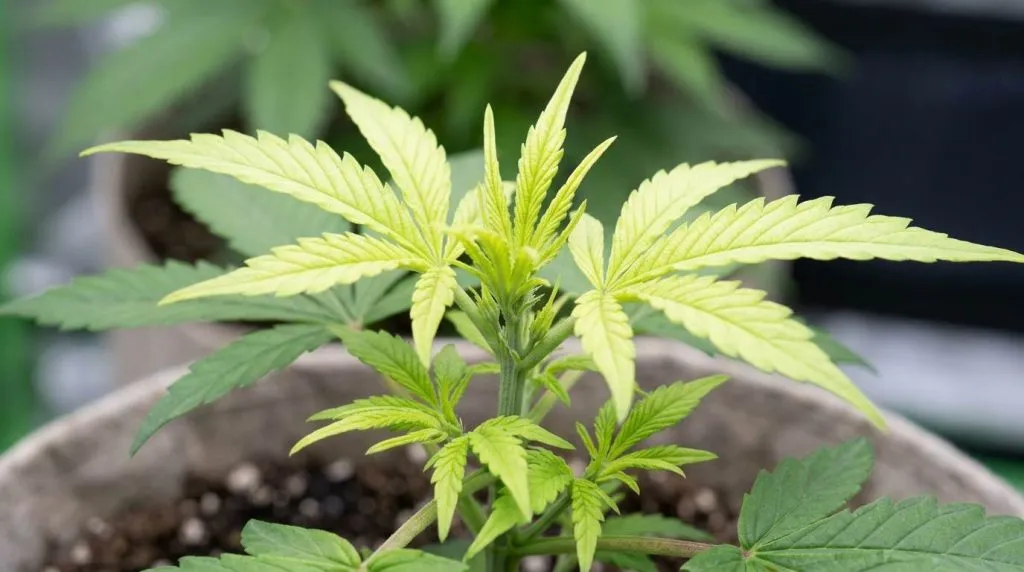
Zinc deficiency causes small, distorted leaves, shortened internodes, and mottled yellowing. High pH and excessive fertilizer levels commonly reduce zinc availability.
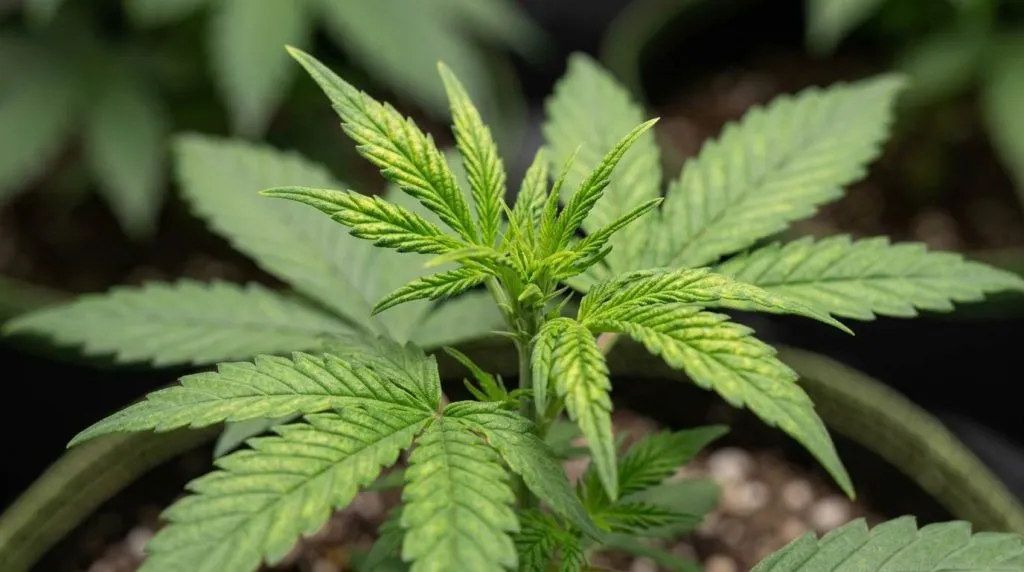
Correct pH and nutrient balance before adding individual micronutrients.
Grower Tip: Yellow young leaves with green veins usually point toward iron, while distorted new growth makes zinc more likely
Manganese, Boron, Copper and Molybdenum Deficiencies
These micronutrient deficiencies are relatively uncommon and are usually caused by poor nutrient uptake rather than a lack of fertilizer.
- Manganese deficiency: Yellowing between veins with small brown spots.
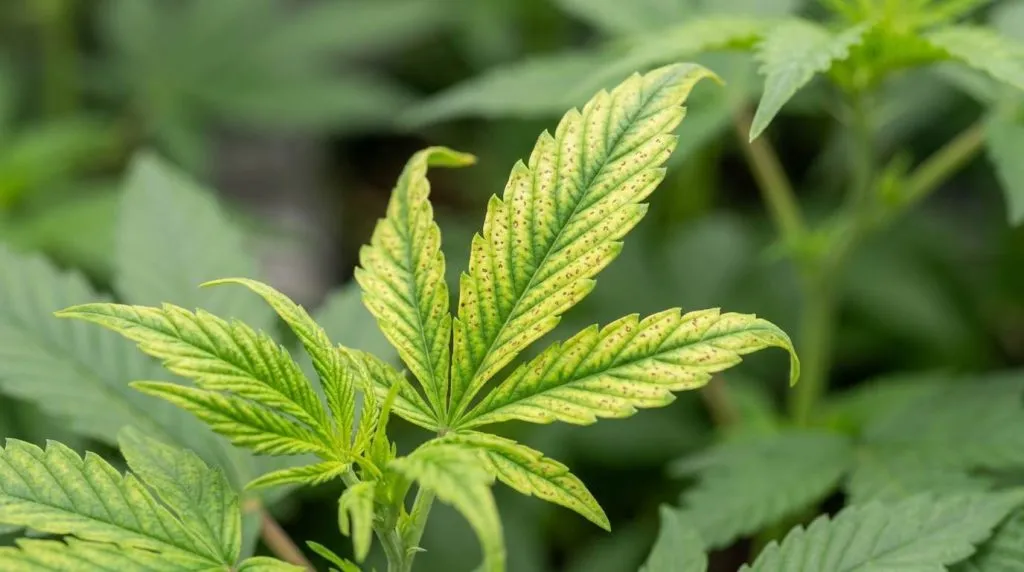
- Boron deficiency: Twisted growing tips and brittle new leaves.
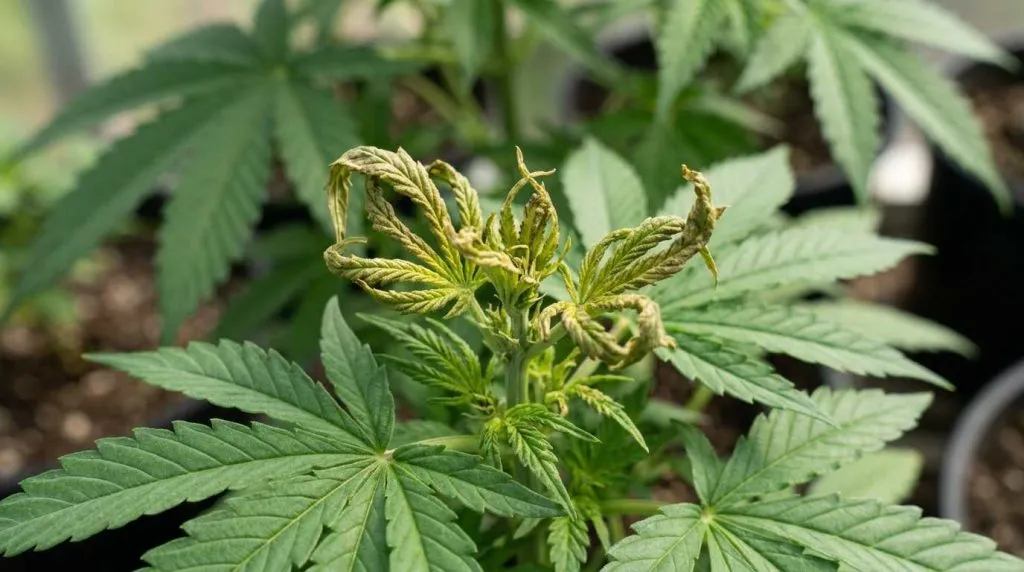
- Copper deficiency: Weak new growth and dead leaf tips.
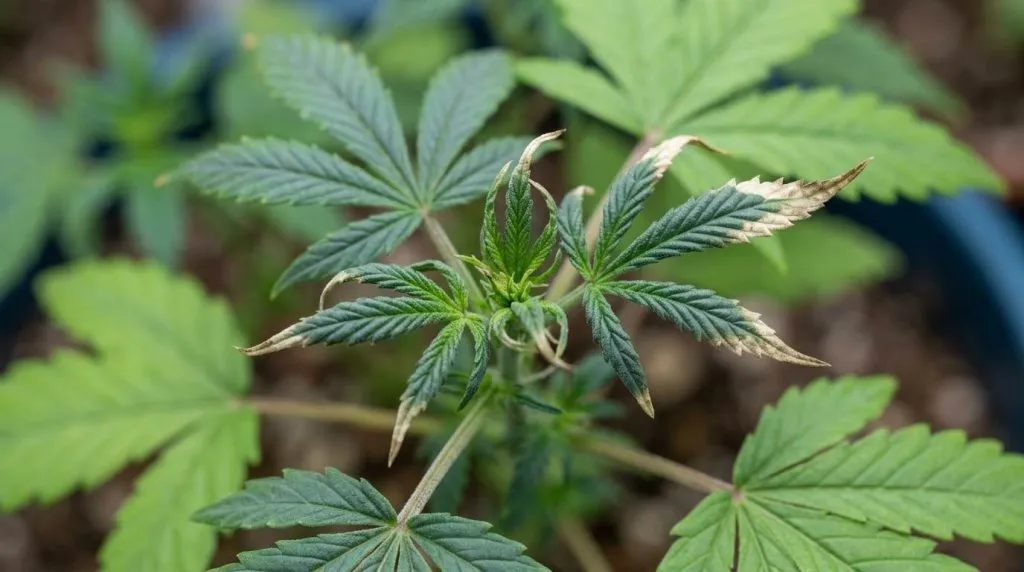
- Molybdenum deficiency: Yellowing on middle leaves resembling nitrogen or sulfur deficiency.
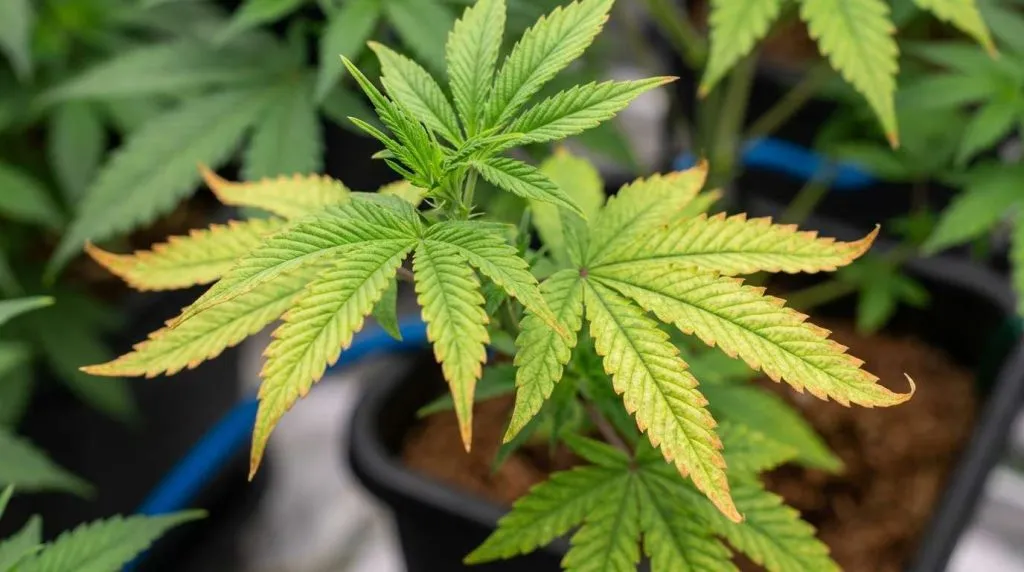
Correct pH and root health first. If symptoms persist, use a balanced micronutrient supplement rather than individual trace elements.
Grower Tip: Rare micronutrient deficiencies are often caused by lockout, not by a complete lack of the nutrient itself.
Nutrient Deficiency, Nutrient Lockout or Nutrient Toxicity?
These problems can produce similar symptoms, but they require different corrections. A deficiency means the plant is not receiving enough of a nutrient. Nutrient lockout means the nutrient is present but unavailable to the roots. Toxicity occurs when the plant receives too much, often causing burnt tips, dark foliage, or clawed leaves.
| Problem | What it means | Common signs |
| Deficiency | Too little available nutrient | Yellowing, spotting, weak or distorted growth |
| Lockout | Nutrients are present but cannot be absorbed | Several deficiency symptoms appearing together |
| Toxicity | Excess nutrient levels | Burnt tips, dark leaves, clawing, slowed growth |
What Causes Nutrient Lockout in Cannabis?
Nutrient lockout usually develops when root-zone conditions prevent the plant from absorbing nutrients already present in the growing medium.
Common causes include incorrect pH, salt buildup, overfeeding, poor drainage, cold roots, and damaged root systems. Nutrient imbalances can also contribute. For example, excessive potassium may reduce calcium and magnesium uptake.
Lockout often produces several deficiency-like symptoms at once, despite regular feeding. Runoff EC may be high, leaves may show burnt tips, and new discoloration can continue even after nutrients are added.
Check root-zone pH, runoff strength, watering habits, and recent feeding changes before increasing the dose. The original article identifies unsuitable pH as a major cause of nutrient lockout.
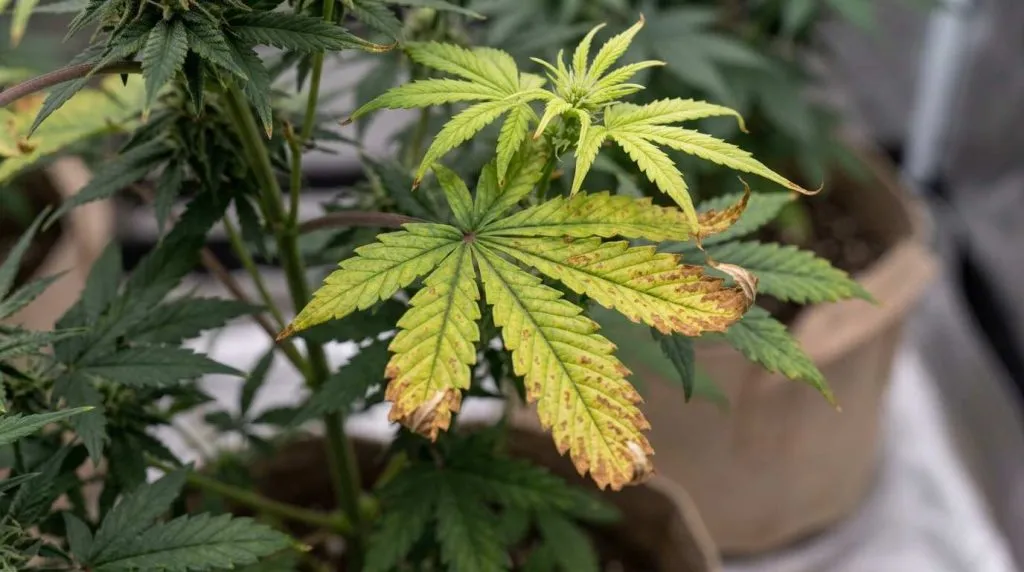
Grower Tip: If a well-fed plant continues showing multiple deficiencies, suspect poor uptake before assuming it needs more fertilizer.
How Nutrient Toxicity Differs From a Deficiency
A nutrient deficiency usually causes pale leaves, discoloration, weak development, or damage linked to a particular nutrient. Toxicity is caused by excessive feeding and often begins with burnt leaf tips.
Nitrogen toxicity commonly produces very dark, glossy foliage with tips curling downward into a claw shape. High fertilizer concentrations can also cause marginal burn, slowed growth, and salt buildup around the root zone.
Deficiencies generally develop because a nutrient is missing or unavailable. Toxicity develops because too much has been supplied. However, excessive amounts of one nutrient can also block another, so toxicity and deficiency symptoms may appear together.
Review feed strength and runoff EC before deciding which problem you have. The source article notes that toxicity commonly causes dark green leaves, brown tips, and curling after overfeeding.
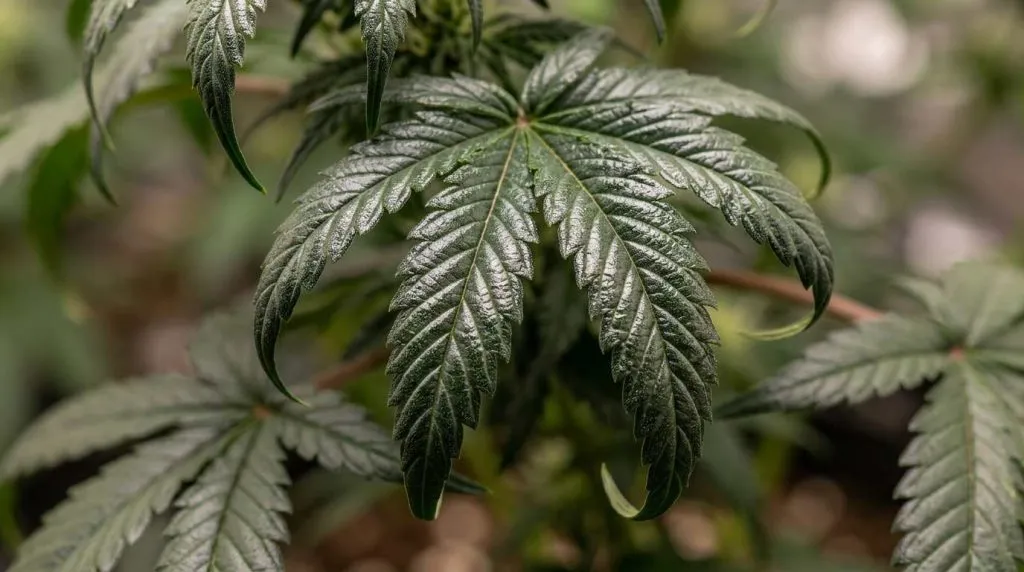
Grower Tip: Burnt tips after a stronger feed usually suggest excess nutrients rather than a shortage.
When Should You Flush a Cannabis Plant?
Flushing may be appropriate when there is clear evidence of excessive fertilizer salts, severe overfeeding, or very high runoff EC. It can help remove accumulated nutrients and restore a more balanced root zone.
Do not flush every plant showing yellow leaves or spots. Flushing an underfed plant can make a genuine deficiency worse, while repeatedly saturating soil may reduce root oxygen and create further stress.
Use appropriately pH-balanced water and allow adequate drainage. In coco or hydroponics, correcting the nutrient solution and replacing an imbalanced reservoir may be more suitable than a heavy soil-style flush.
After flushing, allow the root zone to stabilize before returning to a milder, balanced feed.
Grower Tip: Treat flushing as a response to confirmed salt buildup or overfeeding, not as the default cure for every nutrient problem.
How Long Does Recovery Take?
The first improvement may become visible within several days, but full recovery depends on the cause, severity, and growth stage. Fast-growing plants often show healthier new leaves within three to seven days after the underlying problem is corrected.
Existing yellow, burnt, or necrotic tissue may not return to normal. Judge recovery by whether symptoms stop spreading, new growth develops correctly, and the plant resumes steady development.
Root damage, severe lockout, or long-term overfeeding can take longer to resolve. Avoid making repeated adjustments while the plant is responding, as this can create new imbalances.
Grower Tip: Photograph the plant before treatment and compare the newest growth several days later. Healthy new leaves matter more than the appearance of old damage.
How to Prevent Cannabis Deficiencies Throughout the Grow
Preventing cannabis nutrient deficiencies is easier than correcting them after leaf damage appears. The most reliable approach is to control pH, monitor nutrient strength, adjust feeding as plants mature, and protect the root zone. Follow these steps throughout the grow rather than waiting for yellow leaves, brown spots, or slowed growth to develop.
Step 1: Maintain the Correct pH for Soil, Coco and Hydroponics
Measure the pH of every nutrient solution after all fertilizers and supplements have been mixed. The correct range keeps essential nutrients available to the roots and reduces the risk of nutrient lockout.
| Growing medium | General pH range |
| Soil | 6.0–7.0 |
| Coco coir | 5.5–6.5 |
| Hydroponics | 5.5–6.5 |
Check the root zone or runoff when plants show unexplained symptoms, rather than relying only on the solution entering the container. Calibrate digital pH meters regularly and store the probe according to the manufacturer’s instructions.
Grower Tip: Avoid constantly chasing one exact reading. Small movement within the suitable range can help make different nutrients available.
Step 2: Use EC and Runoff Readings to Monitor Nutrient Strength
Measure EC to confirm that the nutrient solution is suitable for the plant’s age and growing medium. Begin with a mild feed and increase the strength gradually as plants develop.
In soil and coco, compare the EC of the incoming solution with the runoff. A rising runoff EC can indicate fertilizer salts are accumulating, especially when accompanied by burnt tips or dark, clawed leaves. A low reading alongside pale growth may suggest the plant is underfed.
Track trends rather than reacting to a single measurement. Water quality, nutrient products, and growing media can all influence the final result.
Grower Tip: Record both input and runoff readings. A gradual change is easier to correct than a severe buildup discovered after symptoms appear.
Step 3: Adjust Feeding During Each Growth Stage
Match nutrient strength and balance to the plant’s stage of development.
| Growth stage | Feeding approach |
| Seedling stage | Mild nutrition; avoid rich soil and concentrated feeds |
| Vegetative growth | Balanced feed with sufficient nitrogen |
| Early flowering | Gradual transition to bloom nutrition |
| Mid to late flowering | Support flower development without removing nitrogen completely |
Seedlings have small root systems and are easily overfed. During vegetative growth, plants generally require more nitrogen to support leaves and branches. As flowering begins, change formulas gradually rather than making a sudden switch.
Follow the nutrient manufacturer’s schedule as a starting point, then adjust it according to plant response, water quality, and growing medium.
Grower Tip: Healthy leaves should guide your feeding decisions. Do not increase the dose simply because the label allows it.
Step 4: Maintain Healthy Roots and Consistent Watering Practices
Healthy roots are essential for nutrient uptake. Use containers with adequate drainage and avoid keeping the growing medium constantly saturated.
Water thoroughly, then wait until the root zone has used enough moisture before watering again. The correct timing depends on container size, plant maturity, temperature, and medium. Lifting the pot can help you judge how much moisture remains.
Protect roots from extreme temperatures, poor aeration, and standing water. Watch for persistent drooping, slow water uptake, unpleasant odors, fungus gnats, or slimy roots, as these can indicate a root-zone problem.
In hydroponic systems, maintain good oxygenation and keep equipment and reservoirs clean.
Grower Tip: Watering on a fixed calendar often causes problems. Base each irrigation on the condition of the growing medium and plant.
Step 5: Keep a Grow Diary to Identify Problems Early
Record each feeding and watering so you can identify changes before they become serious cannabis deficiencies. Include:
| Information to record | Why it matters |
| pH and EC | Reveals changes in nutrient availability and strength |
| Nutrient dosage | Helps identify underfeeding or overfeeding |
| Runoff readings | Shows possible salt accumulation |
| Temperature and humidity | Highlights environmental stress |
| Plant symptoms | Tracks where and when damage started |
Take regular photographs under neutral lighting and note any changes in leaf color, growth rate, or water use.
Grower Tip: When symptoms appear, review the previous seven to ten days. The cause is often linked to an earlier change in feeding, watering, or environment.
Conclusion
Cannabis nutrient deficiencies are easier to correct when you identify the cause before changing the feed. Start by checking where symptoms appeared, then compare the damage with the plant’s pH, EC, watering routine, root health, and recent feeding history. This helps distinguish a genuine deficiency from nutrient lockout, toxicity, or environmental stress.
Avoid making several corrections at once. Restore the root zone, apply only the treatment the plant needs, and monitor new growth over the following days. Existing yellow, burnt, or damaged leaves may not recover, so focus on whether symptoms stop spreading and healthy leaves begin to develop.
The best prevention is consistent care: suitable pH, measured nutrient strength, stage-appropriate feeding, healthy roots, and clear grow records.
Frequently Asked Questions About Cannabis Nutrient Deficiencies
What Is the Most Common Cannabis Nutrient Deficiency?
Nitrogen deficiency is one of the most common cannabis deficiencies, especially during vegetative growth. It usually begins with uniform yellowing on older lower leaves before progressing upward. However, similar yellowing can also result from incorrect pH, overwatering, or the natural fading of leaves late in flowering.
Can Cannabis Plants Recover From Nutrient Deficiencies?
Yes, cannabis plants can usually recover when the problem is identified and corrected early. Mild deficiencies may stop progressing within several days, although severe cases can take longer. Damaged leaves rarely return to perfect condition, so judge recovery by healthy new growth and improved development.
Should I Remove Leaves Showing Deficiency Symptoms?
Do not remove every affected leaf immediately. Partially healthy leaves can still support photosynthesis, and keeping a few damaged leaves makes it easier to monitor whether symptoms are spreading. Remove leaves that are completely dead, badly damaged, diseased, or blocking airflow around dense growth.
Can Overwatering Look Like a Nutrient Deficiency?
Yes. Overwatering reduces oxygen around the roots, which can limit nutrient uptake and cause yellowing, drooping, brown spots, or slowed growth. Before increasing fertilizer strength, check whether the growing medium remains saturated for too long and confirm that the container drains properly.
Should I Flush a Cannabis Plant Showing Deficiency Symptoms?
Not automatically. Flushing is most appropriate when high runoff EC, salt buildup, or severe overfeeding has been confirmed. Flushing a genuinely underfed plant can worsen the deficiency. Check pH, EC, feeding history, and root conditions first, then choose the least disruptive correction.


