




Cannabis root rot can develop quickly, often starting below the surface before a grower notices any signs. Affected plants may droop, turn yellow, stop growing, or appear thirsty even when the soil is still wet. Beneath the surface, healthy roots can become brown, slimy, fragile, and unable to absorb water or nutrients effectively.
Root rot in cannabis is commonly caused by overwatering, poor drainage, low oxygen levels, warm reservoirs, or pathogens like Pythium. Early detection greatly improves the chances of recovery, while advanced infections can severely damage the root system and threaten the entire crop.
This guide explains how to identify cannabis root rot in both soil and hydroponic systems, understand its causes, prevent it from developing, and apply an effective cannabis root rot fix. It also covers how autoflowers are affected and how to recognize signs of recovery.
Key Takeaways
- Cannabis root rot usually develops when roots remain overly wet, poorly oxygenated, or exposed to pathogens such as Pythium.
- Reliable diagnosis depends on several signs together, including persistent drooping, slow growth, soft or slimy roots, foul odors, and a root zone that stays saturated.
- The correct cannabis root rot fix depends on the growing medium, with soil, coco, and hydroponic systems requiring different treatment steps.
- Recovery is most likely when some firm, healthy roots remain and the original cause—such as poor drainage, low aeration, or warm reservoir water is corrected immediately.
- Autoflowers are more vulnerable to lasting setbacks because their fixed life cycle gives them less time to rebuild damaged roots before flowering.
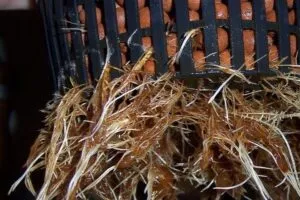
What is root rot?
Root rot in cannabis is the breakdown of healthy root tissue caused by prolonged moisture, low oxygen, and disease-causing organisms in the root zone. Pythium is one of the best-known causes, although it is technically an oomycete, or water mold, rather than a true fungus. Healthy cannabis roots are usually firm and white to cream-colored. Infected roots often become brown, soft, slimy, fragile, and unpleasant-smelling.
As explained in our guide to cannabis roots, damaged roots can no longer absorb water and nutrients effectively or support healthy plant growth. This causes symptoms above the growing medium, including drooping, yellow leaves, slowed growth, and wilting despite wet soil. Root rot can affect plants grown in soil, coco, or hydroponic systems, but stagnant reservoirs and waterlogged media create the greatest risk. Autoflowers are particularly vulnerable to lasting setbacks because their short life cycle leaves less time for recovery. Catching the problem early gives the plant the best chance of producing new roots.
How to Identify Cannabis Root Rot
Identifying cannabis root rot early gives an affected plant the best chance of recovery. However, drooping cannabis leaves or yellow foliage alone do not confirm root disease, as several watering, environmental, and nutrient problems can cause similar symptoms. Overwatering, nutrient lockout, incorrect pH, heat stress, and underwatering can cause similar symptoms. A reliable diagnosis should consider the plant’s appearance, root-zone moisture, smell, root texture, and recent growth rate together.
How to Check a Cannabis Plant for Root Rot
Begin by checking the root-zone moisture. Root rot becomes more likely when a plant wilts while the soil is still saturated or when roots sit in warm, stagnant hydroponic solution. Next, smell the growing medium or reservoir. A healthy root zone should smell neutral or earthy, while infected roots often produce a sour, swampy, or rotten odor.
Inspect the roots where possible. Healthy cannabis roots are usually firm and white to cream-colored. Some nutrients and organic additives can stain roots tan or brown without causing disease, so color alone is not enough. Nutrient-stained roots remain firm, smell normal, and do not break apart easily. Roots affected by rot often feel slimy, mushy, stringy, or fragile.
| Check | Healthy Root Zone | Possible Root Rot |
| Plant posture | Leaves remain firm between waterings | Drooping despite wet soil or available water |
| Root color | White, cream, or evenly stained | Patchy brown, gray, or black areas |
| Root texture | Firm and flexible | Slimy, soft, stringy, or easily broken |
| Smell | Neutral or earthy | Sour, stagnant, or rotten |
| Growth | Steady new development | Unexpected slowing or stopped growth |
| Moisture | Drains or circulates normally | Remains saturated, warm, or stagnant |
In my experience, root texture and odor are more dependable indicators than color alone. Root rot is most likely when several warning signs appear together.
How to Identify Root Rot in Soil-Grown Cannabis
Roots are difficult to inspect without disturbing a soil-grown plant, so start with the container. Check whether water drains freely, how long the soil remains wet, and whether a sour smell is coming from the drainage holes. Avoid repeatedly removing the plant from its pot, as unnecessary root disturbance can worsen the problem.
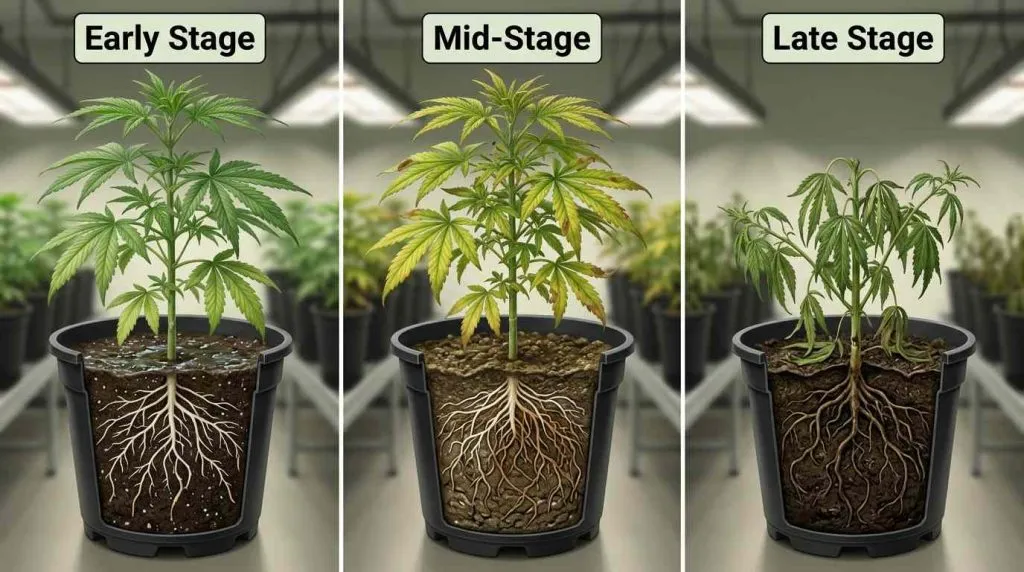
| Stage | Plant Symptoms | Root-Zone Signs |
| Early | Lower leaves begin to pale, growth slows, and the plant droops while the soil is still moist. | The medium stays wet longer than expected. Some root tips may appear tan or feel slightly slippery. |
| Moderate | Yellowing spreads, leaves develop brown areas, and wilting becomes persistent. | Roots become brown, soft, stringy, or fragile. A stale or sour odor may develop. |
| Advanced | Severe wilting, leaf loss, weak stems, and rapid decline occur. | Much of the root system is dark, mushy, foul-smelling, and breaks apart when handled. Rot may reach the crown or lower stem. |
How to Identify Root Rot in Deep Water Culture
When growing cannabis using hydroponics, root rot is often easier to confirm because the roots and reservoir are directly accessible. Check them whenever growth slows unexpectedly, even when pH and nutrient strength appear correct.
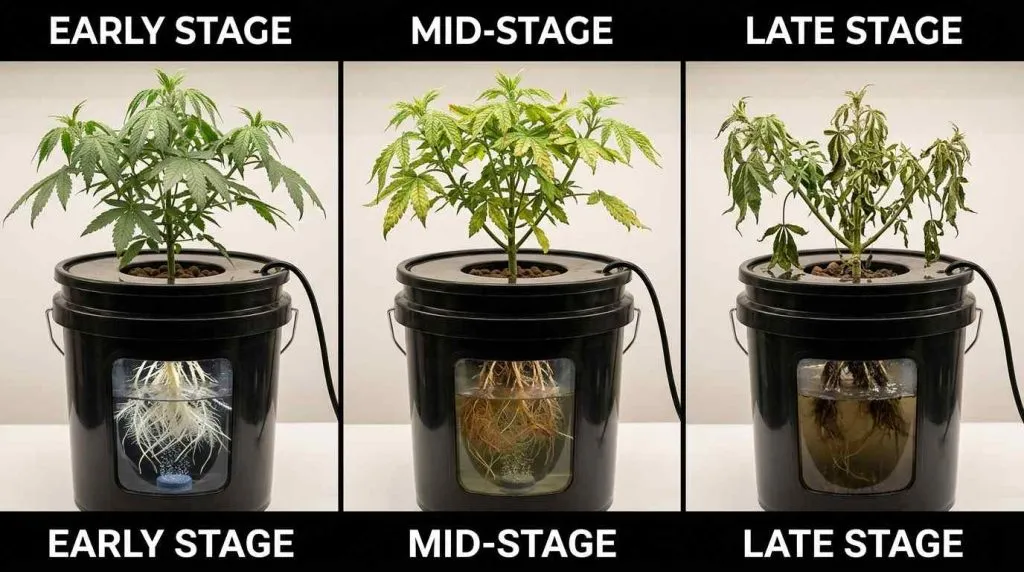
| Stage | Plant Symptoms | Root and Reservoir Signs |
| Early | Leaves lose firmness or color, and growth becomes slower than expected. | Root tips develop patchy tan areas or a faint slippery coating. The reservoir may feel warm or smell slightly stale. |
| Moderate | Drooping becomes obvious, while yellowing, spotting, or deficiency-like symptoms appear. | Roots become brown, sticky, soft, or stringy and may tear when lifted. A foul odor is usually noticeable. |
| Advanced | Severe wilting, leaf loss, stem weakness, and collapse may occur. | Roots turn dark brown or black, become coated in slime, and disintegrate when touched. The lower stem may also soften. |
Identifying Root Rot in Autoflowers and Feminized Photoperiod Plants
Plants grown from autoflower seeds show the same root rot symptoms as photoperiod cannabis, but they have less time to recover before their fixed life cycle moves forward. A photoperiod plant affected during vegetative growth can remain in that stage while it rebuilds healthy roots. An autoflower continues progressing toward flowering, so days lost to disease or root pruning cannot be regained. Early diagnosis is therefore especially important, as even a successful recovery may reduce the plant’s final size and yield.
Common causes of root rot in cannabis plants
Cannabis root rot usually develops when environmental stress weakens the roots and creates favorable conditions for disease-causing organisms. It is rarely caused by a single mistake. In most cases, excessive moisture, limited oxygen, warm root-zone temperatures, and poor hygiene combine until healthy roots begin to deteriorate.
Understanding the cause is important because trimming damaged roots or applying treatments will not provide a lasting fix if the growing conditions remain unchanged.
Main Causes of Cannabis Root Rot
| Cause | Why It Damages Cannabis Roots | Commonly Affected Systems |
| Overwatering | Fills air spaces in the medium and limits oxygen around the roots | Soil and coco |
| Poor drainage | Prevents excess water from leaving the container | Soil and coco |
| Compacted growing medium | Reduces air-filled pore space and slows drainage | Mainly soil |
| Insufficient aeration | Leaves submerged roots without enough dissolved oxygen | DWC and hydroponics |
| Warm nutrient solution | Holds less oxygen and favors water molds | Hydroponics |
| Pythium and related pathogens | Infect weakened root tissue and cause decay | All systems |
| Contaminated equipment or water | Spreads pathogens between plants | Recirculating hydroponics |
| Dead root matter | Encourages microbial growth | Hydroponics and poor media |
| Restricted root space | Creates dense, slow-drying root zones | Container-grown cannabis |
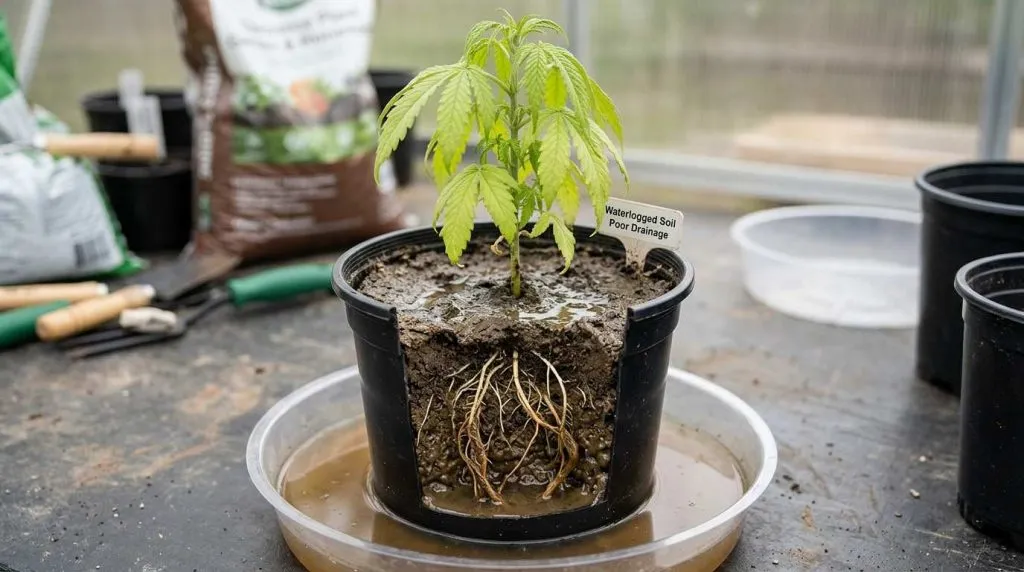
Overwatering and Poor Soil Drainage
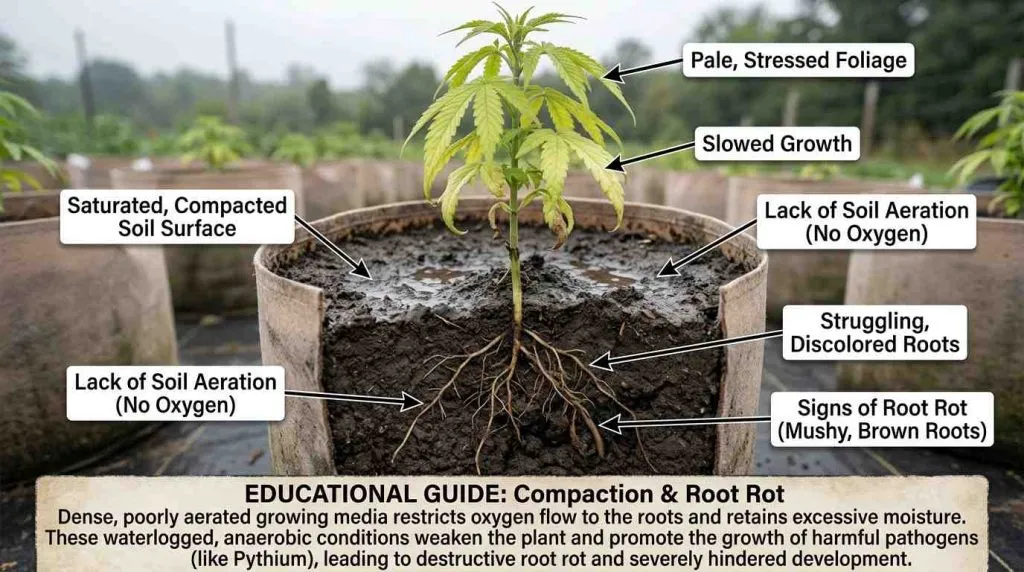
Overwatering is one of the most common causes of root rot in soil-grown cannabis. The issue is not just excess water, but lack of oxygen. Saturated soil fills air pockets, preventing roots from breathing and absorbing nutrients. Prolonged waterlogging can suffocate roots and make them more vulnerable to decay.
Poor drainage increases this risk. Dense soil, small drainage holes, standing runoff, and constantly wet containers prevent oxygen from returning to the root zone. Large pots can also cause problems when small plants are watered across the entire container before their roots can use the moisture.
Often, the issue is watering frequency rather than volume. Beginners may water again because the surface appears dry while deeper soil remains wet. Lifting the pot or checking moisture below the surface is more reliable than following a fixed schedule.
Compacted or Water-Retentive Growing Media
The best soil for growing cannabis provides a balance of moisture retention, drainage, and air-filled spaces around the roots. Compacted soil drains slowly and reduces oxygen availability. Reusing compressed media, packing soil too tightly, or using mixes with little aeration can all contribute to root rot.
Plants can also become root-bound. Dense root masses may trap moisture unevenly, creating wet pockets that stress the plant and complicate watering.
Lack of Oxygen in Hydroponic Systems
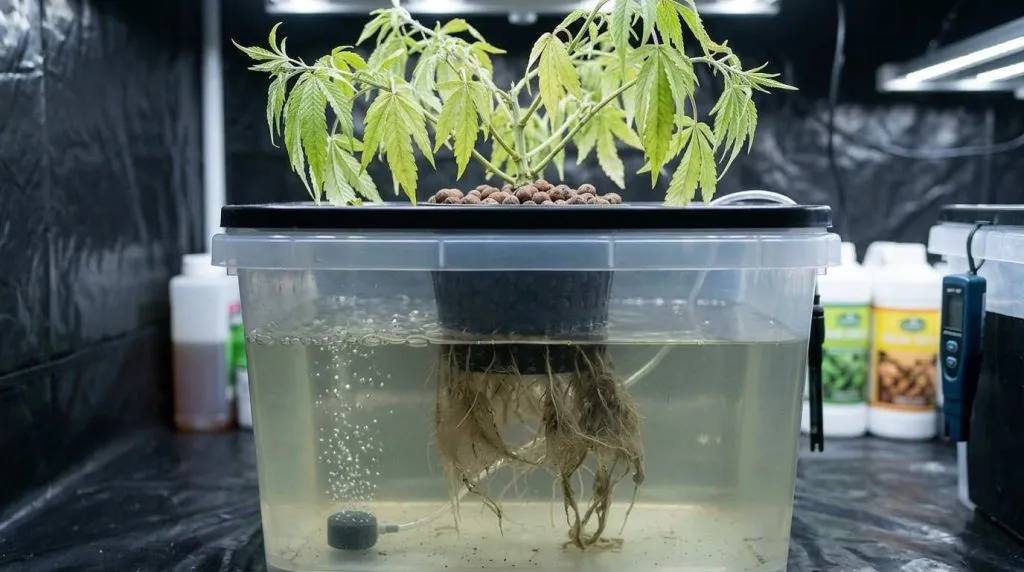
In hydroponics, roots rely on dissolved oxygen supplied by air pumps and stones. Equipment failure, undersized pumps, or blocked lines can quickly reduce oxygen levels. Low oxygen weakens roots and increases susceptibility to pathogens.
Recirculating systems carry additional risk because contaminated water can spread pathogens to every plant. Once introduced, organisms like Pythium can move rapidly through shared nutrient solutions.
Warm Root-Zone Temperatures
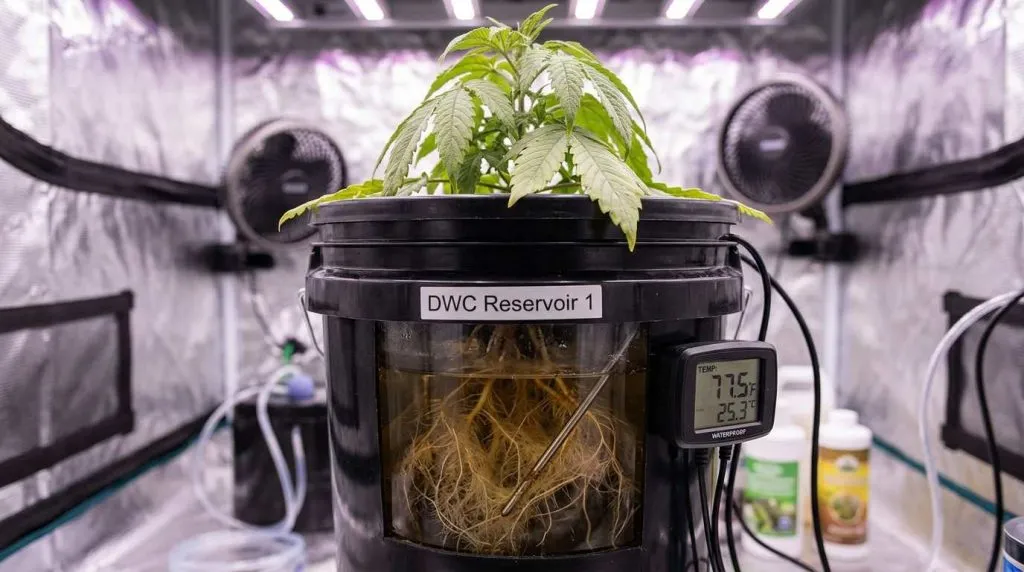
Warm water holds less oxygen, while roots and microbes consume oxygen faster at higher temperatures. This combination can create ideal conditions for root rot.
There is no single temperature that causes root rot, but nutrient solutions above about 75°F (24°C) should be monitored closely, especially if aeration is limited. Some Pythium species thrive in warmer conditions, while others prefer cooler environments.
Pythium Root Rot and Other Pathogens
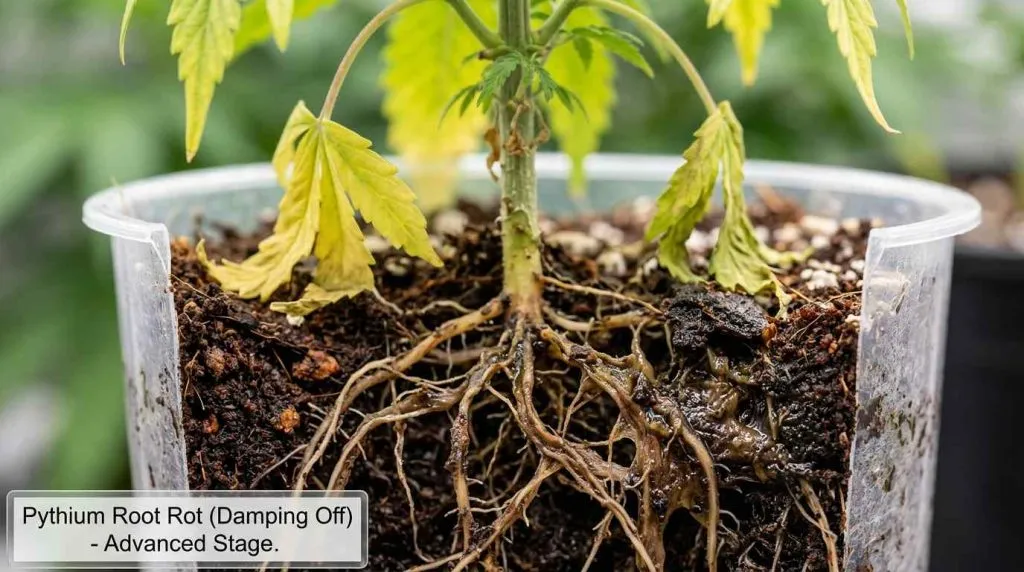
Pythium is one of the most common organisms linked to cannabis root rot. It is an oomycete, or water mold, rather than a true fungus. Its spores move through water and infect stressed or damaged roots.
Pythium typically becomes harmful when conditions favor it. Excess moisture, low oxygen, poor drainage, and root damage increase infection risk. In severe cases, roots turn brown or black and decay.
While incorrect pH can stress plants, it is not usually the primary cause of root rot. Moisture, oxygen levels, temperature, and sanitation are more important factors.
Contaminated Tools, Media and Reservoirs
Pathogens can enter a grow through contaminated water, reused media, infected plants, dirty containers, tools, or equipment. In hydroponics, shared water can spread contamination quickly.
Using the same tools or trays between healthy and infected plants can transfer pathogens. Maintaining clean equipment and avoiding cross-contamination is essential.
Root Damage and Dead Organic Matter
Poor cannabis transplanting techniques, aggressive root pruning, high nutrient concentrations, extreme pH swings, and drought can damage roots and leave them more vulnerable to pathogens.
Dead roots left in reservoirs also increase microbial activity and oxygen demand as they decompose. Removing decaying material helps maintain a healthier root environment.
Why Autoflowers Are More Vulnerable to Root Rot
Autoflowering cannabis is affected by root rot for the same reasons as photoperiod plants, but the impact can be greater. Autoflowers continue progressing toward flowering based on age, even if growth slows due to root stress.
During the cannabis seedling stage, a small root system cannot use moisture from an oversized container quickly, leaving unused soil wet for too long. Watering the entire pot can leave unused soil wet for long periods. It is better to water around the root zone and expand gradually as the plant grows.
Autoflowers also have less time to recover from stress or infection. Preventing root rot through proper watering, aeration, stable temperatures, and early monitoring is more effective than trying to fix severe problems later.
How to prevent root rot in cannabis plants
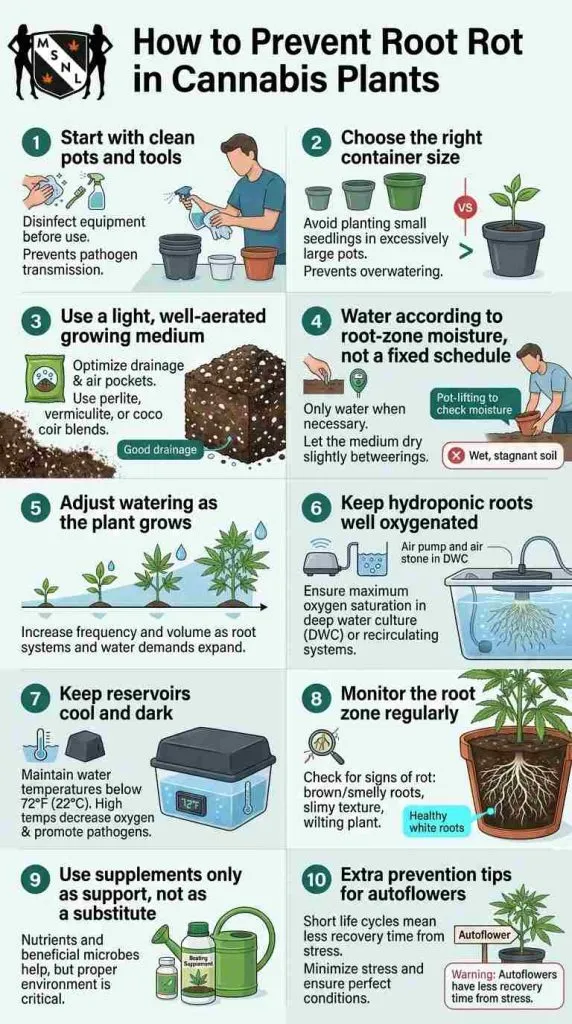
Preventing cannabis root rot depends on managing moisture, oxygen, temperature, and cleanliness. Beginners should not wait for drooping leaves or foul smells before checking these factors. the start prevent most issues. Strong root-zone habits from the start prevent most issues. Growers dealing with damp or humid conditions may also benefit from choosing mold-resistant cannabis strains, although resistant genetics will not prevent root rot caused by saturated soil, poor drainage, or low oxygen.
Follow these steps throughout the grow.
Step 1: Begin With Clean Pots and Equipment
Clean all reused pots, trays, tools, pumps, reservoirs, air stones, and irrigation lines before planting. Remove all old root material since decaying roots can support harmful microorganisms and increase oxygen demand in hydro systems.
Do not reuse media that had root rot unless properly treated. Keep runoff from unhealthy plants away from healthy ones and never add it to a shared reservoir.
If equipment has touched diseased roots, clean it before reuse.
Step 2: Choose a Suitable Container
Selecting the right pot for growing cannabis helps the root zone dry at a manageable rate and reduces the risk of leaving a small plant in too much wet soil. Small plants cannot use water from large pots quickly, so oversized containers may stay wet too long.
Ensure all pots have drainage holes. After watering, confirm runoff exits freely and empty trays so pots do not sit in water.
Fabric pots improve airflow but do not prevent overwatering. Always allow the medium to dry between waterings.
Step 3: Prepare a Light, Aerated Growing Medium
Choosing suitable cannabis soil and growing mediums helps retain moisture without removing the air-filled spaces healthy roots need. Loosen the mix rather than packing it tightly. Compacted media drains poorly and limits oxygen.
If the medium holds water too long, add perlite, pumice, or rice hulls. The mix should absorb water evenly and drain without becoming dense.
After watering, observe drainage and pot weight. The container should lighten as the plant uses moisture.
Step 4: Learn When the Plant Needs Water
Avoid fixed watering schedules. Water use varies based on plant size, environment, and medium.
Use this method:
- Lift the pot after watering and note its weight.
- Check it daily.
- Feel below the surface, not just the top layer.
- Wait until the pot feels lighter and the root zone has dried.
- Water evenly and allow full drainage.
A common mistake is watering when the surface looks dry but the lower soil is still wet. When unsure, wait and check again.
Step 5: Water According to Root Size
Seedlings have small root systems and cannot use all the moisture in large pots. Water a small area around the plant instead of soaking the entire container.
Expand the watering area as the plant grows to encourage root development.
| Plant Stage | How to Apply Water | What to Avoid |
| Seedling | Water a small area around the plant | Saturating the entire container |
| Early vegetative growth | Gradually widen watering area | Watering while the pot is still heavy |
| Established plant | Water evenly across the root zone | Leaving dry pockets or standing runoff |
| Flowering | Monitor moisture closely | Following an outdated schedule |
Always check the root zone before watering.
Step 6: Keep Hydroponic Roots Oxygenated
In deep water culture, roots stay submerged, so aeration is critical. You should see steady bubbling across the reservoir surface.
Check daily:
| Equipment Check | What to Look For |
| Air pump | Runs continuously without overheating |
| Air stone | Produces strong, even bubbles |
| Airline | No kinks, leaks, or blockages |
| Reservoir surface | Constant movement |
| Roots | Firm and free from slime |
Keep spare equipment. If aeration fails, roots can lose oxygen quickly.
Step 7: Keep the Reservoir Cool and Dark
Warm water holds less oxygen. Keep reservoirs below about 75°F (24°C). Use opaque containers to block light and prevent algae.
Check temperature regularly. Do not ignore warm water even if plants look healthy.
Step 8: Inspect Plants Regularly
Check root-zone conditions often. Look for changes rather than waiting for severe symptoms.
Watch for:
- Pots staying heavy too long
- Drooping in wet soil
- Slow growth
- Poor drainage
- Sour smells
- Weak bubbling in hydro
- Soft or slimy roots
Avoid removing plants from soil unnecessarily. In hydro, inspect roots when opening the reservoir.
Brown roots are not always diseased. Nutrients can stain roots. Healthy roots stay firm and smell normal.
Step 9: Use Supplements Carefully
Enzymes and beneficial microbes can support root health but will not fix poor conditions. Always correct moisture, oxygen, temperature, and cleanliness first.
How to Prevent Root Rot in Autoflowers
Autoflowers need careful root management because they do not pause growth to recover from stress. Saturated soil early can reduce size and yield.
When growing autoflowers:
- Use a light, aerated medium
- Avoid compacting soil
- Learning how much water to give autoflowers helps you moisten the active root zone without saturating the entire final container during early growth.
- Expand watering as roots grow
- Use pot weight instead of schedules
- Limit transplanting
- Act quickly if plants droop in wet soil
Choosing the correct pot size for autoflower seeds matters because soaking an oversized container can leave most of the medium wet while the young roots occupy only a small area. Roots may only occupy a small area, leaving excess wet soil.
Healthy plants show steady growth, predictable drying cycles, proper drainage, and clean-smelling root zones.
Grower’s Tip: Learn the weight of every pot when fully watered and again when it is ready for water. This simple habit is more reliable than judging the surface or following a calendar. With autoflowers, it is especially useful during the first few weeks, when a small root system can leave most of a large final pot wet for too long
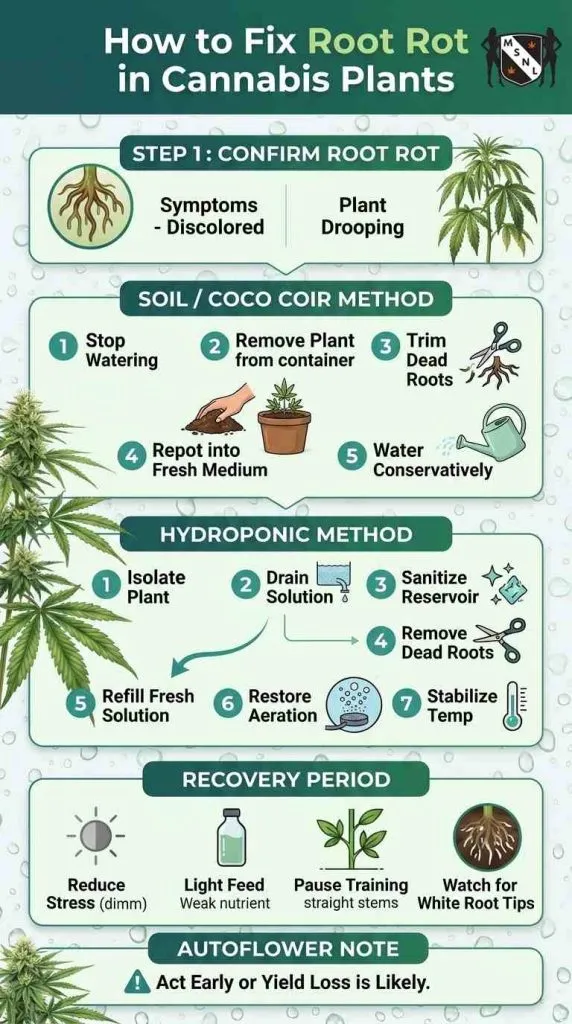
How to Fix Root Rot in Cannabis Plants
A cannabis plant can recover from root rot if enough healthy root tissue remains. Dead roots cannot be restored, so treatment focuses on removing decay, correcting conditions, and encouraging new growth.
Act quickly once root rot is confirmed. Waiting allows damage to spread. Wet conditions, poor drainage, and low oxygen promote pathogens like Pythium, so environmental fixes come first.
Treatment varies by growing medium. Follow the correct method for soil, coco, or hydroponics.
Before Treatment: Can the Plant Be Saved?
Inspect roots and the crown (where stem meets roots). Recovery is possible if some roots are firm and the crown is intact.
| Root Condition | Likely Outlook | Recommended Action |
| Some damaged roots, many firm roots | Good chance | Treat immediately |
| Several damaged areas, some healthy roots | Possible recovery | Remove rot and fix conditions |
| Mostly black, slimy roots | Poor chance | Attempt treatment, isolate plant |
| Soft, collapsing crown or stem | Likely beyond recovery | Remove plant |
| No healthy roots or growth | Unlikely recovery | Discard and sanitize |
Do not keep infected plants in shared hydro systems, as pathogens spread through water.
Fixing Root Rot in Soil
Only remove the plant if root rot is confirmed (soggy soil, foul smell, wilting, soft roots).
Step 1: Stop Watering
Allow excess moisture to drain. Ensure drainage holes are clear. Avoid forcing rapid drying with strong airflow.
Step 2: Remove the Plant
Gently slide the root ball out. Avoid pulling or shaking. Loosen only compacted soil that falls away easily.
Step 3: Remove Dead Roots
Use sterilized scissors to cut roots that are black, mushy, slimy, or foul-smelling. Keep firm roots, even if discolored. Avoid over-pruning.
Step 4: Replace Soil
Repot into fresh, well-aerated soil. Use a container slightly larger than the root mass. Add perlite or similar material for drainage.
Step 5: Replant Properly
Keep the plant at its original depth. Do not bury the stem. Lightly settle soil without compacting.
Step 6: Water Lightly
Moisten only the root zone. Wait until the pot feels lighter before watering again.
Fixing Root Rot in Coco
Coco should stay moist but not saturated.
Step 1: Check Drainage
Ensure even runoff and no pooling. Fix compaction or blocked drainage.
Step 2: Remove Damaged Roots
Trim soft, decaying roots if possible. Avoid disturbing healthy roots.
Step 3: Repot
Use fresh, buffered coco with added aeration. Match pot size to root mass.
Step 4: Resume Feeding
Use mild nutrients. Avoid overwatering or excessive flushing unless salt buildup is confirmed.
Fixing Root Rot in Deep Water Culture (DWC)
Treatment must include both plant and system.
Step 1: Isolate the Plant
Separate it from shared systems. Use a clean temporary container.
Step 2: Drain Reservoir
Discard contaminated solution. Remove debris.
Step 3: Clean System
Sanitize all components. Replace clogged air stones if needed.
Step 4: Trim Roots
Rinse gently and remove slimy or decaying roots. Keep firm tissue.
Step 5: Refill Solution
Use fresh, mild nutrients. Do not increase strength to fix yellowing.
Step 6: Restore Aeration
Ensure strong, consistent bubbling.
| Issue | Fix |
| Weak bubbles | Check pump and air stone |
| Kinked airline | Repair or replace |
| Warm water | Reduce heat |
| Light leaks | Block light |
| Debris | Remove promptly |
| Shared contamination | Isolate system |
Step 7: Control Temperature
Keep water cool (below ~75°F / 24°C). Cooler water holds more oxygen.
Additives: Do They Help?
Environmental correction is essential. Additives cannot fix poor conditions.
| Treatment | Role | Limitation |
| Enzymes | Break down dead material | Do not eliminate pathogens |
| Beneficial microbes | Compete with pathogens | Must suit system |
| Mycorrhizae | Support root growth | Not a cure for active rot |
| Fungicides | Target specific pathogens | Must be labeled for use |
| Root stimulators | Encourage new roots | Cannot fix poor conditions |
Pythium is a water mold, not a true fungus, so general fungicides may not work.
Supporting Recovery
After treatment, focus on stable conditions.
Step 1: Reduce Stress
Keep temperatures steady and avoid intense light. Do not make sudden changes.
Step 2: Feed Lightly
Use mild nutrients. Yellow leaves do not mean more feeding is needed.
Step 3: Pause Training
Avoid pruning or training until recovery is clear.
Step 4: Monitor Progress
| Recovery Sign | Meaning |
| New white root tips | Root growth returning |
| Upright new leaves | Improved water uptake |
| Normal drying cycle | Roots functioning again |
| Better smell in reservoir | Less decay |
| New growth | Plant stabilizing |
| Continued slime/discoloration | Ongoing problem |
Focus on new growth, not damaged leaves.
Root Rot in Autoflowers
Autoflowers follow the same treatment but have less recovery time due to their fixed lifecycle.
For early-stage root rot:
- Fix moisture or system issues immediately
- Remove only dead roots
- Use mild nutrients
- Stop training
- Maintain stable conditions
- Watch for new growth
Young autoflowers may recover well. Flowering plants with severe damage may survive but yield less. If roots or the crown are mostly destroyed, removal may be the best option.
Grower’s Tip: Judge recovery by new roots and growth, not old leaves. Healthy new development and normal water use are the best signs your treatment is working.
Conclusion
Cannabis root rot can quickly weaken a plant, but early action can prevent a minor issue from becoming a lost crop. Beginner growers should look beyond leaf symptoms. Drooping, yellowing, and slow growth may suggest trouble, but root texture, odor, drainage, moisture, and reservoir conditions offer a more reliable diagnosis.
Treatment begins by correcting the cause. Remove dead roots, replace contaminated media or solution, restore oxygen, and stabilize the root zone while new growth develops. Supplements may help, but they cannot fix saturated soil, poor drainage, warm reservoirs, or failed aeration.
Prevention is key. Learn proper watering, keep hydroponic systems clean and oxygenated, and inspect plants regularly. This is especially important with autoflowers, which have less time to recover. Healthy new roots, steady growth, and normal water use signal recovery.
Frequently Asked Questions
Can a cannabis plant recover from root rot?
Yes, a cannabis plant can recover when the infection is caught early and enough firm, healthy roots remain. Dead roots will not repair themselves, so treatment focuses on removing decayed tissue, correcting moisture and oxygen problems, and encouraging fresh root growth. New white root tips, upright new leaves, and normal water use are the best signs of recovery.
What are the first signs of root rot in cannabis?
Early signs include drooping while the growing medium is still wet, slower growth, pale or yellowing leaves, and unusually long drying times. In hydroponics, root tips may develop patchy tan areas or a slippery coating. Root rot becomes more likely when these symptoms appear alongside soft roots and a sour or rotten smell.
Are brown cannabis roots always caused by root rot?
No. Nutrients and organic additives can stain healthy roots tan or brown. Stained roots usually remain firm, flexible, and free from unpleasant odors. Roots affected by rot tend to feel slimy, mushy, stringy, or fragile. Beginners should use root texture, smell, plant condition, and moisture levels together rather than diagnosing root rot from color alone.
How long does cannabis take to recover from root rot?
Recovery time depends on the plant’s age, the amount of healthy root tissue remaining, and how quickly the underlying problem is corrected. Do not expect damaged leaves to become healthy again. Instead, monitor the plant for new roots, steady shoot growth, improved posture, and a return to normal water use over the following days.
Is root rot more serious for autoflowers?
Root rot can affect autoflowering and photoperiod cannabis, but autoflowers have less time to recover. Their growth cycle continues even while the plant is stressed, so lost development cannot be replaced with additional vegetative time. Early treatment may save the plant, although moderate or severe root damage can permanently reduce its final size and yield.


