Growing cannabis successfully starts with understanding its life cycle and providing the right conditions at each stage. From selecting quality seeds and germinating them properly to managing the seedling, vegetative, flowering, and harvest phases, every step impacts plant health, yield, and quality.
Whether growing indoors or outdoors, beginners often face challenges like overwatering, poor lighting, incorrect humidity, nutrient issues, and early harvesting. Fortunately, these mistakes are easy to avoid with the right knowledge.
This guide covers everything you need to grow cannabis from seed to harvest, including choosing a growing medium, managing light cycles, maintaining the environment, feeding plants, and properly drying and curing your buds.
Key Takeaways
- Most cannabis plants take 3–5 months to grow from seed to harvest, while autoflowering varieties typically finish in 8–12 weeks.
- Healthy cannabis plants require different temperatures, humidity levels, nutrients, and light cycles during each stage of growth.
- Photoperiod cannabis grows under an 18/6 light cycle during the vegetative stage and 12/12 during flowering, while autoflowers flower without changing the light schedule.
- Overwatering, overfeeding, and unstable environmental conditions are among the most common mistakes made by beginner growers.
- The best time to harvest cannabis is when most trichomes are cloudy or milky with around 10–20% amber.
- Slow drying and proper curing preserve aroma, flavour, terpene profile, and overall flower quality.

- What Is the Best Growing Medium for Cannabis?
- Which Cannabis Seeds Should You Choose?
- How to Germinate Cannabis Seeds
- How to Grow Cannabis During the Seedling Stage
- How to Grow Cannabis During the Vegetative Stage
- How to Grow Cannabis During the Flowering Stage
- How to Harvest Cannabis
- What Is the Ideal Climate for Growing Cannabis?
- Choosing the Right Cannabis Grow Lights
- What Nutrients Do Cannabis Plants Need?
- Frequently Asked Questions
What Is the Best Growing Medium for Cannabis?
Choosing the right growing medium is one of the most important decisions you'll make before planting a cannabis seed. Your growing medium supports the root system, controls how water and nutrients are delivered, and directly affects plant health, growth rate, and overall yield. While soil, coco coir, hydroponics, and aeroponics can all produce excellent results, the best option depends on your experience, budget, and how involved you want to be.
Soil
Soil is the most beginner-friendly growing medium and the easiest way to grow healthy cannabis plants. A high-quality organic potting mix with added perlite provides excellent drainage while supplying beneficial microorganisms that support strong root development. Because soil naturally retains moisture and nutrients, it offers a greater margin for error if you accidentally overwater or overfeed your plants.
Coco Coir
Made from coconut husks, coco coir is a popular alternative to soil that combines excellent water retention with high oxygen levels around the roots. Cannabis plants often grow faster in coco, but because it contains very few nutrients, you'll need to provide a balanced nutrient solution throughout the grow.
Hydroponics
Hydroponic systems grow cannabis without soil by delivering water and nutrients directly to the roots. This can encourage faster growth and larger yields, but it also requires careful monitoring of pH, EC, and irrigation. While highly effective, hydroponics is generally better suited to growers with some experience.
Aeroponics
Aeroponics is an advanced cultivation method where plant roots are suspended in the air and fed with a fine nutrient mist. It can produce exceptional growth rates and vigorous plants, but it demands precise environmental control and constant system maintenance, making it less suitable for beginners.
Best choice for beginners: If this is your first cannabis grow, start with a high-quality organic soil mix. Soil naturally buffers water and nutrients, making it the most forgiving medium while you learn the fundamentals of watering, feeding, and plant care.
Which Cannabis Seeds Should You Choose?
Choosing the right cannabis seeds is the first step to a successful grow. The genetics you select influence your plant's size, flowering time, yield, and overall growing difficulty. Before buying seeds, consider your available space, growing environment, and experience level.
Feminized Seeds
Feminized seeds produce almost exclusively female plants, eliminating the need to identify and remove males. They're an excellent choice for beginners and growers looking to maximize their harvest.
Autoflower Seeds
Autoflowering cannabis seeds flower automatically after several weeks of growth without changing the light cycle. Their compact size, fast flowering time, and simple growing requirements make them one of the easiest options for first-time growers and those with limited space.
Regular Seeds
Regular seeds produce both male and female plants and are best suited to experienced growers interested in breeding, preserving genetics, or selecting mother plants for cloning.
How to Choose the Right Strain
Most modern cannabis strains are hybrids, so don't rely solely on "indica" or "sativa" labels. Instead, choose a cultivar based on factors such as flowering time, plant size, yield potential, cannabinoid profile, and whether you need indoor cannabis seeds or outdoor cannabis seeds for your growing environment.
Best Choice for Beginners: Beginner cannabis seeds, including feminized photoperiod and autoflower varieties, are excellent choices for first-time growers because they simplify the growing process while producing reliable results. Feminized plants offer greater control over the growing cycle, while autoflowers finish faster and don't require changes to the light schedule.
How to Germinate Cannabis Seeds
Plant Age: Week 0–1
Temperature: 70–75°F (21–24°C)
Humidity: 70–80%
Germination is the first stage of the cannabis life cycle and the foundation of a successful grow. Healthy germination encourages strong root development and vigorous seedlings. While there are several ways to germinate cannabis seeds, the paper towel method remains one of the easiest and most reliable because you can monitor each seed before planting.
Paper Towel Method
- Moisten two paper towels with clean, room-temperature water until they're damp but not soaking wet. Excess moisture can reduce oxygen around the seed and slow germination.
- Place your cannabis seeds between the paper towels, leaving a small gap between each one so the taproots don't become tangled.
- Create a warm, humid environment by placing the paper towels between two plates or inside a sealed container. Store them somewhere dark where temperatures remain between 70–75°F (21–24°C).
- Check your seeds daily. Keep the paper towels moist and avoid letting them dry out. Most healthy cannabis seeds will crack open and produce a white taproot within 24–72 hours, although some genetics may take up to a week.
- Plant the germinated seed once the taproot reaches approximately ¼–½ inch (0.5–1 cm) long. Place it taproot down into your growing medium and cover it lightly with soil.
Other Germination Methods
The paper towel method isn't the only way to germinate cannabis seeds. Many growers also use:
- Directly in soil: Plant the seed around ½ inch (1–1.5 cm) deep in lightly moistened soil. This avoids transplanting but makes it harder to monitor germination.
- Water soaking: Soak seeds in room-temperature water for 12–24 hours before planting or transferring them to paper towels. This can help soften the seed shell, but don't leave seeds submerged for longer than 24 hours.
- Starter plugs or root cubes: Products such as Rapid Rooters, peat pellets, or rockwool cubes provide a clean, stable environment for germination and reduce root disturbance during transplanting.
Grower's Tip: Not all cannabis seeds germinate at the same speed. Fresh, high-quality seeds often sprout within a few days, while older seeds or varieties with thicker shells may take longer. Avoid digging up seeds to check on them—patience is usually the best approach.
Our recommendation: For most home growers, the paper towel method offers the best combination of simplicity, visibility, and consistently high germination success. If you'd like to explore additional techniques and troubleshooting advice, read our guide on how to germinate marijuana seeds.
How to Grow Cannabis During the Seedling Stage
Plant Age: Week 1–2
Temperature: 68–77°F (20–25°C)
Humidity: 65–70%
The seedling stage begins once your cannabis seed has sprouted from the growing medium. At this point, the plant will produce its first rounded cotyledons, followed by its first serrated true leaves. Growth above the surface may look slow, but most of the plant’s energy is going into root development.
Step 1: Give Seedlings Gentle Light
Place your seedlings under a full-spectrum LED grow light and keep the light high enough to avoid heat stress. Seedlings need enough light to stay short and sturdy, but too much intensity can dry them out or damage young leaves. If seedlings become tall, thin, and stretched, they usually need stronger or closer light.
Step 2: Water Lightly Around the Root Zone
Water lightly around the base of the seedling rather than soaking the entire pot. If you're unsure how often to water, our guide on how to water your marijuana plants explains exactly when and how much to water at every stage of growth.
Step 3: Avoid Nutrients Too Early
Do not feed seedlings heavily during the first one to two weeks. If you are growing in quality soil, plain pH-adjusted water is usually enough. If you are growing in coco coir or another inert medium, begin with a quarter-strength nutrient solution once the first true leaves have fully formed.
Step 4: Keep the Environment Stable
Maintain temperatures between 68–77°F (20–25°C) and humidity around 65–70%. Gentle airflow helps strengthen young stems, but avoid placing a fan directly on seedlings, as this can dry them out too quickly.
Step 5: Check Seedlings Daily
Look for early signs of problems such as stretching, drooping, yellowing leaves, burnt tips, or pests. Most cannabis seedling problems are caused by too much water, weak light, excessive nutrients, or unstable growing conditions. Correcting these issues early gives the plant the best chance of healthy vegetative growth.
Grower’s Tip: Healthy seedlings spend most of their energy developing roots before rapid growth begins. Be patient, avoid overwatering, and let the plant establish a strong foundation before expecting vigorous top growth. If you're struggling with issues like stretching, yellowing leaves, or slow growth, read our guide on how to get through the cannabis seedling stage.
How to Grow Cannabis During the Vegetative Stage
Plant Age: Week 2–7
Temperature: 71–82°F (22–28°C)
Humidity: 60–70%
The vegetative stage begins once your cannabis plant has developed 3–4 sets of true leaves. During this phase, the plant shifts its energy into producing strong roots, thick stems, healthy branches, and large fan leaves rather than flowers. If you want a deeper look at plant development, training, and common problems, read our complete guide to the vegetative stage of weed. This rapid growth creates the structure that will support heavy bud production during the flowering stage, making the vegetative phase one of the most important parts of the cannabis life cycle.
As your plant matures, you'll notice faster vertical growth, new branches forming at each node, and large fan leaves expanding to capture more light. This is also the best time to transplant, train, and correct any growing problems, as healthy plants recover much more quickly during vegetative growth than they do in flower.
Step 1: Provide the Correct Light Cycle
Cannabis plants need plenty of light to fuel vegetative growth. If you're growing photoperiod cannabis, use an 18/6 light cycle (18 hours of light and 6 hours of darkness). If you're growing autoflowering cannabis, maintain an 18/6 or 20/4 light schedule throughout the entire grow, as autoflowers begin flowering automatically without any change in lighting.
Step 2: Water for Healthy Root Growth
As your plant grows, its roots will spread quickly and require more water than during the seedling stage. Water thoroughly until a small amount of runoff appears, then allow the growing medium to partially dry before watering again. This encourages deeper root growth and helps prevent overwatering, one of the most common causes of slow vegetative growth.
Step 3: Feed Vegetative Nutrients
Vegetative cannabis plants require higher levels of nitrogen to support vigorous leaf and stem development. Use a balanced vegetative nutrient formula and increase feeding gradually according to the manufacturer's recommendations. Healthy plants should have vibrant green leaves, sturdy stems, and steady new growth without burnt tips or signs of nutrient deficiency.
Step 4: Transplant Into a Larger Container
If your cannabis plant has outgrown its container, transplant it before flowering begins. Our guide on when and how to transplant cannabis plants explains exactly when to move your plants and how to minimise transplant shock. Roots growing through drainage holes, slow growth, or a growing medium that dries out quickly are all signs it's time to move into a larger pot. Providing more root space during vegetative growth allows the plant to reach its full potential.
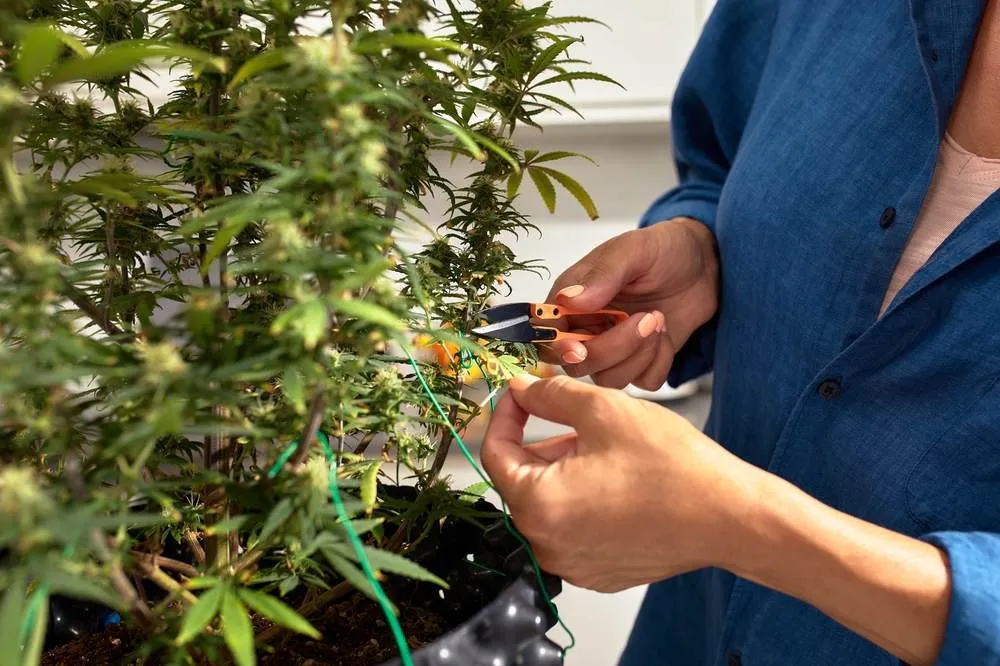
Step 5: Train Your Plants
The vegetative stage is the ideal time to shape your cannabis plants for better yields. Techniques such as Low Stress Training (LST) gently bend branches to create a flatter, more even canopy, allowing light to reach more bud sites. If you plan to top, prune, or defoliate your plants, complete these tasks during vegetative growth so they have plenty of time to recover before flowering.
Step 6: Monitor Plant Health
Inspect your plants every day for signs of pests, nutrient deficiencies, disease, or environmental stress. Healthy vegetative plants should produce new growth regularly, maintain tight node spacing, and develop thick stems capable of supporting dense flowers later in the grow.
Grower's Tip: Resist the temptation to switch photoperiod plants into flowering too early. A well-developed root system and several strong branches will almost always produce a larger, healthier harvest than rushing into the next stage.
What's Next?
Once your cannabis plant has reached your desired size and developed a strong branching structure, it's ready to enter the flowering stage. Photoperiod plants begin flowering when the light cycle changes to 12 hours of light and 12 hours of darkness, while autoflowering varieties make this transition automatically.
How to Grow Cannabis During the Flowering Stage
Plant Age: Week 7–15 (Early to Mid Flowering)
Temperature: 68–78°F (20–26°C)
Humidity: 45–50%
Plant Age: Week 15–17 (Late Flowering)
Temperature: 65–75°F (18–24°C)
Humidity: 40–45%
The flowering stage is the final phase of the cannabis life cycle and the stage every grower looks forward to. Instead of producing new stems and leaves, your plant now directs its energy into developing dense, resin-covered buds. The goal during flowering is to maintain a stable environment, avoid stressing the plant, and provide the right nutrients so it can reach its full genetic potential.
Flowering begins with the appearance of small bud sites and white pistils at the nodes. If you'd like a more detailed breakdown of what to expect each week, read our guide to the cannabis flowering stage week by week. As the weeks progress, buds become larger and denser while producing increasing amounts of sticky resin. During the final weeks, you'll notice trichomes becoming more visible, pistils darkening, and the buds swelling as the plant approaches harvest.
Step 1: Switch to the Correct Light Cycle
If you're growing photoperiod cannabis strains, change your lighting schedule to 12 hours of light and 12 hours of uninterrupted darkness to trigger flowering. Darkness must remain completely uninterrupted, as light leaks can stress the plant and increase the risk of hermaphroditism.
If you're growing autoflowering cannabis, no changes are needed. Autoflowers begin flowering automatically after several weeks of vegetative growth.
Step 2: Feed Bloom Nutrients
As flowering begins, reduce nitrogen levels and switch to a bloom nutrient higher in phosphorus and potassium. These nutrients support flower development and overall plant health. Increase feeding gradually according to the manufacturer's recommendations and avoid overfeeding, which can cause nutrient burn and reduce flower quality.
Step 3: Maintain the Ideal Environment
Lower humidity to 45–50% during early flowering and 40–45% during the final weeks to reduce the risk of bud rot and mold. Good airflow throughout the canopy is equally important, helping moisture evaporate from dense flowers and improving overall plant health.
Step 4: Support Heavy Buds
As buds gain weight, branches may begin to bend under the load. Use bamboo stakes, plant supports, or a trellis net to prevent branches from snapping and to keep developing flowers exposed to as much light as possible.
Avoid major pruning, transplanting, or high-stress training during flowering, as cannabis plants recover much more slowly once bud production has begun.
Step 5: Inspect Your Plants Every Day
Check your plants daily for signs of pests, nutrient deficiencies, powdery mildew, or bud rot, especially as flowers become larger and denser. If you're growing regular cannabis seeds, inspect plants during early flowering for pollen sacs and remove male plants before they can pollinate your females.
Healthy flowering plants should continue producing fresh white pistils, swelling buds, and a steady coating of resin throughout this stage.
Step 6: Monitor Trichomes for Harvest
The most reliable way to judge harvest readiness is by examining the trichomes with a jeweler's loupe or digital microscope. Trichomes begin clear, turn cloudy or milky as cannabinoid production peaks, and eventually develop amber heads as THC begins to degrade.
For most growers, harvesting when the majority of trichomes are milky with around 10–20% amber provides an excellent balance of potency and terpene preservation.
Grower's Tip: During the final weeks of flowering, it's normal for vertical growth to slow as the plant directs its energy into swelling the buds. Some growers also choose to flush cannabis plants before harvest depending on their growing medium and feeding programme. Learn whether flushing is right for your grow in our complete guide.
What's Next?
Once your buds have reached full size and the trichomes indicate peak maturity, it's time to harvest. Drying and curing your cannabis correctly is just as important as growing it, as these final steps preserve potency, flavor, aroma, and overall flower quality.
How to Harvest Cannabis
Harvesting is the final stage of growing cannabis and one of the most important. Even if you've grown healthy plants, harvesting too early, drying too quickly, or skipping the curing process can reduce the flavour, aroma, and overall quality of your buds. The harvest process can be divided into three stages: harvesting, drying, and curing.
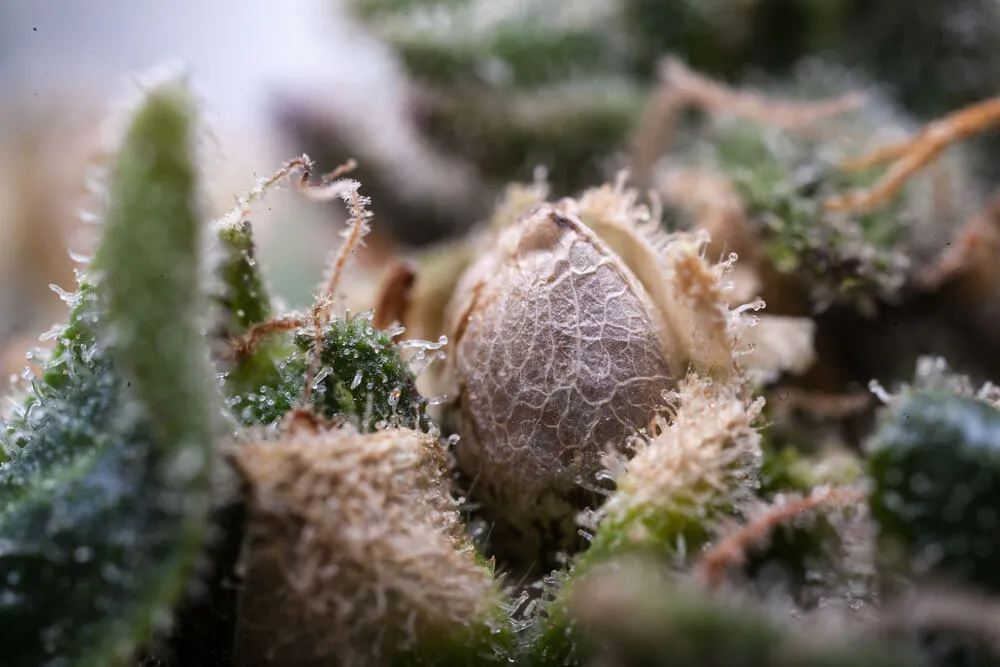
How Do You Know When Cannabis Is Ready to Harvest?
The best way to determine when to harvest cannabis is by examining the trichomes, the tiny, resin-filled glands covering the buds and surrounding sugar leaves. Using a jeweller's loupe or digital microscope, monitor their colour as your plants mature.
- Clear trichomes: The plant is still immature.
- Cloudy or milky trichomes: Cannabinoid production is at its peak.
- Amber trichomes: The plant has continued to mature, producing a more relaxing effect for many growers.
For most cultivars, harvesting when the majority of trichomes are milky with around 10–20% amber provides an excellent balance of potency and maturity.
Trichomes should be your primary guide, but they aren't the only indicator. As harvest approaches, around 70–80% of the pistils will have darkened and curled inward, while the calyxes (bracts) swell noticeably, giving the buds a fuller, denser appearance.
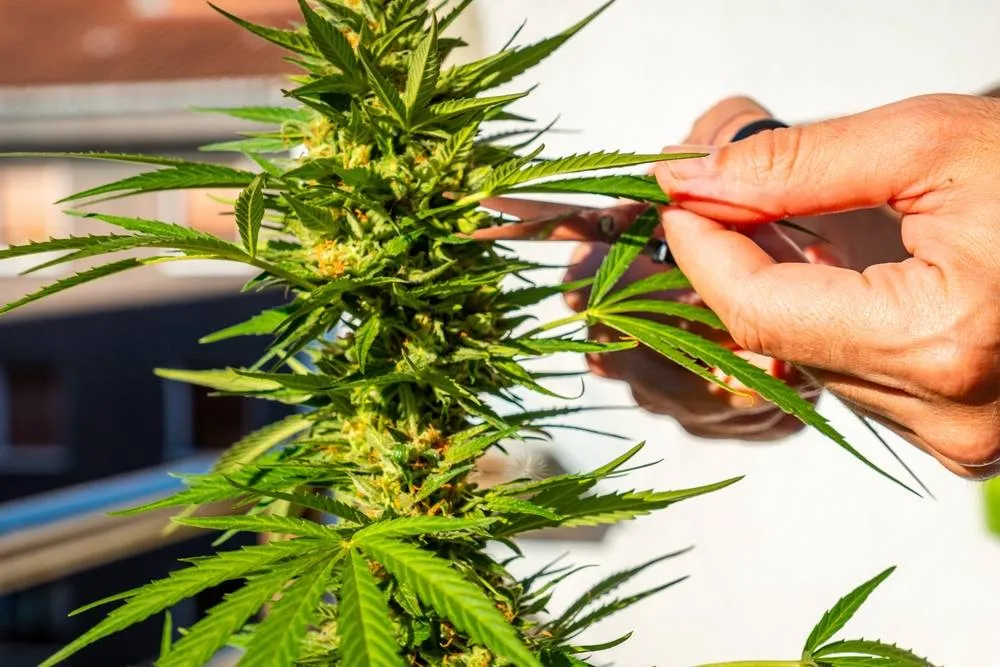
Step 1: Harvest Your Plants
Once your cannabis plants reach peak maturity, use clean pruning shears or quality trimming scissors to cut down the entire plant or remove branches individually. If you're looking for the right tools, see our guide to the best bud trimming scissors for marijuana. Before hanging the plant to dry, remove the large fan leaves to improve airflow and make trimming easier. Resin-covered sugar leaves can be trimmed later and saved for making concentrates or edibles.
Step 2: Dry Your Buds
Temperature: 60°F (15–16°C)
Humidity: 55–60%
Drying usually takes 10–14 days, although environmental conditions can make this shorter or longer. Properly dried buds should feel dry on the outside, while the smaller stems should snap cleanly instead of bending. If you want to optimise flavour, aroma, and terpene preservation, read our guide to drying weed for the perfect taste, smell and potency.
Drying too quickly can reduce aroma and flavour, while drying too slowly in high humidity increases the risk of mold.
Step 3: Cure Your Buds
Temperature: 60°F (15–16°C)
Humidity: 60%
Once your buds are dry, transfer them into airtight glass jars, filling each jar to around 75% capacity to allow some air space. For a more detailed curing schedule and storage tips, read our guide on how to cure weed. Store the jars in a cool, dark place and open them once a day for the first week to release excess moisture, a process known as burping. After the first week, burp the jars every few days as needed.
Curing typically takes 2–8 weeks, although many growers cure for longer to further develop the aroma and smoothness of the finished flower. Check your jars regularly for excess moisture or signs of mold.
Grower's Tip: One of the biggest mistakes new growers make is rushing the drying and curing process. Slow drying followed by a proper cure preserves the terpene profile, improves smoothness, and helps your cannabis reach its best possible quality.
What's Next?
Congratulations, your cannabis has completed its full life cycle from seed to harvest. Store your cured buds in airtight glass jars away from heat, light, and excess humidity to maintain their freshness and quality over time.
What Is the Ideal Climate for Growing Cannabis?
Creating a stable growing environment is one of the most important factors in producing healthy cannabis plants. Temperature, humidity, light, and airflow all influence photosynthesis, nutrient uptake, and plant development. While the ideal conditions change slightly throughout the cannabis life cycle, maintaining a consistent environment helps reduce plant stress and encourages stronger growth.
Temperature
Cannabis plants generally prefer warmer temperatures during the vegetative stage and slightly cooler conditions during flowering. Avoid sudden temperature fluctuations, as they can slow growth, reduce yields, and increase the risk of environmental stress.
Humidity
Humidity should gradually decrease as your plants mature. Seedlings benefit from higher humidity, while flowering plants require lower humidity to reduce the risk of mold and bud rot. Maintaining the correct balance between temperature and humidity often referred to as Vapor Pressure Deficit (VPD) helps plants absorb water and nutrients more efficiently.
Airflow and Ventilation
Good air circulation strengthens stems, helps regulate temperature and humidity, and reduces the risk of pests, powdery mildew, and bud rot. Indoor growers should use oscillating fans and adequate ventilation, while outdoor growers should avoid planting in areas with stagnant air.
Protect Plants from Environmental Stress
Whether growing indoors or outdoors, protect cannabis plants from extreme heat, frost, heavy rain, and strong winds whenever possible. If you're growing in an arid region, our guide on growing cannabis in dry desert-like climates explains how to adapt your environment for better results.
Grower's Tip: Don't chase perfect numbers every day. Healthy cannabis plants respond better to a stable environment than constantly changing temperatures or humidity in an attempt to achieve ideal conditions.
Choosing the Right Cannabis Grow Lights
Light is the energy source that drives cannabis growth. While outdoor plants rely on the sun, indoor growers must provide a high-quality grow light that supports every stage of the cannabis life cycle. Choosing the right lighting will improve plant health, increase yields, and produce denser, more resinous flowers.
Light Cycles
Indoor cannabis plants require different light schedules depending on the type of seed you're growing:
- Photoperiod cannabis: 18 hours of light and 6 hours of darkness during the vegetative stage, followed by 12 hours of light and 12 hours of uninterrupted darkness to trigger flowering.
- Autoflower cannabis: 18–20 hours of light throughout the entire grow, as autoflowers flower automatically without changing the light cycle.
Types of Grow Lights
LED Grow Lights: Full-spectrum LED lights are the preferred choice for most home growers. They are energy efficient, produce less heat than traditional lighting, and provide excellent results from seedling through harvest.
HID Grow Lights: Metal Halide (MH) and High-Pressure Sodium (HPS) lights are still capable of producing excellent yields but generate significantly more heat and consume more electricity than modern LEDs.
Fluorescent Lights: CFL and T5 fluorescent lights are suitable for seedlings, clones, and small propagation areas but generally lack the intensity needed to produce high-quality flowering plants.
Best Choice for Beginners: A quality full-spectrum LED grow light offers the best balance of performance, energy efficiency, and ease of use. Choose a fixture that matches the size of your grow space and follow the manufacturer's recommended hanging height to avoid stretching or light stress.
What Nutrients Do Cannabis Plants Need?
Like all plants, cannabis requires a balanced supply of nutrients to grow healthy roots, strong stems, and dense flowers. The amount of nutrients your plant needs changes throughout its life cycle, so feeding the right nutrients at the right time is essential for healthy growth and high-quality harvests.
The Three Primary Nutrients (NPK)
Cannabis plants rely on three essential macronutrients:
- Nitrogen (N): Supports vigorous leaf and stem growth during the vegetative stage.
- Phosphorus (P): Encourages healthy root development and flower production.
- Potassium (K): Supports water uptake, plant health, and dense bud development throughout the grow.
Cannabis also requires smaller amounts of calcium, magnesium, sulfur, and trace minerals to support healthy growth. Most cannabis nutrient products already contain these micronutrients in the correct proportions.
Step 1: Feed for the Growth Stage
During the vegetative stage, use nutrients higher in nitrogen. Once flowering begins, switch to a bloom formula with more phosphorus and potassium to support bud development. Always follow the manufacturer's feeding schedule and increase nutrient strength gradually.
Step 2: Maintain the Correct pH
Even the best nutrients won't work if your pH is outside the correct range. Aim for a pH of 6.0–7.0 when growing in soil and 5.8–6.5 when growing in coco coir or hydroponic systems. Maintaining the correct pH allows your plants to absorb nutrients efficiently.
Step 3: Avoid Overfeeding
Overfeeding is one of the most common mistakes made by new growers. Start with a weaker nutrient solution than recommended and gradually increase feeding as your plants grow. Watch for signs such as yellowing leaves, burnt leaf tips, or slow growth, which may indicate nutrient deficiencies or excesses.
Grower's Tip: When it comes to feeding cannabis, less is often more. Healthy plants usually recover more easily from slight underfeeding than severe nutrient burn caused by overfeeding.
Frequently Asked Questions
How long does it take to grow cannabis from seed to harvest?
Most cannabis plants take 3–5 months to grow from seed to harvest, depending on the genetics and growing conditions. Autoflowering strains typically finish in 8–12 weeks from seed, while photoperiod plants usually require a longer vegetative stage before flowering. For a complete breakdown of each stage, read our guide on how long it takes to grow cannabis.
Is it better to grow cannabis indoors or outdoors?
Both methods can produce excellent results. Indoor growing gives you complete control over light, temperature, and humidity, making it easier to produce consistent harvests. Outdoor growing is often less expensive and allows plants to grow much larger, but you'll depend on the local climate and weather conditions.
How often should I water cannabis plants?
There isn't a fixed watering schedule. Water your cannabis plants when the growing medium begins to dry rather than on specific days. The amount of water needed depends on the plant's size, container, growing medium, and environmental conditions. Overwatering is one of the most common mistakes made by beginner growers.
What is the easiest cannabis seed for beginners?
Autoflowering and feminized cannabis seeds are both excellent choices for beginners. Autoflowers are fast, compact, and flower automatically, while feminized photoperiod seeds give growers more control over plant size and flowering time without the need to identify and remove male plants.
How much light does cannabis need?
Photoperiod cannabis plants typically require 18 hours of light during the vegetative stage and 12 hours of uninterrupted darkness to begin flowering. Autoflowering cannabis can remain under 18–20 hours of light throughout its entire life cycle because flowering isn't triggered by changes in the light schedule.
When should I harvest cannabis?
The best time to harvest cannabis is when most trichomes have turned cloudy or milky, with around 10–20% becoming amber. While darkened pistils can provide a helpful indication, trichomes are the most reliable way to judge harvest readiness.
Why are my cannabis seedlings stretching?
Stretching usually occurs when seedlings don't receive enough light. The stem grows taller as the plant searches for a stronger light source, often becoming thin and weak. Moving your grow light closer or increasing light intensity—while following the manufacturer's recommendations—can help prevent excessive stretching.
What causes yellow leaves on cannabis plants?
Yellow leaves can be caused by several factors, including overwatering, underwatering, nutrient deficiencies, incorrect pH, or natural aging during late flowering. Identifying when the yellowing occurs and which leaves are affected will help determine the underlying cause.
Can I grow cannabis without nutrients?
If you're growing in a high-quality organic soil, your plants may not need additional nutrients during the early stages of growth. However, as cannabis plants mature, they usually require supplemental nutrients to produce healthy growth and high-quality flowers, especially when grown in coco coir or hydroponic systems.
What is the biggest mistake new cannabis growers make?
Overwatering is one of the most common mistakes made by first-time growers. Cannabis plants generally recover more easily from slight underwatering than constantly saturated roots. Maintaining a stable environment, avoiding overfeeding, and being patient throughout each stage of growth will give you the best chance of a successful harvest.

