




Yellow leaves are common in autoflowers, but they do not always mean your plant is in serious trouble. Yellowing can result from overwatering, underwatering, nutrient deficiencies, incorrect pH, nutrient lockout, overfeeding, light stress, temperature problems, pests, root issues, or fungal disease. In late flowering, older fan leaves may also fade naturally as the plant approaches harvest.
Because autoflowers move through their life cycle quickly, it is important to identify problems early. The longer a plant spends recovering from stress, the less time it has to establish healthy growth before flowering progresses.
To diagnose yellow autoflower leaves, look at when the yellowing started, where it appears on the plant, how the discoloration develops, and whether other symptoms are present.
In this guide, you’ll learn the main causes of yellow autoflower leaves, how to separate normal late-flower fading from a genuine problem, and what steps to take to help your plant recover.
Key Takeaways
- Yellow autoflower leaves can be caused by watering problems, incorrect pH, nutrient issues, root stress, light, temperature, pests, or natural late-flower fading.
- Where the yellowing starts can help identify the cause. Lower leaves often point to nitrogen or watering issues, while new growth may indicate iron, calcium, pH, or light stress.
- Always identify the cause before adding more nutrients, as overwatering and nutrient lockout can look similar to a deficiency.
- Some yellowing during late flowering is normal, but early or rapidly spreading discoloration should be investigated.
- Regularly checking watering, pH, feeding, temperature, lighting, and leaf health helps catch autoflower problems before they worsen.
- What do yellow leaves on autoflowers mean?
- How to Diagnose Autoflower Leaves Turning Yellow
- Common Causes of Autoflower Leaves Turning Yellow
- Nutrient Deficiencies That Cause Yellow Autoflower Leaves
- Light Burn on Autoflowers
- Temperature Stress
- Root Rot
- Pests and Fungal Diseases
- Leaf Septoria on Autoflowers
- How to Prevent Autoflower Leaves From Turning Yellow
- Frequently Asked Questions
- Conclusion
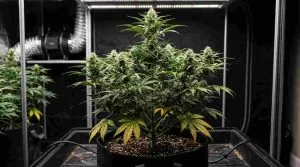
What do yellow leaves on autoflowers mean?
Yellow autoflower leaves usually mean chlorophyll is breaking down, causing healthy green foliage to fade. This can happen when the plant cannot absorb enough nutrients or is under environmental stress.
Common causes include overwatering, incorrect pH, nutrient deficiencies such as nitrogen or magnesium, root problems, excessive light, temperature stress, pests, and disease.
Plant age is also important. Older fan leaves may naturally turn yellow during late flowering as the autoflower approaches harvest. If the plant is otherwise healthy and the fading is limited to older leaves, this is usually nothing to worry about.
Yellowing is more concerning when it appears early, spreads quickly, affects new growth, or is accompanied by spots, curling, wilting, or damaged roots.
Grower's Tip: Don't add more nutrients as soon as you notice a yellow leaf. Check the plant's growth stage, watering, pH, roots, and environment first to identify the actual cause.
How to Diagnose Autoflower Leaves Turning Yellow
Several autoflower problems can cause similar yellowing, so avoid diagnosing the issue by leaf color alone.
Start by asking:
- What growth stage is the autoflower in?
- Where did the yellowing begin?
- Are there any other symptoms?
Step 1: Identify the Growth Stage
The cause of yellow leaves can change depending on the age of the plant. Understanding the typical autoflower growth stages can help you determine whether yellowing is appearing earlier than expected.
Autoflower Seedling Stage
Young seedlings are sensitive to watering, feeding, pH, and root-zone conditions.
Common causes include:
- Overwatering
- Excess nutrients
- Incorrect pH
- Poor root development
- Environmental stress
The cotyledons naturally yellow and die after the first true leaves develop. If the true leaves are turning yellow, check the growing conditions.
Avoid making several changes at once, as young autoflowers can respond quickly to changes in watering or feeding.
Early Vegetative Growth
Yellowing during early vegetative growth usually indicates a problem that should be corrected before flowering.
Common causes include:
- Nitrogen deficiency
- Overwatering or underwatering
- Nutrient lockout
- Incorrect pH
- Root problems
- Heat or light stress
- Pests
Because autoflowers have a short vegetative period, prolonged stress can limit development before flowering begins. If yellowing is accompanied by unusually slow growth, check for other signs of a stunted autoflower.
Pre-Flower and Early Flowering
A few older leaves may become paler, but widespread yellowing during early flowering is not usually normal.
Investigate further if:
- Yellowing spreads quickly
- New growth is affected
- Leaves curl or wilt
- Brown or rust-colored spots appear
- Leaf edges look burnt
- Growth slows
These symptoms may point to feeding, root-zone, environmental, or pest problems.
Late Flowering
Yellowing becomes more common as an autoflower approaches harvest.
It is more likely to be natural when older fan leaves fade first, flowers continue developing normally, and newer growth remains relatively healthy.
Rapid yellowing, spotting, wilting, or discoloration across the entire plant should still be investigated.
Step 2: Check Where the Yellowing Starts
Leaf position can quickly narrow down the possible cause.
| Yellowing Pattern | Possible Cause |
| Older lower leaves | Nitrogen deficiency, watering problems, or natural late-flower fading |
| New growth or upper leaves | Iron or calcium problems, incorrect pH, or light stress |
| Entire plant | Overwatering, root damage, nutrient problems, or environmental stress |
| Yellow between green veins | Magnesium or iron deficiency |
| Yellow or brown spots | Calcium deficiency, pests, fungal disease, or nutrient splash |
| Yellow or scorched edges | Potassium deficiency or nutrient burn |
| Highest leaves only | Excessive light or heat |
Always consider the yellowing pattern alongside the plant's growth stage and overall condition.
Step 3: Check the Growing Environment
Before changing the feeding schedule, check:
- How wet or dry the growing medium is
- Root-zone pH
- Temperature
- Light intensity and distance
- Signs of insects or disease
- Root health
Many yellow-leaf problems are caused by watering, pH, roots, or environmental stress rather than a lack of nutrients.
Grower's Tip: Use growth stage, leaf position, other symptoms, and environmental conditions together to diagnose yellow autoflower leaves accurately.
Common Causes of Autoflower Leaves Turning Yellow
Overwatering and Underwatering
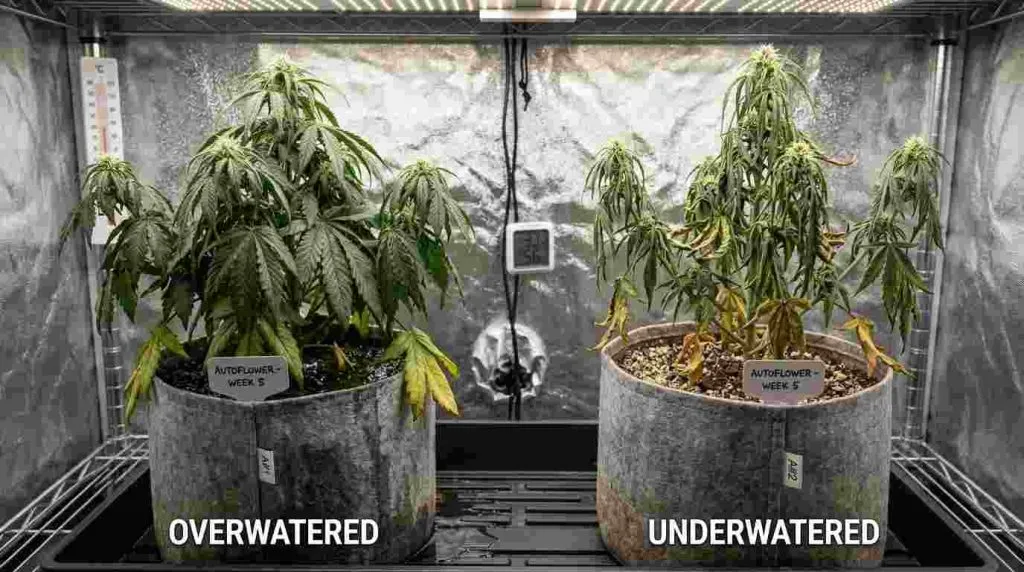
Watering problems are a common cause of yellow leaves on autoflowers. Too much water reduces oxygen around the roots, while too little limits water and nutrient movement through the plant.
| Watering Problem | Common Signs | What to Do |
| Overwatering | Drooping or swollen leaves, yellowing, slow growth, heavy pots, wet growing medium | Allow the medium to dry before watering again and improve drainage |
| Underwatering | Limp or wilted leaves, dry medium, light pots, yellowing lower leaves, curling | Rehydrate thoroughly and increase watering frequency when needed |
How much water autoflowers need changes as they grow, so avoid watering on a fixed schedule. Check the growing medium and lift the pot to judge how much moisture remains instead.
Grower's Tip: A noticeably lighter pot is usually a better watering guide than counting the days since the last watering.
pH Imbalance and Nutrient Lockout
Incorrect root-zone pH can prevent an autoflower from absorbing nutrients already present in the growing medium. This is known as nutrient lockout and can look very similar to a deficiency.
Common signs include:
- Yellowing despite regular feeding
- Several deficiency symptoms appearing together
- Pale or spotted leaves
- Slow or stalled growth
- Root-zone pH outside the suitable range
Use these ranges as a general guide:
| Growing Medium | Recommended pH Range |
| Soil | 6.0–7.0 |
| Coco coir | 5.8–6.5 |
Test the water or nutrient solution and, where appropriate, the runoff. If the root zone is outside the suitable range, correct the pH before adding more fertilizer.
Grower's Tip: When several deficiencies seem to appear at once, check pH and root health first. The problem may be nutrient uptake rather than a lack of nutrients.
Overfeeding and Underfeeding Autoflowers
Autoflowers need enough nutrients to support growth and flowering, but both excessive and insufficient feeding can cause yellow leaves.
| Feeding Problem | Typical Symptoms | Recommended Action |
| Overfeeding | Yellow or brown tips, crispy edges, dark green foliage, downward curling | Reduce nutrient strength and address excess salt buildup if necessary |
| Underfeeding | Pale foliage, yellowing lower leaves, slower growth, yellowing moving upward | Check pH and watering first, then increase nutrients gradually |
Nutrient burn often starts at the leaf tips, while underfeeding usually causes the plant to become progressively paler.
An autoflower nutrient feeding schedule can provide a useful starting point, but nutrient strength should still be adjusted to the plant’s response. Make changes gradually, as large corrections can create unnecessary stress during the limited autoflower growth cycle.
Grower's Tip: Judge recovery by healthy new growth and whether the yellowing stops spreading. Leaves that are already badly damaged may not return to green.
Nutrient Deficiencies That Cause Yellow Autoflower Leaves
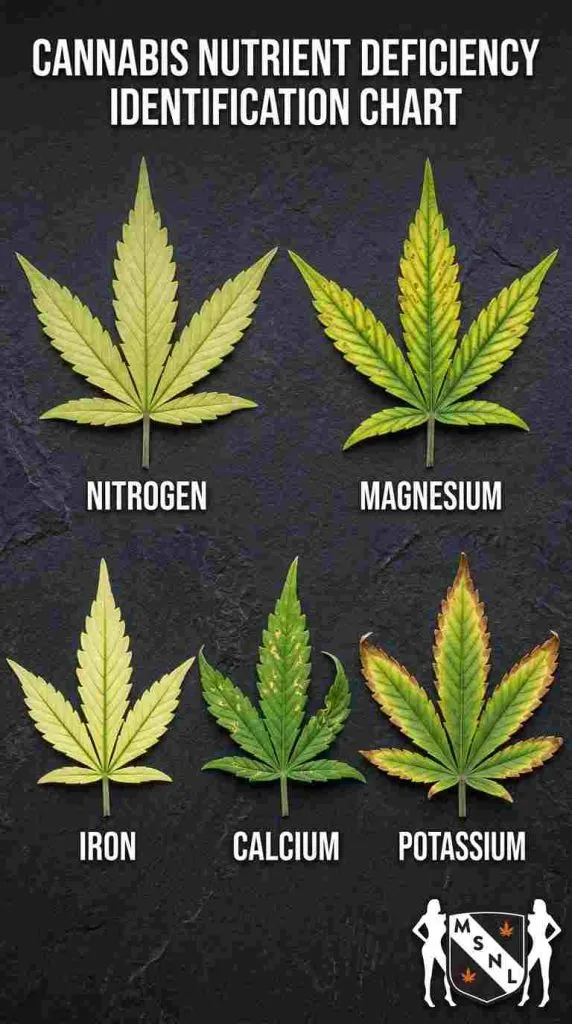
Several nutrient deficiencies can cause yellow leaves on autoflowers. Where the discoloration starts and how it develops can help identify the likely cause.
| Deficiency | Where It Starts | Typical Signs |
| Nitrogen | Older lower leaves | Even yellowing that gradually moves upward |
| Magnesium | Older leaves | Yellowing between green veins, followed by rust-colored spots |
| Iron | New growth | Pale or yellow young leaves with greener veins |
| Calcium | New growth | Irregular yellow or brown spots and distorted leaves |
| Potassium | Older leaves | Yellow leaf edges that become brown, dry, or scorched |
Nitrogen Deficiency
Nitrogen deficiency usually starts on the oldest lower fan leaves because the autoflower moves stored nitrogen toward newer growth.
Common symptoms include:
- Lower leaves fading from green to yellow
- Even yellowing across older leaves
- Discoloration gradually moving upward
- Slower growth if the deficiency becomes severe
Yellow lower leaves early in the grow should be investigated, but a gradual fade close to harvest can be part of the autoflower's natural aging process.
Check watering, root-zone pH, and feeding before increasing nitrogen.
Magnesium Deficiency
Magnesium deficiency also begins on older leaves, but the yellowing usually develops between the veins rather than across the entire leaf.
Look for:
- Yellow tissue between green veins
- Rust-colored spots as the deficiency progresses
- Older fan leaves being affected first
Check root-zone pH before adding magnesium, as poor nutrient uptake can produce similar symptoms.
Iron Deficiency
Iron deficiency usually appears on the newest growth first.
Typical signs include:
- Pale or yellow young leaves
- Veins remaining greener
- Older leaves staying relatively healthy
- Discoloration concentrated near the top of the autoflower
Incorrect root-zone pH is a common cause, so check uptake conditions before adding more iron.
Calcium Deficiency
Calcium deficiency tends to cause irregular damage rather than uniform yellowing.
Symptoms can include:
- Distorted new growth
- Yellow or brown spots
- Small dead patches
- Damage concentrated on younger leaves
Calcium issues can also appear alongside other deficiencies when the root zone is unhealthy or the pH is outside the correct range.
Potassium Deficiency
Potassium deficiency normally starts on older leaves.
The leaf edges often turn yellow first before becoming increasingly dry, brown, or scorched as the problem develops.
If your autoflower is already receiving a balanced flowering feed, check pH, watering, and nutrient strength before automatically adding more potassium.
Grower's Tip: Don't diagnose a deficiency from leaf color alone. Where the yellowing starts, the pattern it follows, and the autoflower's growth stage provide much stronger clues.
Light Burn on Autoflowers
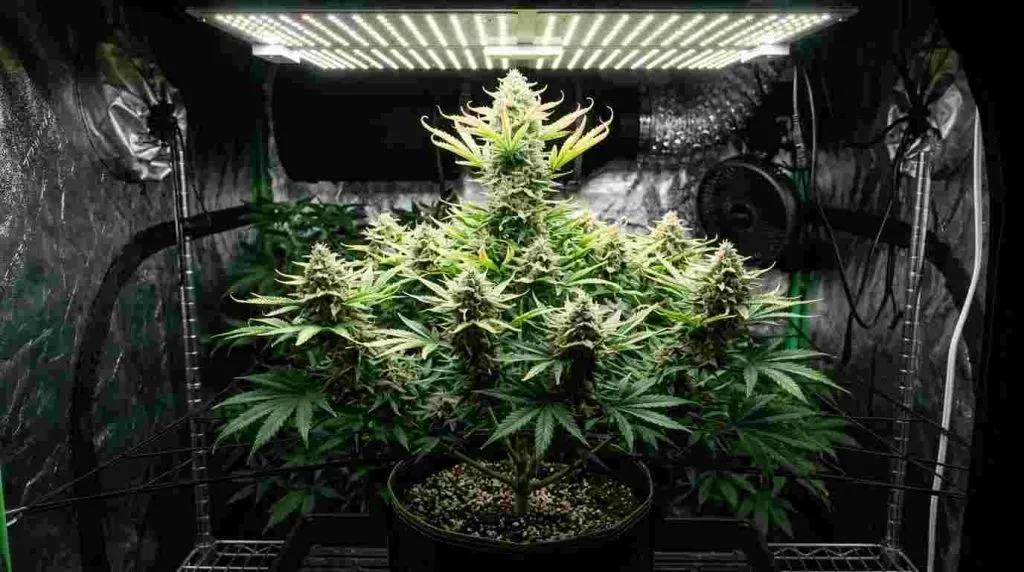
When growing indoor autoflowers, yellow upper leaves can develop if grow lights are too intense or positioned too close to the canopy. Unlike many nutrient problems, light burn usually affects the highest leaves first.
Signs of Light Burn
- Pale, lime-green, or yellow upper leaves
- Bleached areas directly beneath the light
- Dry or curling leaf edges
- Lower foliage remaining relatively healthy
How to Fix Light Burn
Raise or dim the grow light and follow the manufacturer's recommendations for your fixture. For more precise control of autoflower lighting, use PPFD and DLI alongside plant response rather than relying on light distance alone. Increase intensity gradually to avoid sudden light stress.
Good light management is particularly important with high-yielding autoflowers, but increasing intensity beyond what the plant can handle can cause bleaching and yellow upper leaves.
Maintain good airflow around the canopy to help control heat.
Grower's Tip: If yellowing is concentrated at the top while lower leaves remain green, check your lighting before adding more nutrients.
Temperature Stress
Temperatures that are too high or low can interfere with water and nutrient uptake, causing leaves to yellow, curl, or droop. Maintaining suitable temperature and humidity for autoflowers throughout each growth stage helps reduce heat, cold, and moisture-related stress.
| Temperature Problem | Common Signs | What to Do |
| Heat stress | Pale or yellow leaves, upward curling, wilting, dry edges, slower growth | Improve ventilation and airflow, reduce excess heat, and prevent the root zone from drying out |
| Cold stress | Pale foliage, drooping, slow growth, stunting, and sometimes purple stems | Protect plants from cold drafts and sudden nighttime temperature drops |
As a general guide, cannabis grows well at around 68–85°F (20–29°C), although suitable temperatures vary by growth stage and growing environment.
Managing Heat Stress
Indoors, improve ventilation, exhaust warm air, and check whether the grow light is adding excessive heat around the canopy.
When growing outdoor autoflowers, provide protection during extreme heat and water during cooler parts of the day when necessary.
Managing Cold Stress
Keep temperatures stable and protect autoflowers from cold drafts, cold root zones, and sharp nighttime drops.
Grower's Tip: Consistency matters. Sudden temperature swings can stress autoflowers even when daytime conditions appear suitable.
Root Rot
Root rot can cause yellow autoflower leaves because damaged roots struggle to absorb water and nutrients. It is commonly linked to a growing medium that remains wet for too long and lacks sufficient oxygen.
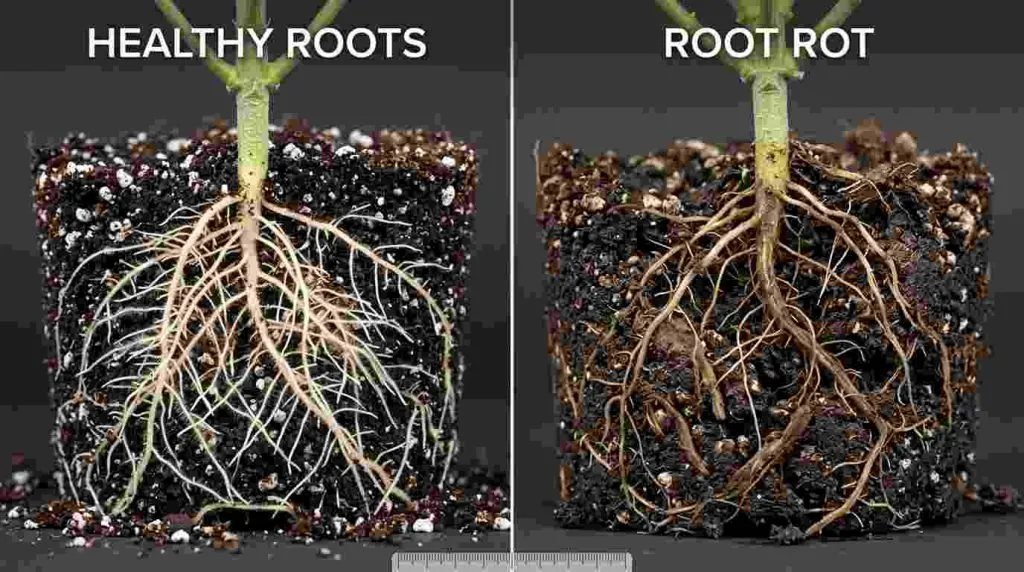
Signs of Root Rot
Look for:
- Yellowing despite wet growing medium
- Persistent drooping
- Slow or stalled growth
- Brown, black, soft, or slimy roots
- An unpleasant smell from the root zone
Healthy roots should generally appear firm and light in color.
How to Fix Root Rot
Allow the growing medium to dry appropriately, improve drainage, and correct any overwatering problems. Using a light, well-draining soil for autoflowers can also help maintain oxygen around the roots and reduce waterlogged conditions.
Avoid unnecessary root disturbance, particularly with autoflowers, unless the damage is severe and direct intervention is required.
Grower's Tip: If an autoflower is yellowing while the root zone stays constantly wet, check the roots before increasing feed strength.
Pests and Fungal Diseases
Pests and fungal diseases can cause yellow autoflower leaves, but the damage usually appears as spots, speckles, streaks, or patches rather than an even yellow fade.
Common pests include spider mites, aphids, thrips, and whiteflies, while fungal problems can include powdery mildew and Leaf Septoria.
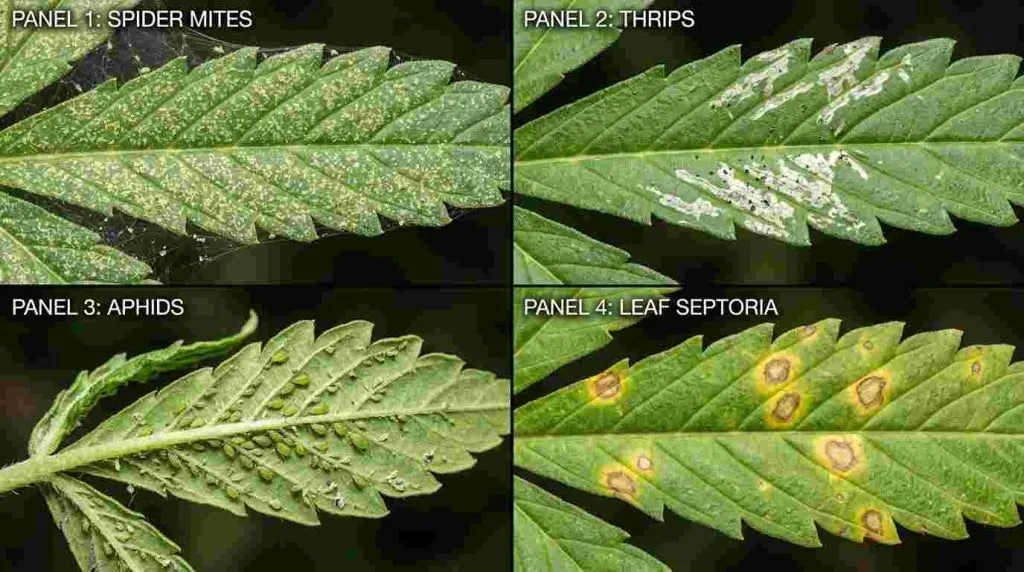
How to Identify Pest Damage
Different pests leave different patterns:
| Pest | Typical Leaf Damage | Where to Check |
| Spider mites | Tiny pale or yellow speckles, sometimes with fine webbing | Undersides of leaves |
| Thrips | Silvery streaks and irregular patches | Both sides of leaves |
| Aphids | Yellowing, curling, or distorted growth | New growth and leaf undersides |
| Whiteflies | Pale or yellow leaves and weakened growth | Undersides of leaves |
Use a magnifying lens if possible and inspect the entire autoflower, especially the lower leaves and undersides.
How to Handle Pest Problems
If you find pests:
- Identify the pest by comparing the damage pattern and checking closely for insects, eggs, or webbing.
- Remove badly damaged leaves using clean scissors if they are unlikely to recover.
- Keep the grow area clean by removing fallen leaves and plant debris.
- Improve airflow around the autoflower to make conditions less favorable for pests and disease.
- Use a suitable treatment such as insecticidal soap, horticultural oil, or beneficial insects, following the product instructions.
- Check the plant regularly for fresh damage so you can see whether the problem is improving.
During flowering, avoid spraying developing flowers unless the product is specifically labeled as suitable for that use.
Grower's Tip: Check your autoflowers every few days. Small pest problems are much easier to manage before they spread across the plant.
Leaf Septoria on Autoflowers
Leaf Septoria, also known as yellow leaf spot, is a fungal disease that produces distinctive yellow spots on autoflower leaves.
It is more likely to develop when conditions are warm and humid, airflow is poor, or foliage stays wet for long periods.
How to Identify Leaf Septoria
Septoria usually begins on older lower leaves.
Look for:
- Small round yellow spots
- Brown or gray centers
- Clearly defined lesions
- Spots gradually becoming larger
- Leaves drying and dying as the disease progresses
The pattern helps distinguish Septoria from pest damage. Pest problems often create tiny speckles or streaks, while Septoria usually forms larger, round spots with darker centers.
How to Handle Leaf Septoria
If you suspect Septoria:
- Remove infected leaves using clean scissors, starting with the worst affected lower foliage.
- Dispose of infected material away from the grow area rather than leaving it near the plant.
- Clean your tools before using them again to avoid spreading fungal spores.
- Water the growing medium directly and avoid getting the leaves wet.
- Improve airflow by giving the autoflower enough space and keeping air moving around the canopy.
- Reduce excess humidity where possible, especially during flowering.
- Inspect the plant regularly for new spots moving upward through the canopy.
If new lesions continue appearing, use an appropriate fungal treatment according to the product label.
Grower's Tip: Septoria is easier to control when caught on the lower leaves. Once it begins spreading upward, more healthy foliage can quickly become affected.
How to Prevent Autoflower Leaves From Turning Yellow
Most yellow-leaf problems can be reduced by keeping watering, pH, feeding, and the growing environment consistent throughout the autoflower's short life cycle.
Step 1: Water Only When Needed
Check the growing medium before watering.
For soil-grown autoflowers, allow the top layer to begin drying and lift the pot to judge how much moisture remains. A lighter pot usually means it is closer to needing water.
Avoid watering on a fixed schedule.
Step 2: Keep Root-Zone pH in Range
Correct pH helps the roots absorb available nutrients.
As a general guide:
| Growing Medium | pH Range |
| Soil | 6.0–7.0 |
| Coco coir | 5.8–6.5 |
Check pH regularly, especially if leaves begin showing several deficiency symptoms at once.
Step 3: Feed Gradually
Avoid making large changes to nutrient strength.
If leaves begin yellowing, check watering and pH before assuming the autoflower needs more food. If feeding does need adjusting, increase or reduce the strength gradually and monitor the response.
Step 4: Keep Conditions Stable
Monitor:
- Temperature
- Humidity
- Light intensity
- Airflow
Avoid sudden changes where possible. Indoors, follow the grow-light manufacturer's guidance and watch the canopy for signs of heat or light stress.
Step 5: Inspect Your Autoflower Regularly
Check both sides of the leaves every few days.
Look for:
- Yellowing
- Spots
- Curling
- Drooping
- Webbing
- Insects
- Powdery patches
Catching a problem early gives you more time to correct it before it spreads.
Step 6: Keep the Grow Area Clean
Remove dead leaves and plant debris, clean tools between uses, maintain good airflow, and avoid standing water.
A clean grow space makes it harder for pests and fungal diseases to become established.
Step 7: Keep Grow Notes
Record key details such as:
- Watering dates
- Nutrient strength
- pH
- Temperature
- Humidity
- Lighting changes
If yellow leaves suddenly appear, these notes can help you identify what changed and narrow down the cause.
Grower's Tip: Prevention is mostly about consistency. Autoflowers have less time to recover from prolonged stress, so small, gradual adjustments are usually better than making several changes at once.
Frequently Asked Questions
Why Are My Autoflower Leaves Turning Yellow During Flowering?
Some yellowing is normal during late flowering as older fan leaves naturally fade. However, yellowing that starts early, spreads quickly, affects new growth, or appears with spots, curling, or wilting may indicate a problem.
Check watering, pH, feeding, lighting, temperature, roots, and pests before making changes.
Why Are the Bottom Leaves on My Autoflower Turning Yellow?
Lower leaves turning yellow can indicate nitrogen deficiency, watering problems, root stress, or natural aging.
Growth stage is an important clue. Yellow lower leaves early in the grow usually deserve investigation, while a gradual fade on older fan leaves close to harvest can be normal.
Should I Remove Yellow Leaves From an Autoflower?
Not immediately. Yellow leaves can help you identify where and how a problem started.
Once a leaf is fully yellow, dry, or badly damaged, it can be removed. Correct the underlying cause first rather than simply removing affected foliage.
Can Yellow Autoflower Leaves Turn Green Again?
Slightly affected leaves may improve after the cause is corrected, but completely yellow leaves rarely return to healthy green.
Judge recovery by whether the yellowing stops spreading and new growth develops normally.
Why Are My Autoflower Leaves Yellow With Brown Spots?
Yellow leaves with brown spots can be caused by nutrient problems, pests, fungal disease, or root-zone stress.
Look at the pattern. Round yellow spots with darker centers may indicate Leaf Septoria, while tiny speckles can point to pests. Irregular spotting on new growth may suggest calcium or other nutrient uptake problems.
Why Is My Autoflower Turning Yellow Before Harvest?
A gradual fade of older fan leaves can be normal near the end of flowering.
Leaf color alone should not determine whether your autoflower is ready to harvest. Check trichomes, pistils, and overall flower development as well. Sudden widespread yellowing, wilting, spotting, or damaged flowers may still indicate a problem that needs attention.
Conclusion
Yellow autoflower leaves can have several causes, from watering and pH problems to nutrient issues, root stress, pests, or natural fading late in flower.
Start by looking at the plant’s growth stage, where the yellowing began, and whether there are other symptoms such as spots, curling, wilting, or burnt edges. Then check watering, root-zone pH, feeding, light intensity, temperature, and root health before making changes.
Because autoflowers move through their life cycle quickly, early diagnosis matters. Avoid reacting to a single yellow leaf or changing several things at once. Small, targeted adjustments make it easier to see what the plant actually needs.
Some yellowing near harvest is normal, especially on older fan leaves. Earlier or rapidly spreading discoloration usually deserves closer attention.
Regular inspections, stable conditions, and good grow notes make yellow-leaf problems easier to identify, correct, and prevent throughout the autoflower life cycle, from early growth through final harvest.


