




Choosing the best soil for autoflowers starts with understanding what your plants need for healthy root development. Autoflowers grow quickly, so unsuitable soil can affect their progress before they have time to recover.
A good autoflower soil provides the right balance of drainage, moisture retention and nutrient availability. However, not every potting mix is suitable, particularly those containing excessive nutrients.
In this guide, I'll explain how to choose the right soil, prepare your own soil mix for autoflowers, compare organic and living soil, and identify common problems that can affect plant development.
Key Takeaways
- Best soil for autoflowers: Light, well-draining soil with manageable nutrient levels is a practical choice for beginners.
- Soil ingredients: Perlite, coco coir and organic matter serve different purposes in maintaining suitable root conditions.
- Homemade soil mixes: Preparing your own mix allows you to adjust its composition to suit your growing environment.
- Living soil: The best living soil for autoflowers supports biological nutrient cycling but requires suitable conditions and management.
- Common soil problems: Poor drainage, excess nutrients and unsuitable moisture levels can restrict growth and should be identified early.
- What is the Best Soil for Autoflowers?
- What Makes a Good Soil for Autoflowers?
- What Are the Best Types of Soil for Autoflowers?
- How to Make a Soil Mix for Autoflowers
- How to Prepare Your Autoflower Soil Mix
- What is the Best Living Soil for Autoflowers?
- What Soil is Best for Autoflower Seedlings?
- Conclusion
- Frequently Asked Questions
- References
What is the Best Soil for Autoflowers?
The best soil for autoflowers is a light, well-draining potting mix that supports healthy root development without supplying excessive nutrients during early growth.
For beginners, I recommend a lightly amended soil containing organic matter and materials that help maintain air spaces. This gives you greater control over feeding as your plants develop. Heavily amended soil can also work, but its nutrient content needs careful consideration.
Your container size, growing environment and watering habits influence which mix performs best. For example, fabric pots generally dry faster than plastic containers, so moisture retention becomes an important consideration.
Research by Schober et al. (2023) found that different growing media affected water availability, nitrogen uptake and biomass development in cannabis. Although the study examined soilless media rather than autoflower soil specifically, it demonstrates how growing-medium selection influences plant development.
Grower tip: Always check the nutrient content of commercial soil before planting. Some mixes contain enough added nutrients to supply young plants for several weeks, making additional feeding unnecessary initially.
What Makes a Good Soil for Autoflowers?
Good soil for autoflowers provides suitable root conditions through a balance of drainage, moisture retention, nutrient availability and pH.
Aeration and Drainage
Roots need oxygen to absorb nutrients and support growth. Compacted or saturated soil restricts oxygen availability, increasing the risk of poor root development.
Ingredients such as perlite and pumice help maintain air spaces and allow excess water to drain. Containers should also have unobstructed drainage holes to prevent water accumulating around the roots.
Moisture Retention
A suitable soil mix retains enough moisture for roots to absorb between watering sessions without remaining saturated.
Peat, coco coir and mature compost can improve water retention. However, soil composition, container material and environmental conditions all influence drying time.
Understanding how much water autoflowers need helps you manage irrigation according to the growing medium rather than following a fixed schedule.
Nutrient Content and Soil pH
Autoflowers require nitrogen, phosphorus and potassium, alongside secondary nutrients such as calcium and magnesium and smaller amounts of trace elements.
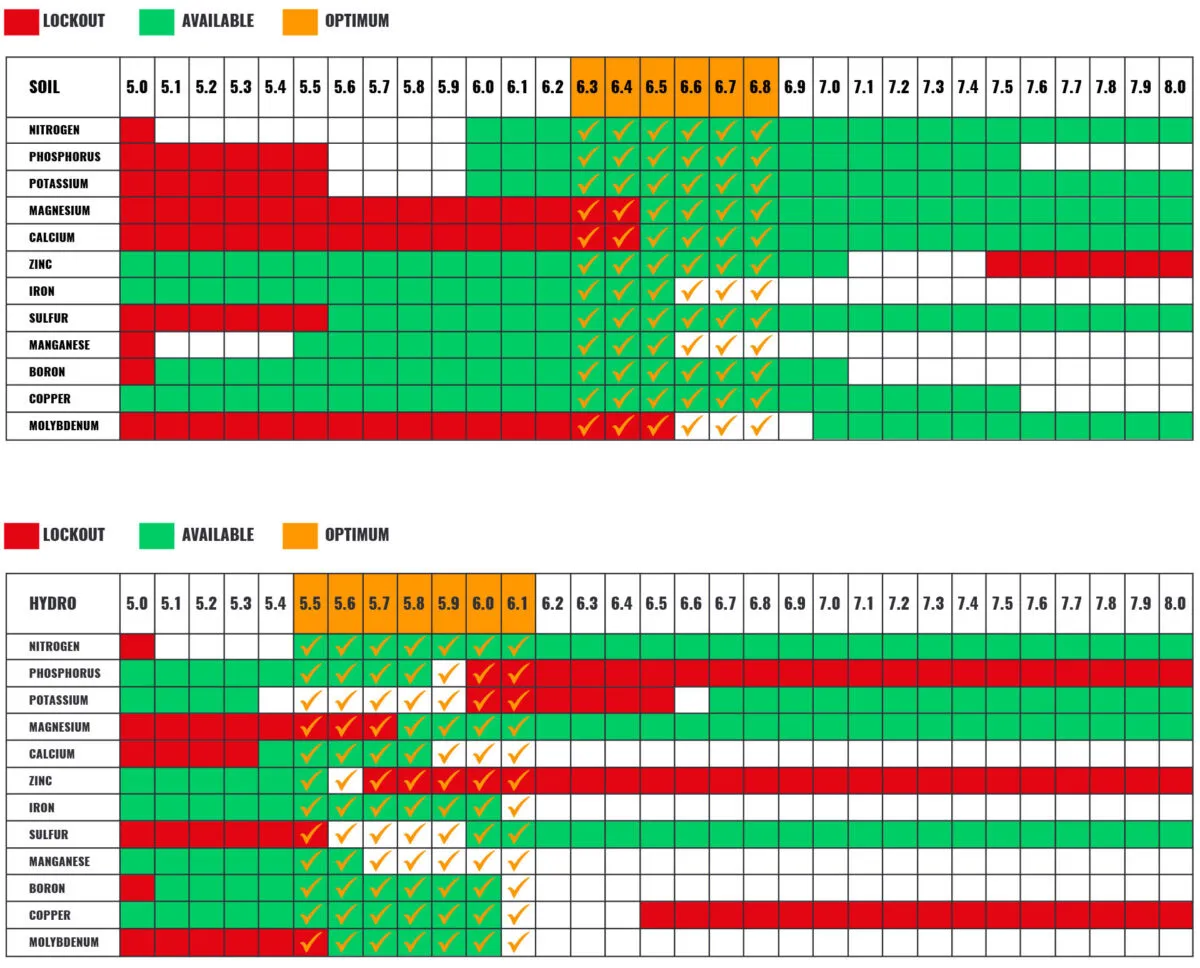
A soil pH of approximately 6.2–6.8 provides a useful starting range for nutrient availability, although suitable values depend on the growing medium.
Avoid adding nutrients simply because growth appears slow. Check existing soil nutrients, moisture and pH before adjusting your autoflower feeding schedule.
What Are the Best Types of Soil for Autoflowers?
Several soil types can support healthy autoflower growth. The main difference is how they supply nutrients and how much control you have over feeding.
| Soil type | Main advantage | Main limitation |
| Light potting soil | Greater control over feeding | May need additional nutrients |
| Organic potting soil | Contains organic nutrient sources | Nutrient levels vary |
| Super soil | Provides an extended nutrient reserve | Can be too rich for seedlings |
| Living soil | Supports biological nutrient cycling | Requires suitable conditions for soil organisms |
Light Potting Soil
Light potting soil is a practical choice for beginners because it usually contains fewer added nutrients than heavily amended mixes. Choose a product with an open texture and clear information about its nutrient content.
Organic Potting Soil
Organic potting soil contains ingredients such as compost and worm castings. These materials contribute organic matter and nutrients that become available through decomposition. Nutrient concentrations vary between products, so always inspect the ingredients.
Super Soil
Super soil is an enriched organic mix containing amendments such as worm castings, mineral sources and plant-based nutrients. It is designed to supply nutrients gradually, potentially reducing additional feeding. However, heavily amended mixes may be unsuitable for young seedlings.
Living Soil
Living soil supports communities of bacteria, fungi and other organisms involved in decomposing organic matter and cycling nutrients.
Unlike simply adding organic amendments, living-soil management focuses on maintaining the biological conditions that allow these processes to continue. Its specific requirements are covered in the dedicated living-soil section.

How to Make a Soil Mix for Autoflowers
Making your own soil mix for autoflowers allows you to control its texture, drainage and initial nutrient content. I recommend starting with a lightly amended potting mix and adding only the ingredients needed to improve its structure.
The aim is to prepare soil that supports early root development without introducing excessive nutrients. Before mixing anything, check what your chosen potting soil already contains.
Ingredients for an Autoflower Soil Mix
You don't need an expensive collection of amendments to prepare good soil for autoflowers. Each ingredient should have a specific purpose.
| Ingredient | Purpose | What to consider |
| Light potting mix | Provides the growing base | Choose a lightly amended product |
| Perlite or pumice | Improves drainage and aeration | May already be present in commercial mixes |
| Coco coir | Helps retain moisture | Use washed, buffered material |
| Worm castings | Supplies organic matter and nutrients | Avoid excessive quantities |
| Mature compost | Contributes organic matter and nutrients | Must be fully decomposed |
For beginners, I recommend keeping the recipe simple rather than adding several nutrient-rich amendments before you know how your soil performs.
How to Prepare Your Autoflower Soil Mix
The following example provides a practical starting point using 70% lightly amended potting soil, 20% perlite and 10% screened worm castings, measured by volume.
These proportions are adjustable and are not suitable for every commercial base mix.
Step 1: Prepare your base soil
Place seven parts lightly amended potting soil into a clean mixing container. Break apart compacted sections and remove large pieces of debris.
Step 2: Add the aeration material
Add two parts perlite and mix evenly throughout the soil. If your base already contains plenty of perlite, reduce the amount added.
Step 3: Incorporate organic matter
Mix in one part screened worm castings. If your starting soil already contains substantial nutrients, omit the castings to avoid making the mix unnecessarily rich.
Step 4: Check the moisture
Slowly add water while turning the mixture. Squeeze a handful of soil. It should hold together loosely without releasing excess water.
Step 5: Prepare your growing container
Fill a pot with drainage holes, leaving a small gap below the rim. Avoid pressing the soil down firmly, as this reduces air spaces.
Your choice of container also affects root development and moisture management. Our guide to choosing the best pot size for autoflowers explains the available options.
Once the soil is prepared, you can germinate your autoflower seeds and plant them directly into the growing medium.
Grower tip: I recommend preparing and checking your soil before planting. Adding amendments and correcting drainage becomes much harder once roots have established themselves.
What is the Best Living Soil for Autoflowers?
The best living soil for autoflowers is a mature, biologically active growing medium containing suitable organic matter, balanced nutrients and a healthy soil ecosystem.
Unlike a basic potting mix, living soil relies partly on microorganisms to break down organic materials and release nutrients over time.
How Living Soil Supports Autoflower Growth
Living soil contains bacteria, fungi and other organisms involved in nutrient cycling. As organic matter decomposes, nutrients become available for root uptake.
However, microbial activity depends on suitable moisture, temperature, oxygen and organic materials. Living soil does not automatically provide every nutrient an autoflower requires.
A study by Da Cunha Leme Filho et al. (2024) investigated organic biostimulants and soil microbial activity in outdoor cannabis. Plant responses varied between growing seasons, demonstrating that biological treatments do not consistently produce the same results. The research was not specific to autoflowers.
How to Choose and Manage Living Soil
When choosing living soil, I recommend checking whether the mix is fully prepared for planting or requires additional time for its amendments to decompose.
Follow these steps:
- Check soil maturity: Choose a finished mix without undecomposed, concentrated amendments that could affect young roots.
- Select an appropriate container: Allow sufficient soil volume for root development and moisture management.
- Maintain suitable moisture: Keep the medium from drying out completely, but avoid prolonged saturation that restricts oxygen.
- Monitor plant development: Observe new growth and leaf condition before deciding whether additional nutrients are needed.
Living soil can reduce the need for additional feeding, but its performance depends on nutrient availability and how well you maintain the growing medium.

What Soil is Best for Autoflower Seedlings?
The best soil for autoflower seedlings is a lightly amended, fine-textured potting mix that allows young roots to establish without excessive nutrient exposure.
I recommend starting seedlings directly in their final container to avoid disturbing developing roots during transplanting. Before planting, lightly moisten the soil around the planting area and check that water absorbs evenly.
During the first week, apply small amounts of water around the seedling rather than repeatedly saturating the entire container. As the root system expands, gradually increase the area you water.
Watch for new leaf development and steady growth. If a seedling stops developing, investigate moisture, temperature and root conditions before adding nutrients.
Research by Burgel et al. (2020) found differences in root development between cannabis plants grown in peat-based and coco-based substrates. Although the study did not examine autoflower seedlings specifically, it demonstrates that growing-medium composition can influence root growth.
Is the Best Soil Different for Indoor and Outdoor Autoflowers?
The same soil mix can support indoor and outdoor autoflowers, but I recommend adjusting how you manage it according to the environment.
| Growing factor | Indoor autoflowers | Outdoor autoflowers |
| Soil moisture | Grow lights and ventilation influence drying | Sunlight, wind and rainfall affect moisture |
| Container placement | Avoid standing water in collection trays | Raise containers where rainwater may accumulate |
| Temperature | Room conditions influence root-zone temperature | Direct sunlight can heat exposed containers |
| Watering frequency | Adjust according to container weight and drying | Check more frequently during hot or windy weather |
Indoors, I recommend checking how quickly containers dry under your existing lighting and ventilation. Outdoors, position containers where excess rainfall can escape and avoid leaving dark pots exposed to intense heat for extended periods.
Our guide to growing autoflowers outdoors covers additional considerations for managing changing weather conditions.
Common Autoflower Soil Problems and How to Avoid Them
Poor soil conditions can restrict root development and interfere with nutrient uptake. When you notice changes in plant growth, I recommend checking the growing medium before changing your feeding routine.
| Problem | Possible cause | What to do |
| Slow or stopped growth | Compacted soil or restricted root development | Check soil structure, moisture and drainage |
| Brown leaf tips | Excess nutrients or salt accumulation | Review soil amendments and feeding strength |
| Soil dries too quickly | Low moisture retention or rapid evaporation | Check container conditions and soil composition |
| Soil remains wet | Excess irrigation or restricted drainage | Check drainage holes and allow appropriate drying |
| Yellowing leaves | Nutrient imbalance, root stress or incorrect pH | Assess soil moisture, pH and new growth |
How to Identify and Correct Soil Problems
Start by examining how your plant responds to watering.
If leaves droop while the container remains heavy and wet, check drainage and allow the medium to dry appropriately before watering again.
If the soil dries unusually quickly, examine its texture and consider whether the container is exposed to excessive heat or airflow.
For slow development, inspect root-zone conditions first. Our guide to identifying and preventing stunted autoflowers explains other possible causes of restricted growth.
Avoid making several changes simultaneously. Correct the most likely problem, then monitor new growth to assess the plant's response.
Grower tip: I recommend lifting your container before and after watering to understand its changing weight. Over time, this helps you judge when the soil needs water without relying on a fixed watering schedule.

Conclusion
The best soil for autoflowers provides a balance of drainage, moisture retention and nutrient availability. Light potting mixes are a practical choice for beginners, while organic and living soils offer different approaches to nutrient management.
I recommend choosing soil based on its composition and your growing conditions rather than relying on product claims. A suitable mix gives your autoflowers a strong foundation for healthy development.
Frequently Asked Questions
Can You Reuse Soil After Growing Autoflowers?
Yes, provided the soil is free from pests and disease. Remove old roots, check its structure and assess nutrient levels before adding fresh amendments. Avoid reusing soil that has persistent contamination or serious root problems.
Is Garden Topsoil Suitable for Autoflowers?
Garden topsoil alone is generally unsuitable for containers because it can compact and restrict drainage. A prepared potting mix provides more predictable root conditions.
Should You Treat Soil Before Growing Autoflowers?
Commercial potting soil usually doesn't need treatment. Heating living soil can destroy beneficial microorganisms. If you suspect contamination, replace the affected medium rather than attempting to sterilize it.
How Can You Check Soil pH Accurately?
Use a calibrated pH meter with a soil slurry prepared according to a consistent testing method, or submit a sample for laboratory analysis. Runoff readings alone may not accurately represent the root-zone pH.
How Can You Tell if Commercial Soil Contains Too Many Nutrients?
Check the packaging for added nutrients, concentrated organic amendments or extended-release feeding claims. These indicate that additional nutrients may be unnecessary during early growth.
References
- Schober, T., Präger, A., Hartung, J., Hensmann, F., & Graeff-Hönninger, S. (2023). Growth dynamics and yield formation of Cannabis (Cannabis sativa) cultivated in differing growing media under semi-controlled greenhouse conditions. Industrial Crops and Products, 203, 117172.
- Da Cunha Leme Filho, J. F., Chim, B. K., Bermand, C., Diatta, A. A., & Thomason, W. E. (2024). Effect of organic biostimulants on cannabis productivity and soil microbial activity under outdoor conditions. Journal of Cannabis Research, 6, Article 16.
- Burgel, L., Hartung, J., & Graeff-Hönninger, S. (2020). Impact of Different Growing Substrates on Growth, Yield and Cannabinoid Content of Two Cannabis sativa L. Genotypes in a Pot Culture. Horticulturae, 6(4), 62.

