




Growing top-quality cannabis is a sweet science that combines genetics, light, carbon dioxide, temperature, and humidity. With autoflowers, getting the environment right from the start is especially important because their short lifecycle leaves less time to recover from prolonged stress.
The best temperature and humidity for autoflowers also change as the plant develops. Seedlings prefer warmer conditions and higher relative humidity (RH), while flowering autos benefit from lower humidity as their buds become larger and denser.
In this guide, I’ll explain the ideal temperature and humidity ranges for autoflowers during the seedling, vegetative, and flowering stages. I’ll also cover how to control your indoor environment, troubleshoot common temperature and humidity problems, manage seasonal changes, and use vapor pressure deficit (VPD) to better understand what your plants are experiencing.
Key takeaways
- Temperature and humidity should change throughout the autoflower lifecycle. Seedlings generally prefer higher RH, while flowering plants benefit from progressively drier conditions.
- Aim for stable ranges rather than one perfect number. Genetics, lighting, airflow, and leaf temperature can all influence the conditions your autos prefer.
- High humidity becomes increasingly risky during flowering. As buds become denser, excess moisture can increase the chance of mold and bud rot.
- Monitor both lights-on and lights-off conditions. Temperature often falls and RH rises after the lights switch off, creating environmental changes you may miss during daytime checks.
- Use temperature, RH, and VPD together. A digital hygrometer provides the essential readings, while VPD helps you understand how temperature and humidity are affecting transpiration and water loss.
Why are temperature and humidity important for autoflowers?
As an indoor grower, you can customize the environment and keep temperature and relative humidity (RH) within a suitable range. Autoflowers transpire water through their leaves, so temperature, humidity, watering, and airflow all influence how efficiently they move water and nutrients.
This is especially important when growing autoflower seeds because they have a short vegetative stage and limited time to recover from stress. Temperatures that stay too high or low can slow growth, while incorrect humidity can affect transpiration and increase the risk of problems during flowering.
- Cold conditions can slow growth and root development.
- Temperatures consistently above around 28°C (82°F) can increase heat stress.
- Severe temperature swings may stress plants and contribute to hermaphroditic expression in susceptible genetics.
- High humidity during flowering increases the risk of mold and mildew.
- Low humidity can cause plants and growing media to dry more quickly.
- Incorrect temperatures during germination can slow early development.
Grower tip: Whichever autoflower light schedule you use, monitor temperature and RH throughout both the lights-on and lights-off periods rather than relying on a single reading.
Best temperature and humidity for each autoflower stage
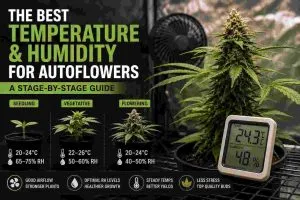
The ideal temperature and humidity for autoflowers change as plants develop. Seedlings prefer higher RH, while flowering plants benefit from progressively drier conditions as buds become denser.
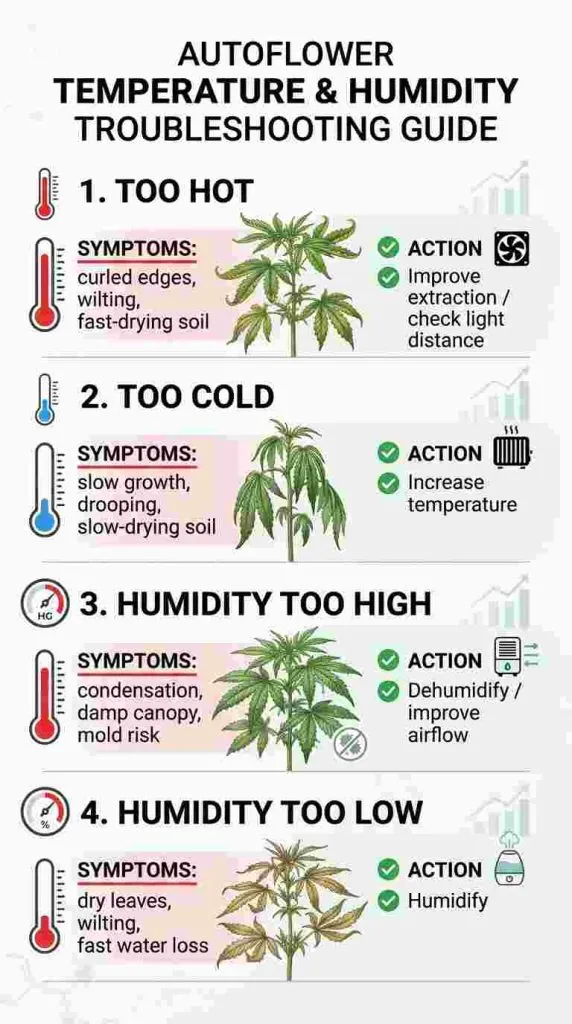
| Autoflower stage | Lights-on temperature | Lights-off temperature | Target RH |
| Seedling | 22–25°C (72–77°F) | 18–22°C (64–72°F) | 60–70% |
| Vegetative | 22–26°C (72–79°F) | 18–22°C (64–72°F) | 50–60% |
| Early flowering | 22–25°C (72–77°F) | 18–22°C (64–72°F) | 45–55% |
| Late flowering | 20–24°C (68–75°F) | 18–21°C (64–70°F) | 40–50% |
These ranges are practical starting points rather than fixed rules. Genetics, lighting, airflow, and leaf temperature can all influence the conditions your plants prefer.
The seedling stage: higher humidity for healthy early growth
The seedling stage generally covers the first two weeks after germinating autoflower seeds. During this time, autoflowers develop their first true leaves and establish the root system that will support later growth.
Seedlings don't need intense lighting or strong nutrients. I prefer temperatures of around 22–25°C (72–77°F) with the lights on, 18–22°C (64–72°F) with the lights off, and an RH of 60–70%.
Grower tip: Position your temperature and humidity sensor around seedling height so the reading reflects the conditions the plant is actually experiencing.
The vegetative stage: stable conditions for productive growth
Autoflowers have a short vegetative period before they automatically transition toward flowering, so healthy early growth is important.
During this stage, I gradually increase light intensity and nutrient strength while keeping RH around 50–60% and lights-on temperatures at 22–26°C (72–79°F).
This is also when I like to use low-stress training (LST) on autoflowers to open the canopy and improve light exposure without placing the plant under unnecessary stress.
The flowering stage: lower humidity to reduce mold risk
Many autos begin flowering around weeks 4–5, although how long autoflowers stay in the flowering stage varies by genetics. As buds develop and become denser, I gradually lower humidity to reduce excess moisture around the flowers.
Aim for around 45–55% RH during early flowering, reducing this toward 40–50% in late flower. Lights-on temperatures can generally stay around 20–25°C (68–77°F).
Once my autos develop dense flowers, I inspect the main colas regularly and maintain good airflow above, through, and underneath the canopy.
Grower tip: Dense buds can create humid pockets even when the overall grow-room RH looks fine, so check airflow inside the canopy as well as the room reading.
How do you control temperature and humidity indoors?
One of the biggest advantages of growing autoflowers indoors is having control over the environment. Instead of relying on outdoor conditions, you can use ventilation, humidifiers, dehumidifiers, fans, and environmental sensors to keep temperature and relative humidity (RH) within your target range.
I know growers who pull fresh air directly through a window and rely on their grow lights to provide enough heat. That can work when outdoor conditions are suitable, but a more controlled setup makes it easier to maintain consistent conditions throughout the year.
| Equipment | Main purpose | When it is most useful |
| Humidifier | Raises RH | Seedling and early vegetative growth |
| Dehumidifier | Lowers RH | Flowering and naturally humid conditions |
| Oscillating fan | Moves air around plants | Throughout the grow |
| Exhaust fan | Removes warm, humid air | Throughout the grow |
| Hygrometer | Measures temperature and RH | Throughout the grow |
| Environmental controller | Automatically adjusts connected equipment | Maintaining consistent conditions |
Humidifiers and dehumidifiers
A humidifier adds moisture when the air is too dry, while a dehumidifier removes excess moisture. I find small humidifiers particularly useful during the seedling and early vegetative stages when autos benefit from higher RH.
During flowering, a dehumidifier becomes more useful if humidity starts climbing above your target range. Dense flowers can trap moisture, so controlling RH becomes increasingly important as harvest approaches.
Place humidifiers and dehumidifiers where the moisture they produce or remove can circulate throughout the grow space rather than affecting one small area.
Grower tip: Check water reservoirs regularly. An empty humidifier or full dehumidifier can quickly allow RH to move outside your target range.
Using fans for consistent airflow
Good airflow helps distribute heat and humidity evenly around your autoflowers. Simply putting one fan in the tent isn't always enough, especially once the canopy becomes dense.
I prefer using two or three small oscillating fans positioned at different heights rather than relying on one powerful stationary fan. For example, I may place one around pot level, another across the middle of the plants, and one above the canopy.
The goal is to create gentle, consistent air movement around and through the plants without blasting leaves or buds from one direction.
A light breeze is also useful for seedlings and young autos, but avoid directing a strong fan straight at them.
Grower tip: Check underneath and inside the canopy. These areas can hold warmer, more humid air even when conditions above the plants appear ideal.
Monitoring tools: hygrometers, thermometers, and wireless sensors
One of the best habits you can develop as an indoor grower is monitoring the environment throughout the day and night. A digital hygrometer measures both temperature and RH, making it one of the most useful tools in any grow room.
I prefer placing the main sensor around canopy height because this gives a better picture of the conditions the leaves and flowers are experiencing. Wireless sensors are even more useful because they can record environmental changes over time and allow you to check the grow room from your phone.
Look at minimum and maximum readings as well as the current conditions. This can reveal temperature drops or humidity spikes that happen when the lights are off.
Grow tents and ventilation setups
A grow tent makes temperature and humidity easier to control, although how many autoflowers you grow in a tent can also affect airflow and humidity around the canopy. The exhaust system removes warm, humid air, while passive vents or an intake fan bring fresh air into the space.
Your exhaust fan should be sized according to its airflow rating, not simply the diameter of the fan. Tent volume, grow-light heat, carbon filters, duct length, and bends can all reduce how effectively a ventilation system moves air.
| Ventilation factor | Why it matters |
| Tent volume | Larger spaces require more airflow |
| Grow-light heat | More heat may require greater extraction |
| Carbon filter | Adds resistance and reduces effective airflow |
| Duct length and bends | Restrict airflow through the system |
| Intake airflow | Determines how efficiently fresh air enters |
| Outdoor conditions | Affect the temperature and RH of incoming air |
In most small grow tents, passive intake vents can work well when paired with an appropriately sized exhaust fan. Larger setups may benefit from an active intake fan.
I also prefer the exhaust system to move slightly more air than the intake. This creates negative pressure inside the tent and helps keep airflow moving in the intended direction.
Grower tip: Don't choose a ventilation system based on fan diameter alone. Check its airflow rating and allow extra capacity for the resistance created by filters and ducting.
Temperature and humidity issues you could encounter
Over the past 20 years of indoor growing, I have dealt with plenty of environmental problems, and temperature and humidity are among the most common. The key is spotting changes early and correcting the cause before your autoflowers lose valuable growing time.
Because several environmental problems can produce similar symptoms, I never diagnose a plant from one sign alone. Check your temperature and RH readings, growing medium, airflow, and light intensity before making changes.
What to do if temperature or humidity levels are wrong
If your grow room moves outside the ideal range, correct it gradually rather than making a drastic change all at once.
| Problem | What to do |
| Low humidity | Use a humidifier and position it where moving air can distribute moisture evenly |
| High humidity | Run a dehumidifier, increase extraction, and improve airflow through the canopy |
| High temperature | Improve exhaust ventilation, increase airflow, and check whether your autoflower lighting intensity is too high or the grow lights are too close to the canopy. |
| Low temperature | Use a thermostatically controlled heater and prevent excessive temperature drops during lights-off |
Grower tip: Check what happens when your lights switch off. RH often rises as temperature falls, so a grow room that looks perfect during the day can become too humid overnight.
Signs your autoflower may be under the wrong conditions
Heat, cold, low humidity, and excessive humidity can affect autoflowers in different ways, although many symptoms overlap with watering, nutrient, and lighting problems.
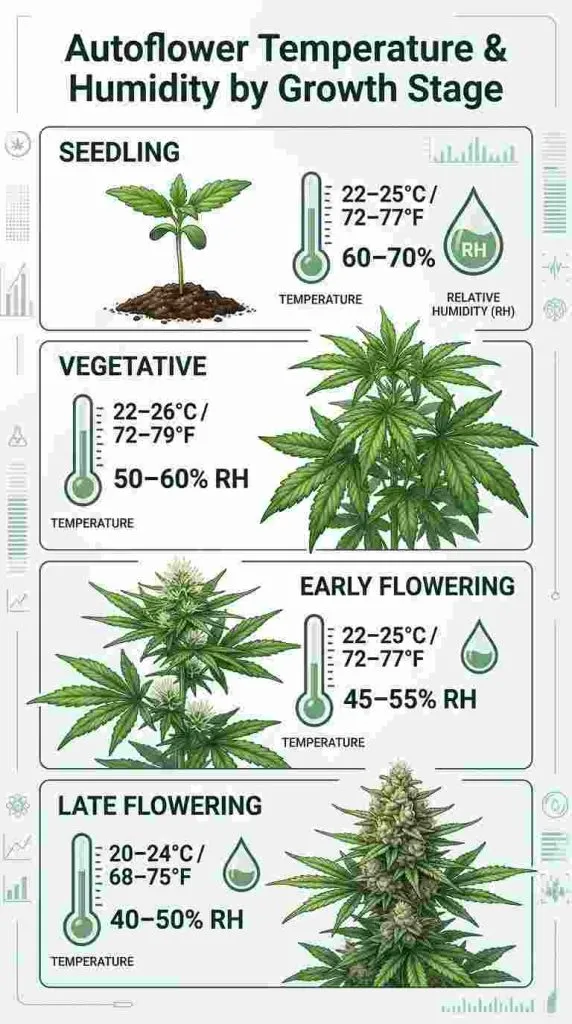
| Environmental issue | Common signs |
| High temperature | Upward-curled leaf edges, wilting, dry or crispy foliage, rapid drying of the growing medium, and possible foxtailing during flowering |
| Low temperature | Slower growth, sluggish root development, drooping leaves, slower drying of the growing medium, and sometimes red or purple stems and petioles |
| Low humidity | Faster water loss, curling or wilting leaves, dry foliage, and rapidly drying pots |
| High humidity | Condensation, moisture on leaves, slower transpiration, persistent dampness, and greater risk of mold during flowering |
Not every symptom proves that temperature or humidity is the cause. Red stems, leaf curl, drooping, or slow growth can also be linked to genetics, watering, nutrients, or light stress.
Grower tip: Use your hygrometer's minimum and maximum readings alongside what you see on the plant. That makes it much easier to connect symptoms with environmental changes.
How poor temperature and humidity control affect yield and quality
An unstable environment from seedling through harvest can make it harder to maximize autoflower yields and maintain flower quality. I have grown hundreds of cannabis plants, and there is nothing more frustrating than putting time, energy, and electricity into a crop only for poor environmental control to hold it back.
Temperature and humidity problems can:
- Slow vegetative growth and reduce the time an auto has to build size before flowering.
- Contribute to airy or poorly developed flowers when combined with prolonged heat stress.
- Reduce terpene retention when flowering temperatures stay excessively high.
- Increase the risk of bud rot, mold, and powdery mildew when humidity remains too high.
- Cause the growing medium to dry too quickly or stay wet for too long.
- Create conditions that favor certain pests; spider mites, for example, reproduce particularly quickly in hot, dry environments.
The goal is not to keep your grow room at one perfect number every minute. What matters most is maintaining a stable range and reacting quickly when conditions repeatedly move outside it.
Grower tip: Pay particular attention during late flowering. Dense buds hold moisture more easily, so good airflow and stable RH become increasingly important as harvest approaches.
Maintaining consistency during seasonal shifts
Most home growers don't have a fully climate-controlled facility, so outdoor weather can influence the baseline temperature and humidity inside the grow room. Winter can bring colder temperatures and higher RH, while summer can make indoor spaces difficult to cool.
The easiest way I have found to stay consistent throughout the year is to automate as much of the environment as possible. Temperature and humidity controllers can switch or adjust fans, heaters, humidifiers, and dehumidifiers when conditions move outside your target range.
| Seasonal problem | What can help |
| Hot summer temperatures | Stronger extraction, increased airflow, air conditioning, or cooler lights-off periods |
| High summer humidity | Dehumidifier and increased extraction |
| Cold winter temperatures | Thermostatically controlled heater |
| High RH during lights-off | Dehumidification and controlled ventilation |
| Large day/night swings | Environmental controller with separate lights-on and lights-off settings |
I particularly like variable-speed fan controllers because they automatically increase or reduce extraction as conditions change. More advanced controllers can also manage heating, cooling, and humidity from one system.
Grower tip: Check your environment whenever the seasons change. A ventilation setting that works perfectly in winter may struggle once summer temperatures arrive.
How are temperature and humidity linked to VPD?
Temperature and relative humidity work together to determine vapor pressure deficit (VPD), which tells you how strongly the surrounding air is pulling moisture from your autoflower's leaves.
A low VPD generally means the air has less drying power. This is often associated with higher humidity and can suit seedlings and young autos because they lose water more slowly. If VPD becomes too low later in the grow, however, transpiration can slow and excess moisture can increase the risk of mold and other pathogens.
A high VPD means the air has a stronger drying effect. Your autos may transpire faster and lose water more quickly. If conditions become too dry, the stomata can begin to close to conserve water, which can also restrict carbon dioxide uptake and slow photosynthesis.
| VPD condition | What happens to the plant | Possible signs |
| Too low | Transpiration slows | Persistent moisture, slower drying, increased mold risk |
| Suitable range | Water movement and transpiration remain balanced | Consistent growth and healthy foliage |
| Too high | Water loss increases | Wilting, curled or crispy leaves, faster drying |
This is why I don't look at RH or temperature in isolation. The same humidity reading can affect your plants differently depending on the temperature and leaf temperature inside the grow space.
Grower tip: Use VPD as another environmental guide rather than chasing one exact number. Watch how your autos respond alongside your temperature, RH, and watering data.
My top tips for temperature and humidity control
After years of growing indoors, three simple habits have made environmental control much easier for me.
Tip #1: Create airflow at different heights
I prefer several small oscillating fans to one large stationary fan in a grow tent. Position them at different heights so air moves underneath, through, and above the canopy without constantly blasting one part of the plant.
Tip #2: Automate your environment
Temperature and humidity controllers are a real game changer, especially when seasonal conditions change or you cannot be in the grow room all day. If possible, use a controller that can manage extraction, heating, cooling, and humidity automatically.
Tip #3: Check humidifiers and dehumidifiers daily
One mistake I have seen plenty of growers make is forgetting about the water reservoir. A humidifier that runs dry or a dehumidifier that fills up may stop working and allow RH to change quickly.
Grower tip: If your equipment doesn't have an automatic drain or water-level alert, make checking the reservoirs part of your daily grow-room routine.
Conclusion
In my experience, maintaining the right temperature and humidity for autoflowers is less about chasing one perfect number and more about keeping the environment stable throughout the grow.
Seedlings benefit from warmer, more humid conditions, while RH should gradually decrease as plants enter flowering and develop denser buds. A digital hygrometer, good airflow, and reliable ventilation make it much easier to spot changes before they become a problem.
Autos have a short lifecycle, so reacting quickly to excessive heat, cold, or humidity can help prevent unnecessary stress and keep plants growing productively from seedling to harvest.
Frequently Asked Questions
What is the best temperature and humidity for autoflowers?
For most autoflowers, aim for around 22–25°C (72–77°F) and 60–70% RH during the seedling stage, 22–26°C (72–79°F) and 50–60% RH during vegetative growth, and approximately 20–25°C (68–77°F) with 40–55% RH during flowering. Treat these as practical ranges rather than fixed rules, as genetics and growing conditions can influence the ideal environment.
What humidity should autoflowers have during flowering?
I generally aim for around 45–55% RH during early flowering, gradually lowering this toward 40–50% RH during late flower. Keeping humidity lower as buds become denser helps reduce moisture buildup and the risk of mold and bud rot.
What temperature is too hot for autoflowers?
Temperatures consistently above around 28°C (82°F) can increase the risk of heat stress, especially under intense grow lights. Signs can include curled leaf edges, wilting, rapid drying of the growing medium, and dry or crispy foliage. If temperatures remain high, improve extraction, airflow, or cooling and check the distance between the lights and canopy.
Is high or low humidity worse for autoflowers?
Both can cause problems, but the risk depends on the growth stage. Low humidity can increase water loss and cause young plants to dry out quickly, while high humidity becomes more concerning during flowering because dense buds can trap moisture and develop mold. This is why I gradually lower RH as my autos mature.
What VPD should autoflowers have?
There isn't one perfect VPD for every autoflower or growth stage. Young plants generally perform better at a lower VPD because they lose water more slowly, while established and flowering plants can tolerate a higher VPD. Instead of chasing an exact number, I use VPD alongside temperature, RH, leaf temperature, and the condition of the plants to judge whether the environment is balanced.


