Growing weed is easy, right? All you have to do is grab a few of the amazing MSNL seeds, a bag or two of dirt, water them every now and then, and bang - next stop, bud city. And sure, with a bit of luck and just the base level of cannabis cultivation knowledge, growing your very own crop of the dankest, stankiest sticky-icky is definitely possible.
But, at some point (probably pretty early on) in your ganga-growing journey, you are bound to run into an issue or two. And what is the most common problem faced by new growers? Nutrient burn, closely followed by overwatering.
Don't worry, it happens to the best of us, and the best way to really learn from your mistakes is to get out there and make them. In this guide, we'll walk you through exactly what nutrient burn is, how to identify it, and most importantly - how to fix it. By the end of this article, you will never need to worry about nutrient burn ever again!
Key Takeaways
- Too many nutrients results in over-fertilisation, which causes nutrient burn
- Nutrient burn will cause plants to produce stunted growth
- Root damage can be a result of overfeeding and nutrient burn
- Bud development can slow down, affecting yields to be lower
- Using an EC pen will allow you to precisely measure the PPM
- Nutrient lockout caused by a pH imbalance can lead to nutrient burn
- Flushing plants with pH-adjusted water helps remove excess nutrients
What is Nutrient Burn in cannabis?
All plants need nutrients to grow and develop during the different stages of their lifecycle.. However, giving your plants too many nutrients results in over-fertilisation, which causes nutrient burn, from overfeeding your plants, nothing more, nothing less.
It's easy to understand why nutrient burn is the most common issue faced by growers just starting out, especially those who dive straight into hydroponics. We all want the best for our favorite green buddies, but boosting up the nutrient levels isn't necessarily the right move and can do more harm than good!
When we 'overfeed' our plants, they don't put on weight - the opposite, in fact. Overfeeding can cause a range of issues, and the symptoms can moonlight as other problems, so it's vital to know how to spot and address nutrient burn.
How to differentiate nutrient burn from other plant issues
Nutrient burn can easily be mistaken for other plant issues. Below explains the symptoms of nutrient deficiencies, light burn and pests.
- Nutrient deficiencies, where the plant isn't receiving enough nutrients, can show similar symptoms, such as yellowing leaves and stunted growth. Check out our full guide to nutrient deficiencies to help with identification.
- Light burn, where the plant is exposed to too much light, can also cause yellowing leaves and burnt or bleached spots. Light burn will cause the upper leaves to bleach, whereas nutrient burn will usually affect the lower, older growth first.
- Pests, mold, and disease can also cause similar symptoms, so it's important to understand exactly what nutrient burn is and how to identify it accurately. We have a whole blog series covering these issues to help you diagnose and address them.
So, how do you accurately identify nutrient burn? You have to know what to look for - let's take a closer look at the tell-tale signs. Below are the visual symptoms to look out for in the event of over feeding your crop.
Symptoms of Nutrient Burn in cannabis plants
If you are a first time or beginner level grower, you probably don’t know what the symptoms of nutrient burn are, and may not even be aware you have an issue. Have a look at the visual signs covered below to get an insight on nutrient burn.
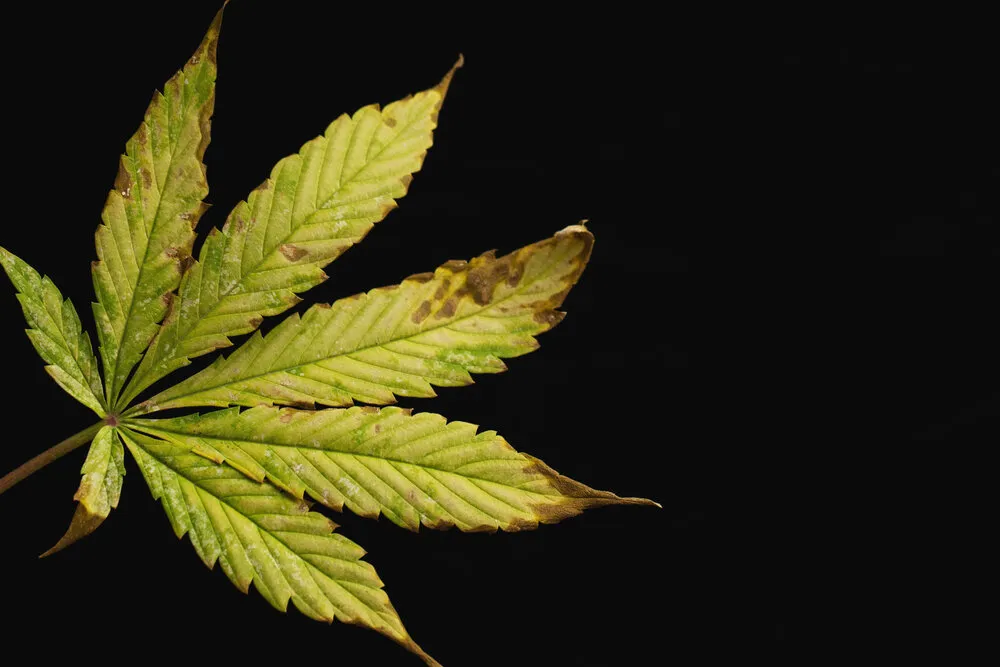
Visual signs of nutrient burn in the leaves (and sometimes buds)
- The very first noticeable change, which most new growers confuse with a sign of a healthy, happy plant, is overly deep-green fan leaves. At first glance, this might seem like a good sign - after all, who doesn't want their plants to be lush and green? But in reality, an overly dark green color is a sign of nutrient overload.
- Within a few days, these darker green leaf tips will begin to take on a slightly burnt, crispy appearance around the edges of the leaflets.
- As nutrient burn progresses, the yellowing will become more obvious, spreading from the tips of the leaves towards the center.
- The leaves will start to warp, usually upward and inwards, and may even have a claw-like appearance.
- You may even see burnt or discolored 'rust' spots on the affected leaves, as the excess nutrients can also damage the plant's cells and cause tissue death.
- If your plants have begun flowering, the same can happen to the buds. Those initially fluffy, bright green buds can become dark and crispy, and the growth slows to a snail's pace.
How nutrient burn affects the overall plant health
An excess of nutrients can quickly lead to a downward spiral of health issues. Below explains the negative ripple effect over feeding your plants can have.
- Stunted growth - the overabundance of certain nutrients can actually block the plant's ability to absorb the stuff they need. This is called 'Nutrient Lockout.
- Root damage - overfeeding can also cause harm to the delicate root system, which is hard to spot but can have long-lasting effects on the plant's health.
- Lowered yield - as mentioned, nutrient burn can also slow down bud growth exponentially, and kill the plant if not addressed promptly.
Early-stage vs. late-stage symptoms
The usual progression goes like this:
- Lower, older fan leaves become a much darker shade of green.
- The tips and edges of these leaves will turn yellow, then brown and dry out.
- The yellowing and browning moves from the leaf tip and edges towards the center, affecting more and more of the leaf as it progresses. 'Rust' spots can also appear.
- The leaf tips will then bend at weird angles, sometimes all the way to 90°.
- The entire leaf can start to warp inwards, becoming twisted and gnarled.
- The stems may change color towards the red/purple side of the spectrum.
- Sugar leaves and the buds themselves will yellow, crisp up, and then start to die-back.
Causes of Nutrient Burn in cannabis
Overfeeding and improper nutrient ratios
It isn’t known as the main beginner mistake for nothing, and it doesn't just come down to the quantity of nutrients you feed your plants, although too much is the primary cause. The nutrient ratio is also crucial, as different growth stages require varying proportions of N-P-K (nitrogen, phosphorus, and potassium) and other essential micronutrients.
It is recommended to follow the manufacturer's feeding guidelines printed on the bottle’s label, or available on their website. You can also use an EC (electric conductivity) pen to see the concentration of your nutrient solution in PPM (parts per million). This is the most accurate method of ensuring you are feeding the correct and recommended EC levels during the seedling, vegetation and flowering stages.
Actionable Tip: Follow feeding charts and avoid exceeding recommended nutrient levels
Impact of different growing mediums (soil, hydroponics, etc.)
Soil-grown plants are much less likely to suffer from nutrient burn than those in hydro systems, as soil acts as a buffer and is generally more forgiving when it comes to feeding, however being over zealous with liquid nutrients and boosters during the flowering period can cause problems to quickly arise.
The microbes in the soil are continually breaking down dead organic matter and converting it into nutrients the plants can use. It's a slow process, but it works because (AND THIS IS A MASSIVE OVERSIMPLIFICATION) these microbes only make available what the plant needs at any given time. They don't store or 'pump' excess nutrients into the plants.
Growers using pure hydroponics or coco-coir will use synthetic nutrients. This makes it much easier to overfeed and is why soil is a more forgiving grow medium for beginners. It is crucial to have the correct balance of EC and pH when using hydroponic systems to allow nutrient uptake and availability to be optimal.
How pH imbalance can lead to nutrient burn
The importance of monitoring and adjusting the pH of your nutrient solution (or just water) cannot be overstated. Different nutrients are absorbed at different pH levels, and if the pH is too high or too low, the plant will struggle to take in the nutrients it needs, leading to deficiency or excess.
Always check the pH of your nutrient solution AFTER adding the nutrients in. They will invariably alter the pH, and it's essential to get it in the right range for your plant's stage of growth.
- Soil grown plants prefer a pH level between 6.0 to 7.0
- Hydro/coco plants prefer a pH level between 5.5 to 6.5.
The role of water quality and frequency in nutrient uptake
The plants need water to transport those nutrients from the growing medium, through the roots, and up into the plant itself. The plants need regular access to good quality water, but not too often, otherwise, you'll run into the other main beginner issue - overwatering.
If you are hand watering, it's best to do so every day or two, but you can let the plants be your guide. It's fine (actually better than fine) to let the soil dry out between watering. A great way to determine if your plants need watering is to lift the pot off the ground and feel how light or heavy it is. You can also insert your little finger down the side of the pot to see if the soil is dry and dusty or wet and soggy.
If you have an automatic watering system with soil, it's important to dial in the frequency and check regularly that the plants are getting enough water without being over-saturated.
If you are using tap water, a good practice to get into is to leave the water out in a bucket for a day or two before using it. This will give the chlorine a chance to evaporate.
How to fix Nutrient Burn in cannabis plants
So you notice that the tips of the fan leaves have become yellow and dry, and need to act fast. Below are the different ways to fix and solve nutrient burn.
Flushing the growing medium to remove excess nutrients
If you suspect nutrient burn, the first thing to do is flush. Flushing is easy, just make sure the water is at the correct pH. To flush, you simply flood water the growing medium with plain, pH-adjusted water until it runs freely out of the bottom. Check out our how to flush cannabis plants properly guide if you are unsure.
Ideally, you want to see the water's pH come out close to what you put in. If it's way off, then run more water through until it stabilizes. The more water that passes through the pot, the lower the salt count will be.
Once you notice your plants are growing back to full health, it is best to slowly increase the nutrients to avoid potentially burning the plants again.
Actionable Tip: Flush with pH-balanced water to remove excess nutrients
Adjusting nutrient levels to a proper balance
Soil growers can just continue with plain pH adjusted water, and let the microbes replenish the nutrients at their own pace. Hydro and coco coir growers will need to re-introduce nutrients but be sure to start with a lower dose and work your way back up. Keep an eye on the plant for any signs of nutrient burn and adjust accordingly. Using a digital EC pen will be the best method of providing the perfect nutrient levels.
Monitoring and adjusting pH levels
I mentioned above that soil growers don't need to worry about pH as much, but if you have run into nutrient burn, it's a good idea to check the pH regardless. Make sure it's in the correct range for your plant and adjust accordingly. Buy yourself a pH pen and always check the pH of the nutrient solution, run off solution and keep within the optimal pH range for soil or hydro.
Preventing Nutrient Burn in future grows
Prevention is key, no matter if you are dealing with nutrient burn, pests, or any other issue in your grow. Some tips to help prevent nutrient burn include:
Actionable Tip: Always start feeding at lower strength and increase gradually
Using a nutrient schedule and feeding charts
Nutrient schedules should be used as a guide to how much of each nutrient to give your plants, and for which stage of their lifecycle. Never feed more than the recommended ml/L dosage, and in some cases less is more. Some strains are more tolerant to higher EC levels than others, so you will need to do some trial and error, but always use the feeding chart / dosage recommendations as a guide.
Regular monitoring and adjustment of pH and nutrient levels
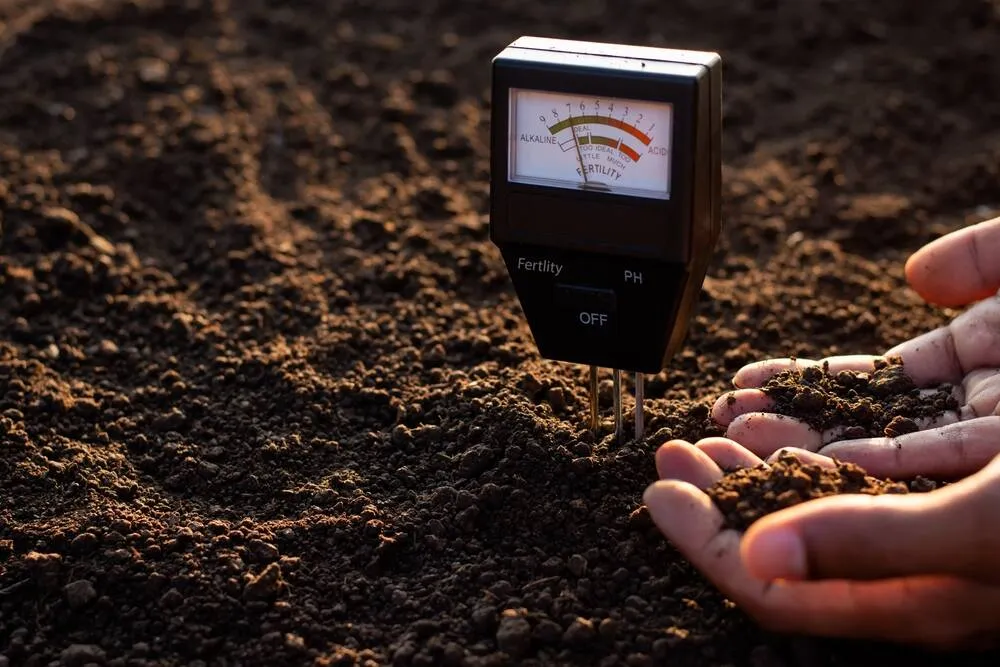
If you are using synthetic bottled nutrients, as soon as you have finished reading this guide, go and buy a digital pH pen,so you know what the pH is and a TDS or EC meter, so you know how much nutrients are in your water.
Without these, you are setting yourself up for failure, and essentially working blind, and second guessing what your EC and pH levels are is a bad habit many beginner growers develop.
Recovery time and what to expect after fixing Nutrient Burn
So you have flushed your plants and pumped the brakes on how much nutrients you were giving them, the next question is how long do plants take to recover from nutrient burn? Well, below is an explanation.
How long does it take for a cannabis plant to recover?
That depends on how bad the nute burn was to begin with. If it is mild, five to ten days is usually enough for the plant to bounce back. If it is severe, recovery time can be up to twenty days.
What to do if the plant doesn’t recover?
If you don't see any improvement after twenty days or so, it's possible that the plant has suffered irreversible damage and may not recover. In this case, it's time to potentially cut your losses and start fresh.
How to promote new growth after nutrient burn?
There's no magic trick to promoting new growth after nutrient burn. Just make sure the plant is getting enough water and light, and the correct balance of nutrients. It may also help to give the plant a break from any added nutrients for a few days but be sure to monitor the plant closely during this time.
What causes nutrient burn in cannabis plants?
Nutrient burn is caused by overfeeding your plants with too many nutrients, particularly when using concentrated liquid fertilisers. This leads to a buildup of salts in the growing medium, which damages the roots and prevents proper nutrient uptake. Poor feeding practices, incorrect nutrient ratios, and lack of flushing can all contribute to the issue.
What are the first signs of nutrient burn?
The earliest signs are overly dark green leaves followed by yellow or brown “burnt” tips on the edges of leaves. As the problem progresses, the tips become dry and crispy, and the damage spreads inward. Leaves may also begin to curl or claw, indicating the plant is under stress.
Can nutrient burn kill a cannabis plant?
Yes, in severe cases nutrient burn can kill a plant. Excess nutrients can damage the root system, leading to nutrient lockout, stunted growth, and eventually plant death if not corrected. However, mild to moderate cases are usually reversible if addressed quickly.
How do you fix nutrient burn quickly?
The fastest way to fix nutrient burn is to flush the growing medium with pH-balanced water to remove excess salts. After flushing, allow the plant to recover for a few days before reintroducing nutrients at a reduced strength. Monitoring pH and EC levels during recovery is essential to prevent further issues.
How long does it take for plants to recover from nutrient burn?
Recovery time depends on severity. Mild cases may recover within 5–10 days, while more severe cases can take up to 2–3 weeks. New growth is the best indicator of recovery, as damaged leaves will not return to their original healthy state.
Can nutrient burn be confused with other problems?
Yes, nutrient burn can easily be mistaken for nutrient deficiencies, light burn, or pest damage because many symptoms overlap. The key difference is that nutrient burn typically starts at the leaf tips and edges, whereas deficiencies often affect leaf colour patterns or specific areas of the plant.
How can I prevent nutrient burn in future grows?
To prevent nutrient burn, always follow feeding schedules carefully and start with lower nutrient concentrations, especially for young plants. Regularly monitor pH and EC levels, avoid overfeeding, and flush the growing medium periodically to prevent salt buildup.

