There is a lot to learn if you want to master growing cannabis and as a beginner it can seem like a daunting task. But before you head off to your local dispensary, have a read of our beginner’s guide to growing weed as it is much easier than you think to grow high-grade weed at home!
At MSNL, our bread and butter is growing cannabis, so where better to learn about the craft than from the experts themselves. We will walk you through the process of growing weed, from the very starting point of germinating your cannabis seeds right the way, and walk you through every step including harvesting and drying your bud.
Along the way you'll learn how to choose the right seeds, germinate them successfully, master each stage of growth, and finally, harvest your flower. From this point on, you will never need to worry about growing medium-quality buds and will be able to produce cup-winning nugs every harvest.
Key Takeaways
- Cannabis plant’s lifecycle consits of the seedling, vegetative and flowering stage
- The two ways to grow cannabis is by using soil or hydroponics
- Seedling stage temperature and humidity levels = 68 - 77° F and 65 - 70%
- Vegetative stage temperature and humidity levels = 71 - 82° F and 60- 70%
- Early Flowering Stage Temperature and Humidity = 68 - 78° F 450 - 50%
- Late flowering stage Temperature and humidity = 65 - 75° F and 40 - 45%
- Cannabis plants require primary nutrients (NPK) secondary and trace elements
- A magnification tool should be used to inspect trichomes before harvesting
- Cannabis plants should dry over a 10-21 day period at 60F and 60% humidity

- Key Takeaways
- What Medium Is Best For Growing Weed?
- What Is The Easiest Way To Germinate Cannabis Seeds?
- How To Grow Weed During The Seedling Stage
- How To Grow Weed During The Vegetative Stage
- How To Grow Weed During The Flowering Stage
- How To Harvest Your Weed
- Which Cannabis Seeds Should You Use?
- What Is The Ideal Climate For Cannabis Plants?
- Cannabis Grow Lights
- What Nutrients Does A Cannabis Plant Need?
- Conclusion
What Medium Is Best For Growing Weed?
Choosing the right growing medium is a good starting point and plays a major role in the development of your seedlings and plants. A medium includes soil, coco coir, inert hydroponic mediums such as hydroton or rockwool and anything you choose to grow your cannabis plant in. The growing medium acts as the home for the roots and root health is paramount if you want to grow big, healthy marijuana plants.
Soil: This is the most natural, chemical free and beginner-friendly medium. It's rich in nutrients and beneficial microorganisms and helpful bacteria, and provides a forgiving environment if you make a mistake with watering or feeding. Organic potting soil, mixed with perlite for better drainage, is usually an excellent choice, and prevents the seedling becoming over fertilized.
Hydroponics: This method involves growing plants inside an inert medium that contains no nutrients.. The roots are effectively dangling in a reservoir of water and nutrients with systems like deep water culture (DWC), nutrient film technique (NFT) and aeroponics. Cannabis plants grown in rockwool cubes typically sit on a table such as flood and drain tables, NFT tables, and dripper systems.
The result is that nutrients are delivered directly to the plant roots, instead of them searching for it causing faster growth and bigger yields. However, it requires more equipment and expertise and you should always test the pH and EC of your nutrient solution using tools such as a TDS meter or digital EC and pH pen.
Coco Coir: Made from the husk of coconuts, coco coir is a sustainable and pH neutral medium. It retains water well, and is extremely oxygen-rich allowing roots to access moisture and nutrients easily. It's a popular choice for both soil-based and hydroponic systems.
Aeroponics: In this advanced method, plants are grown and the roots are suspended inside a chamber.. Nutrients are sprayed directly onto the roots, usually on a 15 mins on and 15-minute off regime, which can lead to rapid growth.
However, it's not beginner-friendly and needs precise control over the environment, but if you want fast growth and explosive yields, then you may want to consider aeroponics in the near future.
Each medium has its own pros and cons, so your choice will depend on your skill level, budget, and the resources you have available.
What Is The Easiest Way To Germinate Cannabis Seeds?
Plant Age: 0 - 1 weeks
Seedling Stage Temperature: 70 - 75° F
Seedling Stage Humidity: 70% - 80%
The paper towel method is widely recognized as one of the easiest and most effective methods to germinate cannabis seeds. Here's a step-by-step guide:
Step 1: Prepare your supplies. You'll need two clean plates, paper towels, and of course, your cannabis seeds.
Step 2: Place 3-4 layers of paper towels on one of the plates. These will serve as a bed for your seeds.
Step 3: Moisten the paper towels with soft tap water or bottled water. They should be damp but not soaking wet. Too much water can drown the seeds.
Step 4: Place your seeds on the damp paper towel, leaving 1-2cm space between each seed to prevent them from touching and potentially tangling roots with each other.
Step 5: Cover the seeds with another sheet of damp paper towel. The top layer of tissue should be gently placed on top of the seeds, allowing them to have as much air as possible between the two layers.
Step 6: Place the second plate upside-down over the first one, creating a dome-like environment for your seeds. This will help maintain the necessary humidity and temperature.
Step 7: Store the plates in a warm, dark place. Ideal temperatures are around 21 to 24 degrees Celsius (70 to 75 degrees Fahrenheit).
Step 8: Check your seeds daily. Make sure the paper towels remain moist and add more water if necessary. Within 36 to 72 hours, you should see the seeds starting to sprout or "pop".
This method is popular because it allows you to monitor the seeds closely and make sure that they have popped before planting them. However, once your seeds have sprouted, handle them with extreme care and always use tweezers as you transfer them into the growing medium. This is one of the most common stages you can damage your plants, so be delicate during the transplanting stage.
How To Grow Weed During The Seedling Stage
Plant Age: 1 - 2 weeks
Seedling Stage Temperature: 68 - 77° F
Seedling Stage Humidity: 65 - 70%
After successfully germinating your cannabis seeds, the next stage is the seedling phase. During this stage your seed emerges from the growing medium and produces its first set of tiny leaves known as cotyledons.
The first set of leaves that a cannabis plant produces are round with smooth edges; these are just the starter set to give the plant enough energy to grow and gain strength. Here's how to care for your weed during the seedling stage:
Step 1: Transferring the Seedlings
Handle the sprouted seeds with utmost care when transferring them to their growing medium using tweezers. The taproot (the little white pointy root that comes out of your germinated seeds) is extremely delicate at this stage and can easily be damaged.
Step 2: Choosing the Right Growing Medium
You can choose from soil, coco coir, or a hydroponic setup. Each has its advantages and disadvantages. For beginners, soil is usually recommended due to its forgiving nature.
Step 3: Providing Light
Seedlings need plenty of light to grow but not too much!. However, they are also sensitive to heat. Keep CFL or LED lights about 12-18 inches above the seedlings to prevent burning them. If you're using fluorescent lights, they can be placed closer (about 3-4 inches away) because they don't emit much heat.
Step 4: Watering Your Seedlings
Overwatering is a common mistake among inexperienced growers. Seedlings don't need a lot of water. Wait until the soil is almost dry before watering again. Lift the pot up and if it feels light weight to determine how dry the plants are becoming. Overwatering can cause the leaves to droop and may lead to root rot.
Step 5: Monitoring Temperature and Humidity
Cannabis seedlings prefer a temperature around 20-25 degrees Celsius (68-77 degrees Fahrenheit) and a relative humidity of 60-70%. A digital hygrometer can help you maintain these conditions.
Step 6: Feeding Your Seedlings
Seedlings do not require additional nutrients if planted in nutrient-rich soil. If you're growing in a soilless medium, start feeding a weak nutrient solution (about 1/4 the recommended strength) once the seedlings have developed their first sets of leaves. Seedlings growing in soil can be given pH adjusted water and will be fine.
Step 7: Checking for Problems
Keep an eye out for common cannabis seedling problems like nutrient burn, overwatering, and pests. Early detection and correction can save your crop.
Remember, patience is key during the seedling stage. It might seem like your plants are growing very slowly, but they are establishing a robust root system underground. Once this foundation is set, your cannabis plants will start to grow rapidly.
Actionable Tip: Avoid overwatering, keep lights gentle, and maintain warm, humid conditions so seedlings can establish healthy roots.

How To Grow Weed During The Vegetative Stage
Plant Age: 2 - 7 weeks
Vegetative Stage Temperature: 71 - 82° F
Vegetative Stage Humidity: 60- 70%
Once your seedlings have developed 3-4 sets of serrated edged leaves it has transitioned into the vegetative stage. The vegetative stage is a key period in your cannabis plant's life cycle, and when your plants will focus on growing side branches, leaves and developing the roots.
This is when your plant focuses on growing bigger and taller, establishing a strong root system, and developing full, healthy leaves. It is during the veg stage that you will be laying the foundations in preparation for a successful flowering stage. Here's how to grow weed during the vegetative stage:
Light Cycles
During the vegetative stage, cannabis plants need plenty of light to fuel their growth. If you are growing feminized photoperiod plants indoors you will need to set your grow lights to an 18/6 schedule (18 hours of light, followed by 6 hours of darkness) to replicate summertime.
The vegetative stage for ordinary photoperiod cannabis plants lasts as long as you want. It should be determined by how big or small you want the plants to be, and taking into consideration any plant training techniques.
When growing indoors you are in control of switching to the flowering stage by simply adjusting the timer to 12/12, however, most growers keep their plants in veg for 5-6 weeks before inducing flower production.
If you are growing autoflowering cannabis seeds you can keep them on either 18/6, 20/4 or even 24 hours light and no dark. The main difference when growing autoflowering plants is that you do not need to change the lighting schedule to trigger the flowering stage. The autoflowering veg stage lasts for 4 weeks, so any plant training such as LST and defoliation should be performed during this stage.
What Happens During the Vegetative Stage
During the vegetative stage, plants will develop nodes and internodes, as well as side branches and axillary shoots. Creating a bushy and robust growth structure needed for producing a top quality harvest.
The focus during the vegetative phase is on strengthening the stem and side branches of your cannabis plants, so that they are strong enough to take the weight of the buds come the flowering phase.
You can manipulate your plant's growth structure with LST or HST training methods, encouraging better light distribution and faster growth. Your plants will develop strong branches and large fan leaves to capture as much light as possible. It's during this time that the plant prepares itself for the flowering stage, where it will start producing buds.
Nutrient Needs
In the vegetative stage, your cannabis plants will require higher levels of nitrogen, along with adequate amounts of phosphorus and potassium. A typical NPK ratio for the veg stage is 3:1:1. They'll also need secondary and micronutrients such as calcium, magnesium, iron,zinc, manganese, boron, copper and molybdenum There are many pre-formulated nutrient mixes available that cater specifically to the needs of cannabis during this stage.
What to Look Out for
Watch out for signs of nutrient deficiencies or overfeeding, such as yellowing leaves or burnt leaf tips. Pests can also become a problem, so keep an eye out for discolored spots, holes in leaves, or the pests themselves. Check your plants regularly for signs of mould, mildew, or other diseases, and be prepared to resolve the issue as fast as possible.
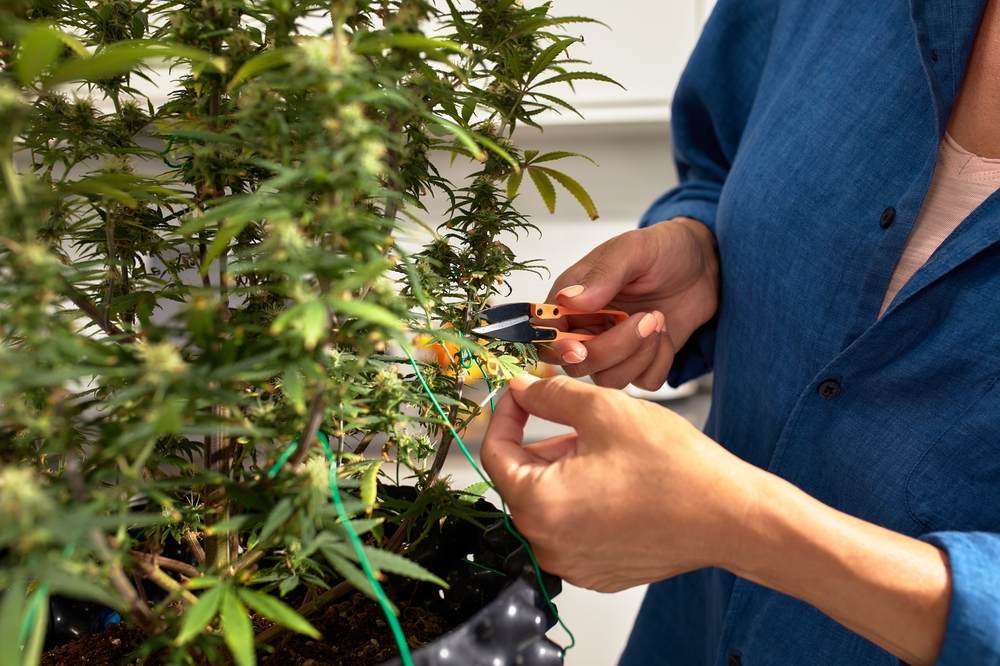
Low Stress Training (LST)
Low Stress Training is a technique used to maximize the plant's exposure to light and increase yield. By gently bending and tying down branches, you can create a flatter and wider canopy, allowing light to reach all parts of the plant. This method can help improve your yield without requiring additional resources.
Remember, the vegetative stage is all about setting your plants up for a successful flowering phase. By providing the right conditions and allowing your plant to grow big and strong you will give yourself the best possible chance of producing a nice big healthy harvest. All plant training should be performed during the vegetative stage to reduce stress levels.
Actionable Tip: Use the vegetative stage to build plant size, train branches, and provide nitrogen-rich nutrients before flowering begins.
How To Grow Weed During The Flowering Stage
Plant Age: 7 - 15 weeks
Early - Mid Flowering Stage Temperature: 68 - 78° F
Early - Mid Veg Flowering Stage Humidity: 45 - 50%
Plant Age: 15 - 17 weeks
Late Flowering Stage Temperature: 65 - 75° F
Late Flowering Stage Humidity: 40 - 45%
The flowering stage is the final phase of a cannabis plant's life cycle, and easily the most exciting part of being an indoor grower! This is when your efforts will pay dividends as your plants start to develop buds.
The aim of the flowering stage for you as a grower is to keep your plants happy, avoid any stress and provide them with the right nutrients to grow big, dense and frosted buds. The more flowers your plant produces the bigger your yields will be!
Light Cycles
During the flowering stage, if you are growing ordinary feminized seeds your light schedule should change to 12 hours of light and 12 hours of uninterrupted darkness. This mimics the natural light cycle of fall, signalling to the plant that it's time to start producing flowers. Maintaining strict light cycles is crucial; any light leaks during the dark period can confuse the plant and potentially cause issues like hermaphroditism.
If you are growing autoflowers you do not need to worry about changing the light cycles, your autoflower plants should flower of their own accord at around 3-5 weeks of vegetative growth.
What Happens During the Flowering Stage
The flowering stage can be divided into two phases: pre-flowering (first 3-4 weeks) and full flowering (Week 4 onwards). In pre-flowering, you'll notice your plants starting to develop small bud sites and show their sex. Female plants produce little wispy white hairs known as pistils and will appear at the nodes of the plant.
Whereas male plants produce pollen sacs that you’ll want to avoid. If you are growing regular seeds, it is really important that you learn the skill of spotting the early signs of male sex so that you can either separate any male plants or cull them from your crop.
Once full flowering sets in from week 4 onwards, the plant focuses all its energy on producing and fattening up buds. The pistils will darken, and the buds will become coated with sticky, resinous crystals called trichomes, which contain the plant's cannabinoids.
Nutrient Needs
In terms of nutrients, cannabis plants require less nitrogen but more phosphorus and potassium during the flowering stage. Phosphorus is essential for bud development, while potassium helps with the overall health and vigor of the plant.
Many cannabis-specific nutrient lines have a different mix specifically designed for the flowering stage. An example of a good NPK ratio to give your plants during the flowering stage is a 2-5-6 for early – mid flowering phase and then moving to a 2:9:10 ratio during the late flowering stage.
What to Look Out For
You should watch out for common problems such as nutrient burn, pests, and diseases. Bud rot, a type of mould, can be particularly devastating in the flowering stage, which is caused by poor air circulation and high humidity levels. Regularly inspect your plant, paying close attention to the buds.
Also, keep an eye on your plant's trichomes. These tiny, glass looking mushroom-like structures will turn from clear to a milky white as the plant matures. When they're mostly milky with some amber, it's usually the optimal time to harvest for maximum potency. Trichomes will grow on the buds and also the smallest leaves surrounding the buds.
Actionable Tip: Keep flowering plants stress-free, maintain strict light control, and shift nutrients towards phosphorus and potassium for bud growth.
How To Harvest Your Weed
Harvesting your cannabis plant is the final stage of growing weed but the period when most eager first-time growers rush and make mistakes. Getting the harvest stage right will massively influence the quality of your weed. The harvest stage can be broken down into 3 phases, cutting down your plants and trimming them, drying your buds and curing them. Here's how to do it right:
How Do You Know When the Buds Are Ripe?
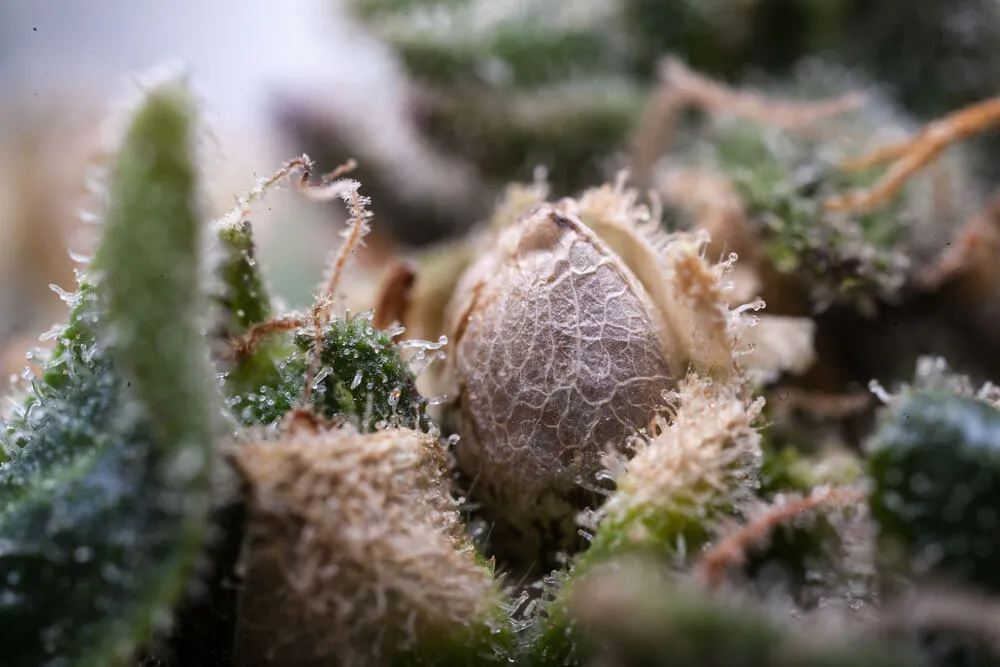
Knowing when to harvest and actually give your plants the chop is an important skill because it affects the potency and flavour of your buds. The most accurate way to tell if your buds are ripe is by looking at the trichomes those small, crystal-like structures coating the buds and smaller leaves
Use a magnification tool to inspect the trichomes. They'll begin to turn from clear to milky white as the plant matures from week 5 onwards of the flowering period.. When most of the trichomes have turned milky and a few are amber-colored, it's usually the best time to harvest for maximum potency.
Apart from trichomes, you can also look at the pistils (the hair-like structures on the buds). When about 800% of the pistils have darkened and curled in, it's another sign that your plant might be ready for harvesting shortly.
How swollen the tear shaped bracts that make up the buds have become, will also be a guide to how close you are to harvesting. Cannabis buds tend to fatten up and stack together during the final 3 weeks.
Cutting Them Down and Drying
Drying Stage Temperature: 60 ° F
Drying Stage Humidity: 55 - 60%
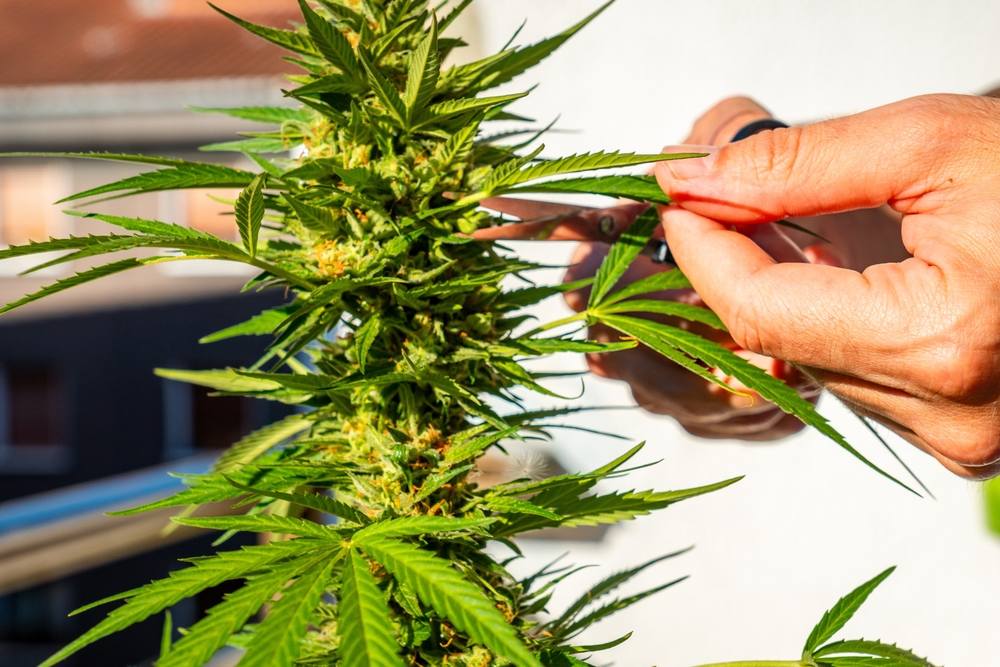
When your plants are ready, cut down the branches one by one using clean, sharp scissors. You may need to use gardening shears if the main stem or side branches are too thick for scissors.
Trim off the larger fan leaves first, as they don't contain trichomes and can make your buds harsh to smoke, however if you notice some fan leaves have resin on, then keep them for making hash with your other trim.
Next, hang the trimmed branches upside down in a dark, cool room with good ventilation. The drying process should take anywhere from 10-21 days depending on your local climate. Your buds are properly dried when the smaller stems snap instead of bend when you try to break them. You will want to try and maintain a consistent drying out temperature of 60F and 60% relative humidity
Curing Your Buds
Curing Stage Temperature: 60F
Curing Stage Humidity: 60%
Curing is the process of storing your buds in a controlled environment to further dry them out and enhance their quality. Proper curing will improve the smoothness, flavour, and potency of your buds, and is easy to do.
Place your dried buds in airtight glass mason jars, or plastic air tight tubs filling them up to 75% to allow some air at the top. Store these jars in a dark, cool place and out of direct sunlight For the first week, open the jars once a day for 10 minutes to let fresh air in and excess moisture out. This process is known as burping the jars and after the first week, you can reduce this to once every few days.
Curing can take anywhere from two weeks to a few months. The longer you cure, the better the quality of your buds in terms of flavour and aroma, however the effect can become physically stronger and potent. Just remember to check your jars regularly for any signs of mould.
Which Cannabis Seeds Should You Use?
The main focus of any grow should be what genetics you want to cultivate. There are thousands of strains available, but to make sure you have got the best cannabis seeds for you, do some research beforehand.
Think about what kind of weed you want to smoke, how much space you have available and if you are growing indoors or outdoors. Let's take a look at the types of cannabis seed you can grow and explain the difference between them to help you make the right choice.
Feminized, Autoflower or Regular?
Feminized Seeds: Feminized seeds have been modified to produce only female plants, which are the ones that produce the buds that we want to smoke.. If you're new to growing marijuana or want to guarantee a harvest without the worry of identifying and removing male plants, feminized seeds are a great choice as they eliminate the risk of male plants.
Autoflower Seeds: Autoflower cannabis seeds are a popular choice for those looking for a fast and easy to grow plant. Autoflowering plants automatically switch from the vegetative stage to the flowering stage after 4 weeks without you needing to change the light cycle. They also tend to be smaller and more compact, making them ideal for indoor growing.
Feminized Autoflowering and feminized photoperiod strains are great for inexperienced growers, however, the easiest marijuana seeds to grow for beginners are autoflowering. This is simply because they are easy to maintain indoors because of the compact size and can even be grown on a window sill or balcony if you don't want to splash out on expensive equipment.
Regular Seeds: These will produce both male and female plants, so you will need to identify and remove male plants to prevent them from pollinating the females, which would result in seeded buds. The main use for regular seeds would be if you wanted to breed cannabis plants, in which case you need both a male and female plant, or want to take the time to find a stable female mother plant for cloning.
Indica or Sativa?
Indica Strains: These are typically shorter, bushier plants with broad, dark green leaves. They grow faster meaning the flowering time ranges from 7-8 weeks and typically reach about 100-150cm tall. The tight golfball sized buds produced by indica strains are known for their relaxing, body high, making them ideal for evening use or to help with conditions like insomnia or chronic pain.
Sativa Strains: Sativa plants are much taller with thin, light-green leaves. They take longer to mature than indicas with flowering time ranging between 10-13 weeks, but are known for producing elongated and pointy buds with uplifting, cerebral effects that stimulate creativity and social interaction. Sativa strains are often recommended for daytime use or to help with conditions like depression or fatigue.
What Is The Ideal Climate For Cannabis Plants?
Creating the ideal climate for your cannabis is important so that they are not stressed while growing. Having a healthy and happy plant allows them to focus on photosynthesis and nutrient uptake, resulting in bigger yields.
Temperature:
The optimal temperature for cannabis plants depends on their stage of growth.
During the vegetative stage, cannabis plants thrive in slightly warmer conditions, typically between 70-85°F (21-29°C).
Once your plants enter the flowering stage, they prefer slightly cooler temperatures, ideally between 70-75°F (21-24°C).
Humidity:
In the seedling stage, cannabis plants prefer high humidity levels of around 75% as it aids in their root development.
As the plant grows into its vegetative stage, you should gradually reduce the humidity to around 60-70%. This reduction helps prepare the plant for the lower humidity levels in the flowering stage.
In the flowering stage, humidity levels low, around 45-50%, to prevent bud rot and other moisture-related diseases. Towards the end of the flowering stage, aim to decrease humidity further, to 40%.
Environment:
Cannabis plants need a clean and controlled environment for optimal growth. Here are some factors to consider:
- Light: Cannabis plants need ample light for photosynthesis. Whether you're growing indoors under artificial lights or outdoors in natural sunlight, make sure your plants receive enough light without getting scorched.
- Air Circulation: Good airflow is essential to keep humidity levels in check and prevent the buildup of mould and pests. If you're growing indoors, consider using fans and vents. Outdoors, ensure your plants are not in a stagnant air environment.
- Protection from Extreme Conditions: Cannabis plants can be vulnerable to extreme weather conditions. High winds can break branches, heavy rains can cause waterlogged roots and mouldy buds, and frost can kill a cannabis plant outright. Provide protection from these conditions where possible. If you're growing outdoors, consider using protective structures like greenhouses.
Actionable Tip: Maintain the correct temperature, humidity, airflow, and protection from extremes to keep plants healthy throughout the grow.
Cannabis Grow Lights
Light provides your plants with energy to grow, so it’s important particularly for indoor grows to get good quality full spectrum grow lights that replicate the sun.
How Much Light Do Cannabis Plants Need?
Cannabis plants need a lot of light, especially during the vegetative stage. During this stage, if you are growing indoors then you should give them 18 hours of light per day.
What Light Cycles are Best for Photoperiods?
Photoperiod cannabis strains are those that depend on specific periods of light and darkness to transition from the vegetative to the flowering stage.
During the vegetative stage, photoperiod strains typically require a light cycle of 18 hours of light and 6 hours of darkness. Once you're ready for them to start flowering, you'll need to adjust the light cycle to 12 hours of light and 12 hours of darkness. This shift signals the plant to start producing buds.
What Light Cycles are Best for Autoflowers?
Autoflowering cannabis strains automatically switch from the vegetative stage to the flowering stage after a certain period, regardless of the light cycle.
However, they still require plenty of light to grow well. Most autoflower growers provide 18-24 hours of light throughout the entire life cycle of the plant. While this may seem excessive, autoflowers have been bred to handle this amount of light, and the extra energy can lead to bigger yields. Autos grown from seed to harvest using a 20/4 light cycle produce superb yields.
Indoor Grow Lights
There are several types of grow lights you can use for indoor cannabis cultivation:
- High-Intensity Discharge (HID) Lamps: These are considered highly effective for growing cannabis, providing a good ratio of yield to watts used. HID lamps include both Metal Halide (MH) lamps, which are ideal for the vegetative stage, and High-Pressure Sodium (HPS) lamps, which are perfect for the flowering stage.
- Light-Emitting Diode (LED) Lights: These are increasingly popular due to their energy efficiency and full-spectrum light. They can be used throughout the entire growth cycle of the plant.
- Fluorescent Bulbs: While not as powerful as HID or LED lights, fluorescent bulbs like Compact Fluorescent Lights (CFLs) and T5 tubes are a good option for the seedling stage or rooting clones, however will not be adequate for the flowering stage
Which Grow Lights are Best for Beginners?
For beginners, LED lights might be the best option. While they have a higher upfront cost, they are energy-efficient, easy to set up, and can be used throughout the entire life cycle of the plant. They also produce less heat than HID lamps, reducing the risk of heat stress. Many LED manufacturers provide dimmers allowing you to increase or lower PAR levels.
What Nutrients Does A Cannabis Plant Need?
Like all plants, cannabis requires certain nutrients to thrive. These nutrients are typically divided into two categories: macronutrients and micronutrients. Let's delve into each category:
NPK: The Macro Nutrients for Cannabis Plants
The primary macronutrients that cannabis plants need are Nitrogen (N), Phosphorus (P), and Potassium (K). These elements are crucial for the plant's growth, flowering, and overall health.
Nitrogen (N): This nutrient is essential for the vegetative stage of cannabis growth. It's a major component of chlorophyll, which the plant uses to convert sunlight into energy during photosynthesis. Nitrogen also plays a significant role in protein synthesis. A nitrogen deficiency can lead to yellowing leaves.
Phosphorus (P): Phosphorus is vital during the flowering stage. It aids in the development of roots and flowers and contributes to the plant’s ability to convert other nutrients into usable building blocks. A lack of phosphorus can lead to stunted plant growth or reduced yield.
Potassium (K): Potassium helps regulate the plant’s overall functions, including the opening and closing of stomata (pores), water uptake, and resistance to disease. It is important throughout the plant's life but is particularly crucial during the flowering stage. A potassium deficiency can lead to weak stems and slow growth.
It's essential to maintain a balance of these nutrients. Too much of one can cause a deficiency of another. The specific ratios needed can vary depending on the stage of growth and the specific strain of cannabis you're growing.
Micronutrients for Cannabis Plants
In addition to NPK, cannabis plants also require several micronutrients, albeit in smaller amounts. These include:
Calcium: This nutrient aids in cell wall development and overall plant strength.
Magnesium: Magnesium is a component of chlorophyll and aids in photosynthesis.
Sulfur: Sulfur helps in the production of vitamins, amino acids, and enzymes.
Trace Elements: Cannabis plants also need trace amounts of iron, boron, manganese, zinc, copper, molybdenum, and chlorine.
Conclusion
And there you have it! From seed to weed this guide has given you a roadmap to grow your cannabis plants. Don't forget to spread the knowledge - like and share this article!

