




Growing autoflowers week by week becomes easier when you know what changes to expect and how to care for your plants at each stage. Most autoflower cannabis plants move from germination to harvest in around 8–12 weeks, although genetics and growing conditions can extend that timeline. During the first weeks, roots, leaves and branches develop quickly. Early signs of flowering often appear around weeks 3–5, followed by several weeks of bud development and ripening.
This guide follows the autoflower timeline from week 1 through week 8, with additional advice for plants that continue flowering into weeks 9–12. You'll learn what healthy growth looks like, when to adjust watering, light and nutrients, and which warning signs deserve attention before problems become serious. Use the weekly descriptions and pictures as practical reference points, not fixed deadlines. Every autoflower develops at its own pace, so the plant's condition should always guide your decisions.
Key Takeaways
- Autoflower timeline: Most autoflowers take approximately 8–12 weeks from germination to harvest, although some need longer.
- Weeks 1–3: Seedlings establish roots, develop their first leaves and begin vegetative growth.
- Weeks 4–5: Many autoflowers show their first pistils, begin flowering and experience a period of rapid growth.
- Weeks 6–8: Flowers increase in size, trichomes become more visible and environmental conditions need careful monitoring.
- Weeks 9–12: Flower development and ripening continue, with harvest timing determined by maturity rather than plant age.
- Growing conditions: Consistent light, suitable temperatures, balanced nutrients and careful watering support healthy development throughout the lifecycle.
- Autoflower Timeline: Growth Stages Week by Week
- Autoflower Week 1: Germination and Seedling Growth
- Autoflower Week 2: Early Seedling Development
- Autoflower Week 3: Vegetative Growth
- Autoflower Week 4: Vegetative Growth and Pre-Flowering
- Autoflower Week 5: Early Flowering
- Autoflower Week 6: Flower Development
- Autoflower Week 7: Flower Growth and Trichome Development
- Autoflower Week 8: Late Flowering and Early Ripening
- Autoflower Weeks 9–12: Ripening and Harvest
- How to Tell if Your Autoflower Is Developing Normally
- Conclusion
- Frequently Asked Questions
- References
Autoflower Timeline: Growth Stages Week by Week
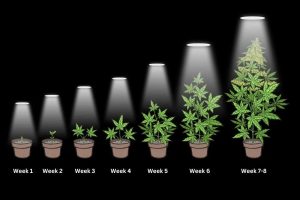
An autoflower timeline begins with germination, followed by seedling development, vegetative growth, flowering and harvest. These stages often overlap, meaning plants of the same age may look different.
Research by Leckie et al. (2024) identified a mutation in the CsPRR37 gene associated with daylength-insensitive flowering in cannabis. This helps explain why autoflowers can begin flowering without a deliberate change to their light schedule.
Autoflower Growth Timeline Chart
| Week | Growth stage | What to expect |
| Week 1 | Germination | Taproot emerges, followed by cotyledons |
| Week 2 | Seedling | First true leaves and stronger stem |
| Week 3 | Vegetative growth | Faster leaf production and side branching |
| Week 4 | Vegetative / pre-flower | Increased growth and possible first pistils |
| Week 5 | Early flowering | Flower sites develop and plants may stretch |
| Week 6 | Flower development | Pistil clusters expand and trichomes become visible |
| Week 7 | Flowering | Flowers gain size and resin production increases |
| Week 8 | Flowering / early ripening | Continued flower development and maturity changes |
| Weeks 9–12+ | Ripening and harvest | Trichomes mature and flower growth slows |
Use this chart as a guide rather than an exact schedule. Some autoflower cannabis seeds produce plants that mature relatively quickly, while others need additional weeks to develop fully.
Preparing for Your Autoflower Grow
Before germination, prepare the growing medium, container, lighting and ventilation.
For many indoor autoflowers, a final container holding approximately 11–19 L provides enough space for root development. Planting directly into this container can reduce the need for transplanting during the short vegetative period.
Choose a loose growing medium that drains well. A light soil mix containing perlite or another drainage material helps maintain moisture while allowing oxygen to reach the roots.
An 18/6 or 20/4 light schedule provides a consistent daily light period. There is no need to shorten the light schedule to initiate flowering. Our autoflower light schedule guide explains how light duration affects daily light exposure.
Environmental requirements change as plants develop.
| Growth stage | Temperature | Relative humidity |
| Seedling | 22–26°C | 65–75% |
| Vegetative | 22–26°C | 55–65% |
| Early flowering | 22–26°C | 45–55% |
| Late flowering | 20–25°C | 40–50% |
These are general starting ranges. Adjustments should account for airflow, leaf temperature and the condition of each plant.
Autoflower Week 1: Germination and Seedling Growth
Days 1–7
Autoflower week 1 begins when the seed absorbs moisture and germination starts. The seed shell opens, allowing a small white taproot to emerge. Once the seedling reaches the surface, two rounded cotyledons appear, followed by the first serrated leaves.
What Should an Autoflower Look Like in Week 1?
| Approximate days | Expected development |
| Days 1–2 | Seed absorbs moisture and germination may begin |
| Days 3–5 | Taproot develops and the seedling may emerge |
| Days 5–7 | Cotyledons open and the first true leaves may appear |
Germination can take longer, so these milestones are not guaranteed.
How to Care for an Autoflower in Week 1
Keep the growing medium slightly moist around the seedling without soaking the entire pot. Young roots require oxygen, and constantly wet soil increases the risk of damping-off disease.
Provide gentle lighting. A PPFD of approximately 100–200 µmol/m²/s is a reasonable starting range, adjusted according to the seedling's response.
Seedlings growing in soil that already contains nutrients may not require additional feeding during the first week. Plants growing in an inert medium may need a weak nutrient solution earlier.
Grower Tip: Check moisture around the seedling rather than relying only on how dry the surface looks. In a large pot, moisture can remain deep in the soil long after the upper layer has dried.

Autoflower Week 2: Early Seedling Development
Days 8–14
During autoflower week 2, the seedling develops additional true leaves, a stronger stem and an expanding root system. Leaf growth should become more noticeable as the plant establishes itself.
What Should an Autoflower Look Like in Week 2?
Healthy seedlings generally have several sets of serrated leaves, with each new set becoming larger.
Some plants remain short and compact, while others develop slightly longer stems. A seedling stretching excessively with a thin, weak stem may not be receiving sufficient light.
Drooping leaves combined with consistently wet soil can indicate that the roots are struggling to obtain oxygen.
How to Care for an Autoflower in Week 2
As roots spread, gradually increase the area receiving water. Allow some moisture to leave the growing medium between watering sessions without letting the root zone become completely dry.
Light intensity can increase as the seedling develops. Around 200–300 µmol/m²/s may suit established seedlings, but the correct level depends on their condition and the lighting equipment.
If feeding is necessary, start with a weak nutrient concentration and check new growth before increasing it.
Avoid training or removing healthy leaves at this stage. The priority is establishing strong roots and steady leaf development.

Autoflower Week 3: Vegetative Growth
Days 15–21
Autoflower week 3 often brings a noticeable increase in growth. Larger fan leaves develop, side branches begin extending from the nodes and the stem becomes stronger.
The expanding root system also allows the plant to absorb more water and nutrients.
What Should an Autoflower Look Like in Week 3?
Look for several established nodes, larger leaves and new branches developing along the main stem.
Some cultivars remain compact with short internodal spacing. Others become taller and develop a more open branching structure.
A few plants may show early pre-flowers near the end of week 3, although this is not necessary for healthy development.
How to Care for an Autoflower in Week 3
During active vegetative growth, gradually increase light exposure according to plant response. A PPFD of approximately 300–500 µmol/m²/s can provide a starting range for established plants.
Check nutrient intake as leaf production increases. Nitrogen supports foliage development, but excessive feeding can cause dark leaves and damaged tips.
Healthy plants may tolerate gentle low-stress training to create a more even canopy. Avoid forcing stiff stems into position or making major changes to plants already showing stress.
For indoor autoflower seeds, maintaining even canopy exposure becomes increasingly useful as side branches expand.

Autoflower Week 4: Vegetative Growth and Pre-Flowering
Days 22–28
During autoflower week 4, many plants approach the transition into flowering. Growth can accelerate, with branches extending and new leaves developing around the upper nodes.
Some plants begin showing their first white pistils, while others continue vegetative growth for another week.
What Should an Autoflower Look Like in Week 4?
The plant should have a more established structure, with several branches developing around the main stem.
Small female pre-flowers may appear where the branches meet the stem. These contain fine pistils, which are commonly white when they first emerge.
The appearance of pistils does not mean vertical growth has finished. Many autoflowers continue stretching as flowering begins.
How to Care for an Autoflower in Week 4
Monitor canopy height as branches extend. Adjust the position or output of indoor lighting when necessary to prevent excessive light exposure at the top of the plant.
Water requirements may increase as the plant develops more foliage. Check the weight of the pot and moisture within the root zone rather than following a rigid daily schedule.
If the plant has started flowering, avoid severe pruning or repeated training. Removing large amounts of healthy foliage can reduce the leaf area available for photosynthesis.
Grower Tip: When the first pistils appear, I would concentrate on keeping conditions consistent. Rather than changing feeding, lighting and watering together, check how the plant responds before deciding what needs adjusting.

Autoflower Week 5: Early Flowering
Days 29–35
Autoflower week 5 is when flowering often becomes clearly visible. Small flower clusters develop around the nodes and growing tips, while the plant may continue increasing in height.
This period of rapid vertical growth is commonly called the flowering stretch.
What Should an Autoflower Look Like in Week 5?
Groups of white pistils become more visible around developing flower sites. The upper branches begin producing compact clusters of reproductive growth.
Some plants increase significantly in height, while smaller cultivars may show relatively little stretch.
How to Care for an Autoflower in Week 5
As flowering develops, review the nutrient balance. Plants continue needing nitrogen, but phosphorus, potassium and other essential elements are also required for healthy flower development.
If changing to bloom nutrients, make the transition gradually and follow the plant's response rather than increasing feeding strength automatically.
Our autoflower feeding schedule explains how nutrient requirements change throughout the lifecycle.
Maintain airflow around developing branches. A gentle movement of air helps prevent pockets of high humidity without placing unnecessary pressure on stems.
Growers using outdoor autoflower seeds should pay particular attention to extended rain and humid conditions as flowers begin forming.

Autoflower Week 6: Flower Development
Days 36–42
During autoflower week 6, flower sites become more established. Small clusters expand along the branches, and glandular trichomes begin becoming easier to see on the developing flowers.
Vertical growth may slow, although some cultivars continue stretching into this stage.
What Should an Autoflower Look Like in Week 6?
Developing flowers contain increasing numbers of pistils, while small bracts form around the reproductive structures.
The first noticeable resin glands often give flowers a slightly reflective appearance. However, the buds are generally still immature and require additional development.
How to Care for an Autoflower in Week 6
As the plant develops flowers, its water requirements may increase. Monitor root-zone moisture and ensure excess water can drain from the container.
Check nutrient concentration and growing-medium pH if new leaves appear unusually pale or develop damaged tips. In soil, a pH around 6.0–7.0 is commonly suitable, while coco and hydro systems generally operate at approximately 5.5–6.5.
Maintain relative humidity around 45–55% when practical, with steady airflow through the canopy.
Avoid removing healthy leaves unnecessarily. They continue supporting photosynthesis while flowers develop.

Autoflower Week 7: Flower Growth and Trichome Development
Days 43–49
Autoflower week 7 usually brings larger flower clusters, stronger aroma and increasing resin production.
The plant may have completed most of its vertical growth, allowing more resources to support developing flowers.
What Should an Autoflower Look Like in Week 7?
Flowers become more substantial as additional bracts develop. Trichomes are easier to identify on the flowers and nearby sugar leaves.
Many pistils remain white, although some may begin darkening as the flowers mature.
At this stage, flowers can still appear relatively loose. This does not necessarily indicate a problem, particularly if the cultivar has several weeks of development remaining.
How to Care for an Autoflower in Week 7
As flowers become larger, check that air can move through the canopy. Dense growth and trapped humidity increase the risk of fungal disease.
Inspect flower clusters for unusual brown patches, decaying tissue or visible fungal growth. These symptoms require attention because affected material can deteriorate quickly.
Continue supplying nutrients according to the plant's condition. Sudden feeding increases are unnecessary when leaves remain healthy and flower development is progressing normally.

Autoflower Week 8: Late Flowering and Early Ripening
Days 50–56
Autoflower week 8 can look different depending on the cultivar. Some fast plants may be approaching harvest, while others still have several weeks of flowering ahead.
Flowers can continue increasing in size as bracts expand and trichomes develop.
What Should an Autoflower Look Like in Week 8?
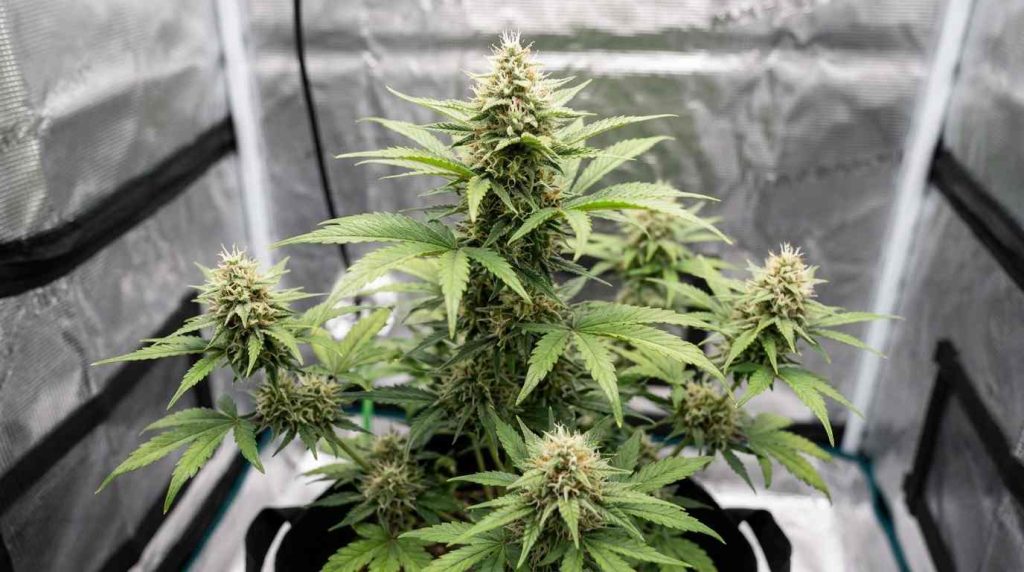
Maturing flowers often contain larger clusters of bracts, with some pistils changing from white to orange or brown.
Older fan leaves may begin fading as the plant approaches maturity. However, widespread yellowing or sudden leaf damage should not automatically be treated as normal aging.
How to Care for an Autoflower in Week 8
Begin inspecting trichomes with a magnifying tool, preferably around 30–60× magnification.
Clear trichomes generally indicate earlier gland development, while cloudy and amber trichomes can indicate more advanced maturity.
Continue monitoring feeding and moisture requirements. Reaching week 8 does not mean nutrients should automatically be stopped.
If flowers are still expanding and most trichomes remain clear, the plant may need more time.
Autoflower Weeks 9–12: Ripening and Harvest
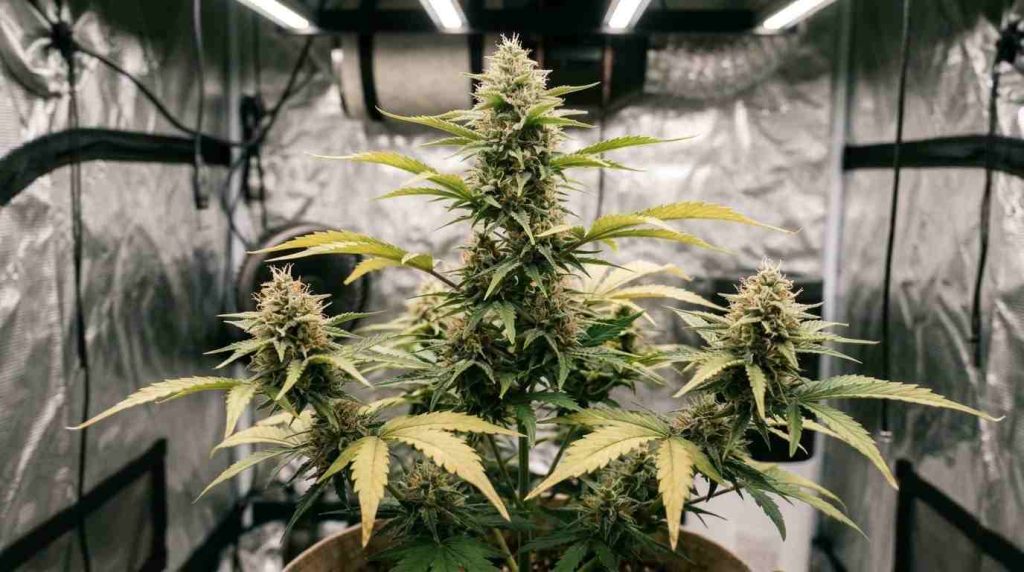
Many autoflowers continue flowering beyond week 8. During weeks 9–12, flowers may increase in mass, bracts expand and trichomes become more mature.
Harvest timing should depend on the plant rather than the calendar.
How to Tell When an Autoflower Is Ready to Harvest
| Observation | What it may indicate |
| Mostly clear trichomes | Earlier stage of maturity |
| Mostly cloudy trichomes | More advanced resin gland development |
| Increasing amber trichomes | Further trichome maturity |
| Flowers still expanding | Ripening may be incomplete |
| Flower growth slowing | Plant may be approaching harvest |
Inspect several flowers because upper branches can develop at a different rate from lower branches.
Grower Tip: When checking trichome maturity, I would examine the flower bracts rather than the nearby sugar leaves. Leaf trichomes can mature earlier and give a misleading impression of overall flower readiness.
Should You Flush Autoflowers Before Harvest?
Flushing is sometimes used during the final stages of cultivation, but it is not essential for every grow.
Research by Saloner, Sade and Bernstein (2024) found that stopping mineral nutrient supply before harvest had mainly minor effects on plant growth, yield and measured cannabinoid and terpenoid concentrations.
The findings do not establish that flushing improves the flavor or quality of harvested flowers. The study was not specific to autoflowers, so results should not be treated as a universal autoflower feeding rule.
Once the flowers reach the desired maturity, harvest with clean equipment. Drying should take place in a clean, dark space with controlled temperature, humidity and gentle airflow.
How to Tell if Your Autoflower Is Developing Normally
The autoflower stages by week provide a useful reference, but plants do not develop at identical speeds.
Genetics influence height, branching and flowering time. Light exposure, temperature, nutrition and root health also affect growth.
Research by Rodriguez-Morrison, Llewellyn and Zheng (2021) demonstrated that cannabis flower yield responds to changes in light intensity. Although the study was not conducted specifically on autoflowers, it supports the importance of appropriate light management during plant development.
Common Signs of Autoflower Growth Problems
| Symptom | Possible cause | What to check |
| Slow early growth | Excess moisture or restricted roots | Drainage and root-zone conditions |
| Thin, stretched stems | Insufficient light | Light intensity and distance |
| Brown leaf tips | Excess nutrients | Feeding strength and EC |
| Drooping leaves | Water imbalance or root stress | Moisture and drainage |
| Pale new growth | Nutrient availability problems | pH and nutrient concentration |
| Damaged flower tissue | Fungal growth or environmental stress | Humidity, airflow and flower condition |
Avoid diagnosing problems from a single symptom. Examine the plant's recent development and growing conditions before making changes.
When comparing autoflower week-by-week pictures or day-by-day growth photographs, focus on healthy new growth rather than exact plant height.
A compact plant producing healthy leaves and flowers may be developing normally even if it is smaller than another autoflower of the same age.
Conclusion
Understanding the autoflower timeline helps growers identify healthy development and spot potential problems throughout the lifecycle.
During the early weeks, roots and foliage become established. Flowering then begins, followed by several weeks of flower development and ripening. Although many autoflowers finish within 8–12 weeks, each plant should be assessed individually.
Following the stages week by week, maintaining suitable growing conditions and checking flower maturity carefully will help beginners make better decisions throughout their autoflower grow.
Frequently Asked Questions
How long does an autoflower take from seed to harvest?
Most autoflowers take approximately 8–12 weeks from germination to harvest. Some fast cultivars finish earlier, while larger plants may require additional weeks. Flower maturity provides a more reliable harvest indicator than age alone.
Why is my autoflower still small in week 4?
Some cultivars naturally remain compact, but slow development may also result from excess moisture, restricted roots, unsuitable temperatures or insufficient light. Check whether the plant is continuing to produce healthy new leaves and branches.
Can an autoflower start flowering in week 3?
Yes. Some autoflowers develop their first pistils around week 3, although flowering often becomes more obvious during weeks 4–5. The timing depends on genetics and growing conditions.
Why does my autoflower still have white pistils in week 9?
Plants can continue producing new pistils while older flowers mature. White pistils alone do not establish whether a plant is ready for harvest. Examine trichome development and the overall condition of several flowers.
Can two autoflowers from the same seeds develop at different speeds?
Yes. Individual plants can differ in height, branching, flowering onset and maturity, even within the same cultivar. Evaluate each plant according to its development rather than expecting identical weekly progress.
References
- Leckie, K. M., et al. (2024). Loss of daylength sensitivity by splice site mutation in Cannabis pseudo-response regulator. The Plant Journal, 118(6), 2020–2036. https://doi.org/10.1111/tpj.16726
- Rodriguez-Morrison, V., Llewellyn, D., & Zheng, Y. (2021). Cannabis Yield, Potency, and Leaf Photosynthesis Respond Differently to Increasing Light Levels in an Indoor Environment. Frontiers in Plant Science, 12, 646020. https://doi.org/10.3389/fpls.2021.646020
- Saloner, A., Sade, Y., & Bernstein, N. (2024). To flush or not to flush: Does flushing the growing media affect cannabinoid and terpenoid production in cannabis? Industrial Crops and Products, 220, 119157. https://doi.org/10.1016/j.indcrop.2024.119157


