Germinating marijuana seeds is the first step in starting a healthy cannabis grow, but small mistakes with moisture, warmth, or handling can stop seeds from sprouting properly. Cannabis seeds typically need steady moisture, access to oxygen, and temperatures around 70–80°F to begin germination, with most viable seeds sprouting within 3–10 days. Choosing quality seeds and using a simple method, such as soil, starter plugs, rockwool, or the paper towel method, can help reduce early issues. This guide explains what cannabis seeds need to germinate and how to give them the best start.
Key Takeaways
- Cannabis seeds typically need moisture, oxygen, and warmth around 70–80°F to germinate.
- Most viable marijuana seeds germinate within 3–10 days, depending on seed quality and conditions.
- Overwatering can limit oxygen around the seed and may increase the risk of rot or failed germination.
- Healthy seeds are usually firm, mature-looking, and darker in color rather than pale green or cracked.
- Seedlings usually do not need added nutrients for the first 7–14 days after sprouting.
- Gentle light, stable humidity, and careful handling help young seedlings establish after germination.

- Key Takeaways
- What does a cannabis seed need to germinate?
- How long does it take a cannabis seed to germinate?
- Starting with good quality cannabis seeds
- How long does it take for a marijuana seed to become a seedling?
- What are the different methods of marijuana germination?
- Using Heat Mats and Propagation Domes for Germination
- What is the fastest way to germinate seeds?
- Transplanting Germinated Seeds
- What lighting do marijuana seeds need?
What does a cannabis seed need to germinate?
To successfully germinate cannabis seeds, three essential elements are required: moisture, oxygen, and warmth. These factors work together to "wake up" the seed and trigger its growth process. Here’s a breakdown of each:
- Water (Moisture): Water is the first signal that lets the seed know it’s time to start growing. Moisture seeps into the seed casing, causing it to soften and crack. This initiates the germination process, allowing the seed to absorb the nutrients it needs to begin sprouting. Too much moisture can drown the seed, while too little can prevent it from sprouting at all, causing the seed to dry out.
- Oxygen: Cannabis seeds need access to oxygen to metabolize and begin growing. In soil, the air pockets within the soil’s structure allow oxygen to reach the seed, which is vital for its development. Without sufficient oxygen, the seed will not be able to break dormancy. Be mindful to not overwater your seeds in soil, as this can suffocate them by blocking the oxygen they need.
- Heat: The final requirement is warmth. Cannabis seeds thrive at temperatures between 70-80°F (21-26°C). This warmth mimics the natural environment during the spring months, prompting the seed to begin its journey toward sprouting. Temperatures outside this range can slow the process, and if it gets too cold, the seed may become dormant.
When setting up your germination environment, aim to maintain the optimal balance of these three factors. Using a seed mat or heat pad can help regulate temperature, and a humidity dome can ensure consistent moisture.
How long does it take a cannabis seed to germinate?
The germination process typically begins within 12 hours under optimal conditions, but full germination can take anywhere from 3 to 10 days. The duration depends on a few key factors:
- Seed Quality: Fresh, healthy seeds will germinate faster than old or poorly stored ones. While cannabis seeds can remain viable for long periods when stored correctly, their ability to germinate decreases with age.
If you’re using older seeds, it’s important to check their quality before starting the germination process. Fresh seeds will likely sprout within 3-5 days, while older seeds can take longer and might be more susceptible to failure.
- Temperature: Warmth plays a crucial role in germination. If the temperature falls below the ideal range of 70-80°F (21-26°C), the process will slow down. Seeds exposed to cooler conditions may take much longer to sprout, and there is an increased risk of fungal or bacterial growth, which can compromise seed health.
- Moisture: If moisture levels are consistently maintained, germination can proceed quickly. However, if there’s too little moisture, seeds will take longer to sprout, and if there’s too much, the seeds planted in soil could drown or be at risk of rot. It's important to monitor humidity levels and ensure a steady balance between wet and dry conditions.
Best Practise Tip: After planting your seeds in your chosen medium, be patient and avoid disturbing them too much. If the temperature and moisture levels are right, you’ll see a taproot within 12-48 hours, but the entire process may take up to 10 days to complete, before noticing the seedling sprouting out of the top of the grow medium.
Starting with good quality cannabis seeds
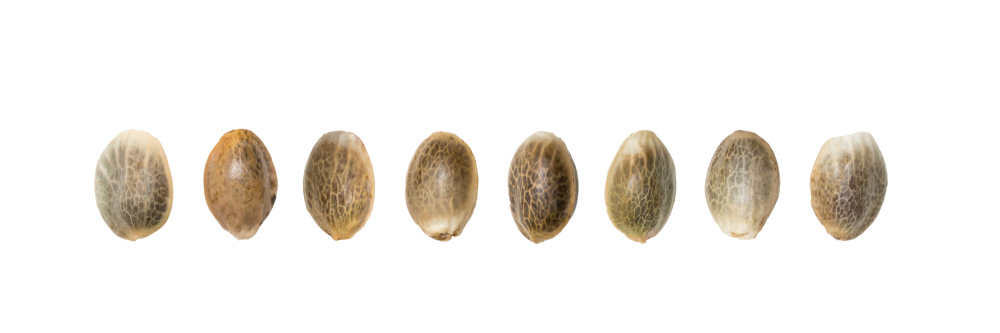
To ensure successful germination and healthy plant growth, starting with high-quality cannabis seeds is paramount. Even the best methods won’t make up for poor seed quality, so it’s essential to carefully choose the right seeds from the start.
Below is a breakdown of what you should look out for when determining good quality and viable seeds that will germinate with no issues.
1. Visual Inspection:
Look at your seeds closely. High-quality cannabis seeds are typically dark brown, tan, or even gray with a hard, smooth shell. Avoid seeds that are pale green, white, or have cracks in their shell, as they are often immature and unlikely to germinate. Quality seeds should be firm and hard to squeeze when pressed between your fingers.
2. Size and Shape:
Cannabis seeds can vary in size, but good-quality seeds are usually plump, symmetrical, and well-formed. Seeds that are deformed or unusually small may be weak or lacking proper genetic material. Make sure your seeds are uniform in shape and size for the best chance of successful germination. The bigger the seed, the better however some seeds are just naturally small and tiny.
3. Firmness Test:
The firmness of a seed can indicate its viability. Place a seed between your thumb and forefinger and gently squeeze it. A healthy seed will feel firm and resilient. If it’s brittle or cracks under pressure, it’s likely not worth attempting to germinate.
4. Trusted Sources:
While inspecting your seeds is a great first step, purchasing them from a reputable industry seed bank or breeder ensures you’re getting the highest quality. Trusted sources typically perform rigorous quality control, ensuring you receive seeds that are fresh, viable, and genetically stable.
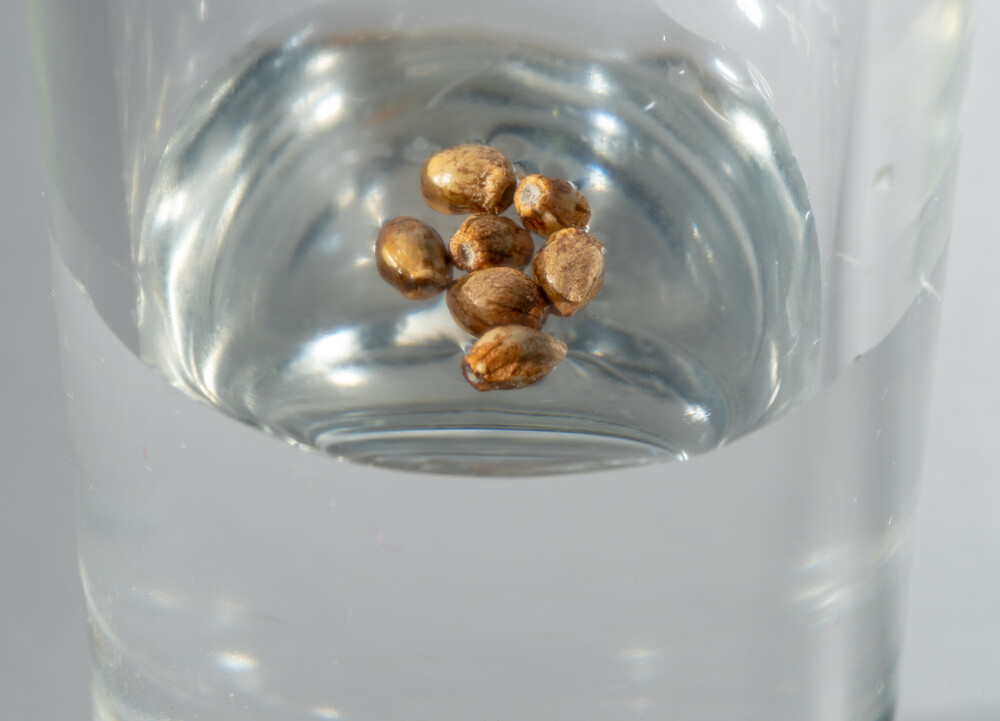
Actionable Tip:
If you’re unsure about the quality of your seeds, consider doing a "float test." Place the seeds in a glass of water for 24 hours. Viable seeds will sink, while those that float are likely not going to germinate and should be discarded.
How long does it take for a marijuana seed to become a seedling?
Once a cannabis seed has successfully germinated and the taproot begins to emerge, the process of becoming a full-fledged seedling can begin. After the seed cracks open and the taproot is visible, it takes 3 to 10 days for the seedling to emerge from the soil and begin developing its first true leaves.
Here’s what to expect as your seed transitions from germination to seedling:
- Emergence of the Stem:
The seed will first push a white colored small stem, or shoot, upwards from the soil. This stem is often pale and fragile, and its job is to push through the surface of the soil to access light and air. At this stage, the seedling is still heavily dependent on the nutrients stored within the seed itself, so you do not need to feed any nutrients. - Cotyledons (Embryonic Leaves):
Once the stem breaks the surface, the seed casing will fall away, and the cotyledons, or embryonic leaves, will unfold. These leaves do not resemble the typical serrated marijuana leaves but instead provide the necessary nutrients to the seedling while it prepares to start photosynthesizing. - True Leaves Appear:
As the plant matures, the cotyledons will be replaced by the true leaves, which look like the familiar jagged marijuana leaves. This marks the beginning of the seedling's ability to carry out photosynthesis and generate its own food.
Best Practice Tip:
During this early phase, it’s crucial to provide your seedlings with gentle care, as they are still delicate. Ensure they are kept in a warm, humid environment with soft light. Avoid direct exposure to strong lights, as this can shock the plant and hinder growth. Seedlings do not require nutrients for the first 7-10 days, so do not feed to prevent overfertilization.
Actionable Tip:
Monitor the seedling's progress daily. Once the cotyledons have unfolded and the true leaves begin to form, you can gently start introducing a small amount of light to encourage further growth.
What are the different methods of marijuana germination?
Germinating cannabis seeds can be done in several ways, depending on your preferences and available resources. Each method offers its own advantages and challenges, but all rely on providing the necessary moisture, oxygen, and warmth. Below are the most popular methods for germinating cannabis seeds, along with some best practices to ensure success
Glass of water method
This method is one of the most widely known but also the least reliable. Place your cannabis seeds in a glass.
You will need to fill the glass with 2 inches of soft water. At first the seeds will float to the surface of the water, however after 12-24 hours, you can swirl the glass or stir the water, and the seeds will sink to the bottom of the glass.
Leave the seeds submerged for about 3-5 days, checking regularly for the appearance of taproots. Once the roots are a couple of centimeters long, carefully transplant the seeds into your soil or starter medium.
Best Practice Tip:
It is best to use a fresh water source for this germination method. Bottled water is a great source of water for cannabis seed germination, especially for growers who only have access to hard water at home.
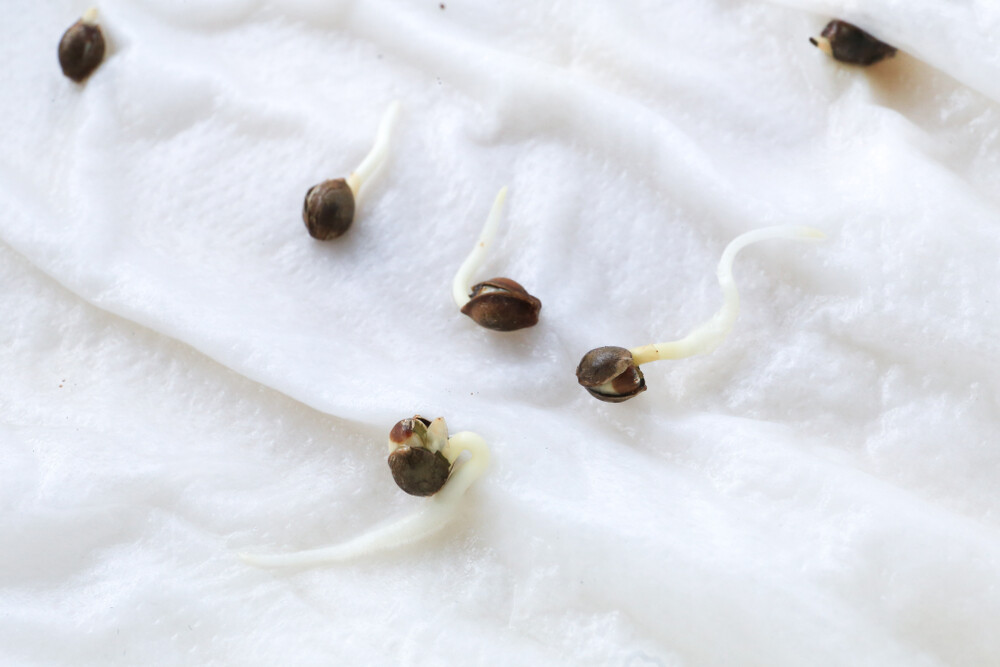
Wet paper towel method
This is another easy and effective method that’s especially popular among first-time growers. Place your seeds between two damp paper towels or cloths creating a blanket over the top of the seeds. Spread the seeds out evenly leaving 1-2cm of space between each seed on the tissue.
Then place them on a plate or shallow dish. Cover the plate with another plate or plastic wrap to retain moisture. In about 2-5 days, you should see small taproots emerging. Once the roots are visible, gently transplant the seeds using a pair of tweezers into soil or your preferred growing medium.
Best Practice Tip:
Be careful not to over-wet the towels, as this can lead to fungal growth. Thick kitchen paper towels work best for this method. For added protection, use a dilute hydrogen peroxide solution (0.5%) to keep pathogens at bay.
Direct to soil method
The most traditional method, direct-to-soil germination, eliminates the need to transplant seeds . Using a match stick, create a 2cm deep hole in the center of the soil. Next, place the seed directly in moist, well-draining soil, at the bottom of the hole you have just created.. Keep the soil moist but not soggy, and maintain the temperature between 70-80°F (21-26°C). In about 3-10 days, you should see the seedling pushing through the surface. The seed must be planted with the pointed side downwards so double check your seed is the right way down, before gently covering the top of the hole.
Best Practice Tip:
While this method requires less handling, it’s harder to tell if the seed has sprouted. Be patient and check for progress every few days. Avoid digging up the seed or disturbing the soil and be patient.
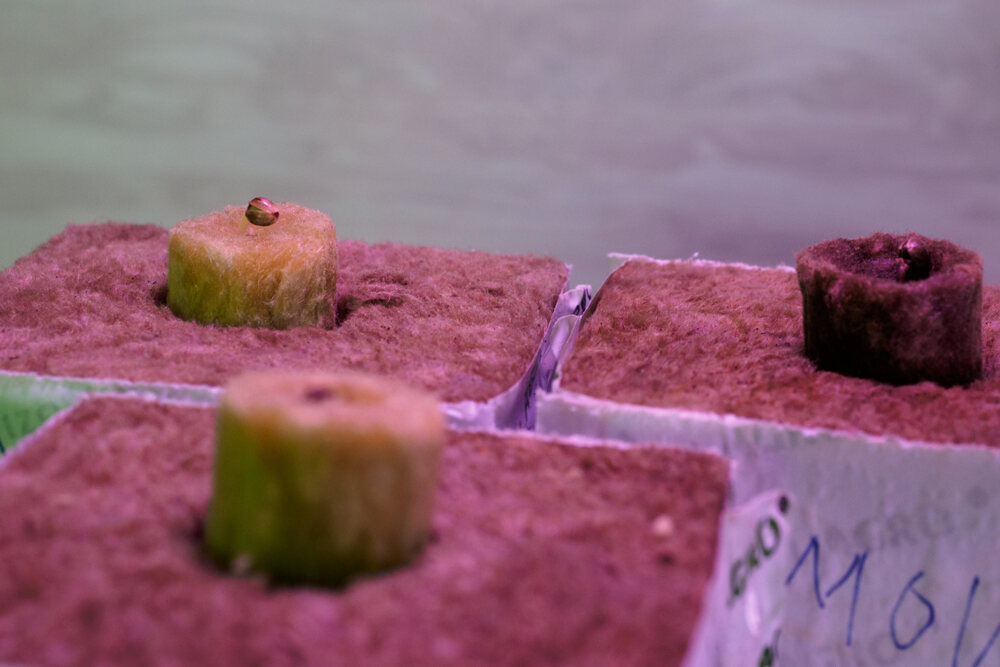
Rockwool cubes
Rockwool cubes provide an ideal environment for germinating seeds. They retain moisture well and provide excellent aeration, and despite them being an inert nutrient free media, they are a great option for both beginners and advanced growers.
Pre-soak your rockwool cubes in water with a pH level of around 5.5-6.0, then place the seeds about 1 cm deep in the cubes. Lightly shake the excess water out of the cube until there are no more droplets of water exiting the cube. Do not squeeze the cubes and only ever lightly shake them.Next, place the cubes in a propagation tray with a humidity dome and keep them in a warm, humid environment. The seeds should germinate in 24-72 hours.
Best Practice Tip:
Keep the rockwool cubes moist, but be careful not to overwater, as this can suffocate the seeds. Use a light, indirect source of heat to maintain a steady temperature.
Starter plugs
Starter plugs, such as Jiffy pellets, are made from a peat-based mix or coco coir and are designed for easy germination, and popular for cloning. Moisten the plugs and place the seeds inside, about 1 cm deep. These plugs provide a great microclimate for seeds, allowing them to sprout quickly and without stress. After the seedlings have developed enough roots, you can transplant them into larger containers or directly into your garden.
Best Practice Tip:
Like rockwool cubes, ensure the starter plugs stay moist but not overly wet. Shake out any water drops until the cube feels moist but not soggy and heavy. Use a plastic dome or propagation tray to maintain high humidity around the seeds.
Actionable Tip:
For faster germination, consider using a heat mat or propagator to maintain consistent warmth. Warmer conditions (around 75-80°F or 24-27°C) will speed up the process.
Using Heat Mats and Propagation Domes for Germination
For optimal seed germination, maintaining consistent warmth and moisture is crucial. Heat mats and propagation domes are excellent tools to help create the perfect environment for cannabis seeds to sprout.
- Heat Mats
A heat mat is a low-wattage device that you place underneath your seed tray to provide consistent warmth. Heat mats are particularly useful if you're germinating seeds in cooler environments or if you want to speed up the process. The ideal temperature for cannabis seed germination is 70-80°F (21-26°C), and a heat mat can help maintain this range.
Best Practice Tip:
Ensure that your heat mat doesn’t get too hot, as temperatures above 85°F (29°C) can stress your seeds. Most heat mats have a thermostat or a built-in temperature control feature to help maintain a stable temperature. - Propagation Domes
A propagation dome is a transparent cover that helps maintain high humidity levels around your germinating seeds. By trapping moisture, it creates a mini greenhouse effect, which is especially important for keeping the environment consistently humid.
Propagation domes are ideal when using soil, rockwool, or starter plugs, as they prevent the medium from drying out too quickly and keep the relative humidity levels high.
Best Practice Tip:
Open the dome periodically to allow fresh air to circulate and prevent mold growth. If you're concerned about fungal or bacterial growth, you can spray the inside of the dome with a mild hydrogen peroxide solution (0.5%) to keep the environment clean and healthy. If the plastic dome fills with water droplets, then lift off the dome, shake the water droplets away and place the lid back on.
What is the fastest way to germinate seeds?
While cannabis seeds generally take anywhere from 3 to 10 days to fully germinate under ideal conditions, there are ways to speed up the process and improve your chances of a successful, quick start.
The fastest natural way to germinate seeds is by ensuring the best possible environment with consistent moisture, warmth, and oxygen. However, for growers in a hurry, there are methods to accelerate the process, such as scarification, which a popular technique used for old seeds
1. Scarification (Pre-Treating the Seed)
Scarification is a technique that involves weakening the hard seed casing to make it more permeable to moisture and oxygen. By gently breaking or softening the seed shell, you can speed up germination and increase the success rate of older seeds. There are several methods of scarification:
- Mechanical Scarification: Lightly rub the seed against sandpaper to gently thin out the outer shell. Be very careful not to damage the seed’s internal structure.
- Thermal Scarification: Heat the seeds by placing them in warm water (around 100°F or 38°C) for 30 minutes before germinating. The heat will expand the seed’s outer shell, making it easier for moisture to penetrate.
- Chemical Scarification: Soaking the seeds in a dilute solution of hydrogen peroxide or mild acid (like vinegar) can break down the outer shell. This method is effective but should be used sparingly, as too much acid can damage the seed.
Best Practice Tip:
Scarification is not recommended for beginner growers as it requires precision to avoid damaging the seeds, and is best suited for old seeds For most growers, ensuring the right temperature, moisture, and oxygen levels is the safest and fastest way to germinate.
2. Warm and Moist Environment
The quickest way to encourage germination is by providing consistent warmth and moisture. Keeping your seeds in a warm, humid environment with temperatures around 75-80°F (24-27°C) will help speed up the process. Using a humidity dome, propagation tray, or heat mat can help maintain these ideal conditions.
Actionable Tip:
Use a germination tray with a clear lid or plastic wrap to trap moisture. This keeps the environment humid, which is crucial for seed activation. Be careful to open the lid slightly to allow airflow, preventing mold growth.
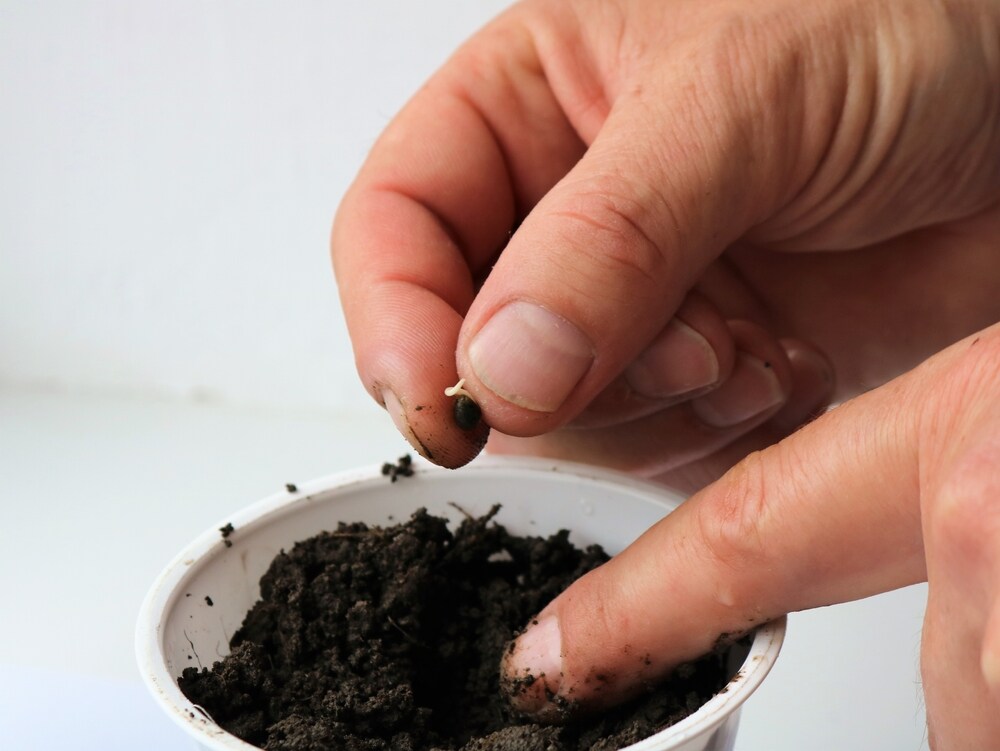
Transplanting Germinated Seeds
Once your cannabis seeds have germinated and the taproot has developed, it’s time to transplant them into the growing medium. This stage is critical to ensuring the health and growth of your plants.
- When to Transplant
You should transplant germinated seeds once the taproot is a couple of centimeters long.. It typically takes 3-5 days before a white tap root will appear.
Best Practice Tip:
Avoid waiting too long to transplant, as the seedling can struggle to establish its anchor tap root when in the growing medium.. Transplanting too early, however, can disturb the delicate roots and cause stress. - Preparing for Transplant
Before transplanting, prepare your pots or growing medium. If you're growing in soil, choose a pot that’s at least 2-3 inches deep. The soil should be light, airy and have good drainage.
If you're using hydroponics, ensure that your system is ready and has a proper pH balance and water temperature.
Transplanting the Seedling
Carefully remove the seedling from its germination medium using tweezers. Be gentle with the roots, avoiding any breakage. Place the seedling into the prepared hole in its new container with the tap root pointing downwards. cover the hole in the center of the pot with soil or chosen growing medium. Make sure the seedling is firmly in place, but don't compact the medium too tightly. You want an airy and oxygen rich consistency when transplanting into soil.
Best Practice Tip:
After transplanting, water the seedling well but avoid overwatering. The seed now needs air and moisture in order to develop and thrive in the soil. Keep the environment humid and warm to help the seedling adjust to its new home. You can also place the seedling under a propagation dome for a few days to reduce transplant shock.
Cannabis seeds contain enough nutrients to support the germination and early seedling stages, meaning that they do not need additional nutrients for the first two weeks. However, once the first true leaves appear, you may consider adding nutrients to encourage healthy growth or using foliar spraying.with an organic nutrient
Early Seedling Stage (0-2 Weeks)
In the first two weeks after germination, cannabis seedlings rely on the stored nutrients inside the seed. During this time, there’s no need to add any fertilizers. Over-fertilizing at this stage can harm the delicate seedlings and encourage nutrient burn.
Best Practice Tip:
If you're growing in soil, choose a high-quality, nutrient-rich potting mix that will provide the seedlings with enough nutrients for their first few weeks of vegetative growth. In hydroponic systems, you may need to introduce a mild nutrient solution, but only at a quarter or half strength to prevent nutrient burn. Use an EC or TDS pen when measuring hydroponic nutrient solutions for seedlings.
Transition to Feeding (2-4 Weeks)
Once your cannabis seedlings develop their first set of true leaves (usually around 2-3 weeks after germination), they are ready to start receiving nutrients. At this stage, it’s best to start slow, introducing light doses of nutrients to support continued growth.
- Nutrient Recommendation: Start with a balanced nutrient mix that provides both nitrogen and phosphorus to encourage both vegetative growth and root development. Make sure to use ¼ or ½ strength of the recommended amount for mature plants. Seedlings growing in soil will access the nutrients through the soil food web, so even pH adjusted water will be fine during this stage.
Best Practice Tip:
Always check the pH levels of your water or nutrient solution. Cannabis plants thrive in slightly acidic conditions (pH range of 6.0-6.5 in soil and 5.5-6.5 in hydroponics). Proper pH ensures that the nutrients are available to the plant and reduces the risk of nutrient lockout.
Nutrient Type for Seedlings
For seedlings, it's best to use a nutrient mix specifically designed for young plants. These formulas are lower in strength and better suited for young cannabis plants, as they prevent overfeeding, which can stunt growth and cause nutrient burns. Otherwise you can create a 1ml per litre nutrient solution and slowly increase each week.
What lighting do marijuana seeds need?
Lighting is crucial in the early stages of cannabis growth, but it must be handled carefully to ensure seedlings don’t become stressed. Since seedlings are delicate, it’s essential to provide them with the right light intensity, duration, and spectrum.
1. Lighting for Seedlings (0-2 Weeks)
During the first two weeks of growth, seedlings are still using the energy stored in the seed for their initial development. They don’t require intense lighting, as too much light can overwhelm the plant, potentially stunting its growth. The goal during this stage is to offer a gentle light source that mimics natural daylight.
- Recommended Light Type: Fluorescent lights, such as T5 or T8 tubes, or compact fluorescent lights (CFLs), are ideal. These lights emit low heat and provide a broad-spectrum light and high levels of blue light (6400K)) without overwhelming young plants.
- Light Distance: Keep the light about 6-8 inches (15-20 cm) above the seedling canopy. Adjust the distance based on the plant's growth and how the light affects it. If the seedlings appear to stretch too much towards the light, lower the light further to provide better intensity.
Check how much heat is being emitted by the light by placing the top of your hand underneath. Increase the distance of the light to 30cm if necessary to avoid heat stress.
2. Lighting Duration for Seedlings
Seedlings do not need as much light intensity as mature plants, but they still need a good amount of exposure to kickstart their development. An18 hour light cycle per day is ideal. The extra hours of light help simulate the longer days of spring, encouraging the seedlings to grow and develop their true leaves.
Best Practice Tip:
To prevent stretching (when seedlings grow too tall in search of light), ensure the light is not too far away. Fluorescents should be placed relatively close to the plants without overheating them.
3. Lighting for Transplanting (2+ Weeks)
Once seedlings have their first set of true leaves (usually around 2-3 weeks), they can begin to tolerate stronger and intense light. At this stage, you can gradually introduce them to higher-intensity lighting sources, such as LED grow lights with dimmers or high-intensity discharge (HID) lights, if you're using an indoor grow setup.
4. Outdoor Lighting
For outdoor growers, cannabis seeds should be planted outdoors once germination is complete. Early spring sunlight is usually sufficient to nurture seedlings, but be cautious of sudden cold snaps. Protect your seedlings by starting them in containers or indoors under a CFL or LED.Summary
Germinating marijuana seeds isn’t the hardest thing to do in the world, and in fact is very easy. However there is a way of doing it right and many ways of doing it wrong!
After reading this article, you will never need to worry about a single seed never germinating ever again, and having 100% success each and every time! If you’re careful enough and react to your seeds accordingly, you’ll be popping beans like you wrote the book on it.

