Growing healthy cannabis plants takes time, patience, and attention to detail, but knowing when to harvest cannabis ultimately determines the quality of your final buds. Harvest too early and you risk losing potency, flavor, and yield. Wait too long and you may lose terpene richness while increasing the risk of mold or overripe flowers. Your plants will show clear signs when they’re ready, including changes in trichomes, pistils, and bud density. In this guide, you’ll learn how to tell when to harvest cannabis, along with step-by-step instructions for harvesting, drying, trimming, and curing to preserve maximum quality and potency.
Key Takeaways
- Harvest based on plant maturity, not the calendar. The most reliable way to know when cannabis is ready to harvest is by checking the trichomes alongside other maturity indicators such as pistil colour, swollen calyxes and bud density.
- Aim for mostly cloudy trichomes with 10–20% amber. This harvest window generally provides the best balance of potency, terpene preservation and overall flower quality.
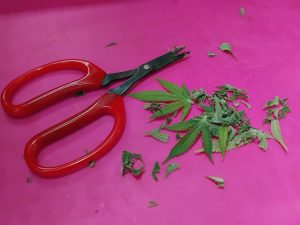
- Handle your plants carefully during harvest. Cut branches with clean, sharp shears, hold them by the stems rather than the buds, and minimise handling to protect delicate trichomes.
- Dry your cannabis slowly under controlled conditions. A drying environment of 60–70°F (15–21°C) with 50–60% relative humidity over 7–14 days helps preserve cannabinoids, terpenes and flavour.
- Don't skip the curing process. Curing your buds in glass jars for at least 2–4 weeks, while burping them regularly, produces smoother smoke, richer aromas and better long-term storage quality.
Understanding When to Harvest Cannabis Plants
Knowing when to harvest cannabis is one of the final skills you'll develop when learning how to grow cannabis successfully from seed to harvest. Harvest too early and your buds won't have reached their full potential. Wait too long and you risk losing some of the bright terpene profile, while also exposing your plants to mould, pests, and environmental damage. The ideal harvest window is when your flowers have reached peak maturity, giving you the best balance of potency, aroma, flavour, and yield.
While breeder flowering times provide a useful guideline, understanding how long it takes to grow cannabis from seed to harvest makes it much easier to estimate when your plants are approaching maturity, they should never be the deciding factor. Every cannabis plant matures differently depending on its genetics, phenotype, growing environment, lighting, temperature, nutrition, and overall health. Healthy plants also benefit from proper root development early in the grow, so understanding when and how to transplant cannabis plants can have a lasting impact on growth and final yields. Instead of relying on the calendar alone, learn to read the signs your plants are giving you. Trichome development, pistil colour, swollen calyxes, bud density, and fan leaf fade all work together to tell you when your cannabis is ready to harvest.
Why Timing Matters for Potency and Yield
Harvest timing directly affects the final quality of your cannabis. During the flowering stage, cannabinoids and terpenes continue developing inside the trichomes, while the buds also increase in size and density. Allowing your plants to fully mature gives them the opportunity to maximise resin production and finish swelling before harvest.
If you harvest too early, you'll often end up with lighter, airier buds that have less developed flavour, aroma, and potency. Harvesting too late can also reduce quality. As trichomes continue to age, some THC gradually oxidises into CBN, producing effects that many growers describe as more relaxing or sedating. Waiting too long also increases the likelihood of bud rot, especially in humid conditions or with dense flowers.
From my own experience, the final week before harvest is often when the biggest improvements occur. Buds continue to swell, resin production increases, and the terpene profile becomes noticeably stronger. Patience nearly always produces a better harvest than rushing to cut your plants.
How Harvest Timing Affects Cannabinoid and Terpene Development
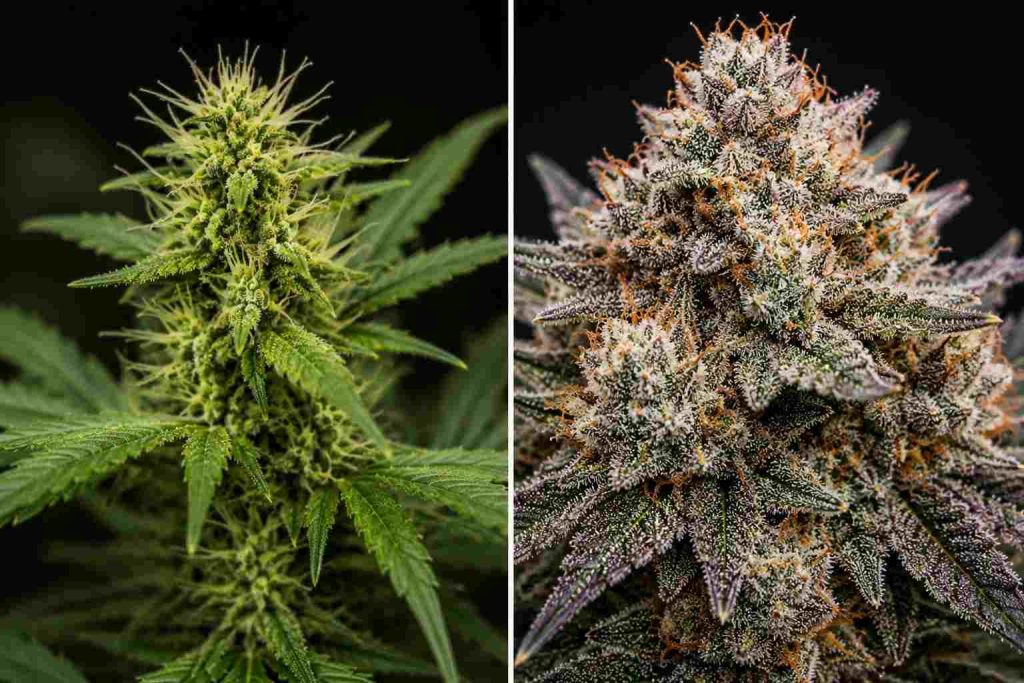
Cannabinoids and terpenes are produced within the trichomes that coat the flowers. As these resin glands mature, their appearance changes from clear to cloudy and eventually amber, providing one of the most reliable ways to judge harvest readiness.
Most growers aim to harvest when the majority of trichomes are cloudy or milky, with around 10–20% turning amber. At this stage, THC levels are generally close to their peak, while the terpene profile has had time to fully develop. If you prefer a more uplifting and energetic effect, harvesting slightly earlier with fewer amber trichomes may suit your preference. For a heavier, more relaxing effect, allowing additional amber trichomes to develop is often preferred.
It's important to understand that harvest timing doesn't increase CBD levels in THC-dominant cultivars. CBD production is primarily determined by genetics rather than the age of the plant. Instead, later harvests are associated with gradual THC oxidation and changes in the overall cannabinoid balance, which many growers feel produces a more calming experience.
| Harvest Stage | Trichome Appearance | Typical Characteristics |
| Too Early | Mostly clear | Lower potency, less developed flavour and aroma, smaller buds |
| Ideal Harvest Window | Mostly cloudy with 10–20% amber | Excellent balance of potency, terpene expression and bud density |
| Late Harvest | High percentage of amber | More relaxing effects, increased risk of mould and terpene degradation if left too long |
Common Mistakes Growers Make When Harvesting Too Early or Late
One of the biggest mistakes new growers make is harvesting strictly according to the breeder's flowering schedule. While these timelines provide a useful estimate, they cannot account for environmental conditions or the natural variation between different phenotypes. Two plants from the same pack of seeds can reach maturity several days apart.
Proper harvest timing also depends on healthy flowering plants, which starts with knowing how to water your cannabis plants correctly throughout the grow cycle.
Another common mistake is relying on a single harvest indicator. For example, pistils may darken early due to heat or light stress, while sugar leaf trichomes often mature before the trichomes found on the flowers themselves. I always inspect the trichomes on the calyxes of several buds across the plant before making a final decision.
As harvest approaches, inspect your plants daily rather than assuming they're ready. Look for multiple signs of maturity working together, including mostly cloudy trichomes, swollen calyxes, dense flowers, naturally fading fan leaves, and a strong aroma. Taking a few extra days to observe your plants can often make the difference between a good harvest and an exceptional one.
How to Know When Cannabis Is Ready to Harvest
One of the questions I hear most often is, "How do I know when to harvest cannabis?" The answer isn't as simple as counting flowering weeks or looking at a single part of the plant. Experienced growers use several maturity indicators together before making the final decision.
Breeder flowering times provide a useful guideline, but they should never be treated as an exact harvest date. Every cannabis plant develops at its own pace depending on its genetics, phenotype, lighting, temperature, humidity, nutrition, and overall growing conditions. Instead of harvesting by the calendar, learn to read the plant itself. When the trichomes, pistils, calyxes, leaves, and buds all show signs of maturity, you'll know your cannabis is ready to harvest.
Every successful harvest starts with healthy seedlings, so learning how to germinate marijuana seeds correctly gives your plants the strongest possible start.
Typical Harvest Windows for Photoperiod and Autoflower Cannabis
Knowing the average flowering time helps you estimate when harvest is approaching, but remember that these timelines are only a starting point. Environmental conditions and genetics can shift the harvest window by several days or even weeks.
| Cannabis Type | Typical Harvest Window | Notes |
| Indica Photoperiod | 7–9 weeks of flowering | Usually finishes earlier with dense, compact flowers. |
| Hybrid Photoperiod | 8–10 weeks of flowering | Most modern cultivars fall into this range. |
| Sativa Photoperiod | 10–14 weeks of flowering | Longer flowering period with slower bud maturation. |
| Autoflower Cannabis | 8–12 weeks from seed | Judge maturity by the plant rather than the calendar. |
As a breeder and grower, I've harvested plants from the same seed pack several days apart because each phenotype matured differently. This is perfectly normal. Rather than chasing an exact week number, use these timelines to know when to start checking trichomes every day, not when to harvest automatically.
The Five Signs Your Cannabis Is Ready to Harvest
If you're wondering how to tell when to harvest cannabis, don't rely on a single sign. Experienced growers look for several indicators of maturity that appear together. While trichomes remain the most accurate way to judge harvest readiness, I always confirm my decision by inspecting the pistils, calyxes, bud density, fan leaves and overall aroma before cutting a plant.
Using multiple indicators reduces the risk of harvesting too early or leaving your plants in flower longer than necessary.
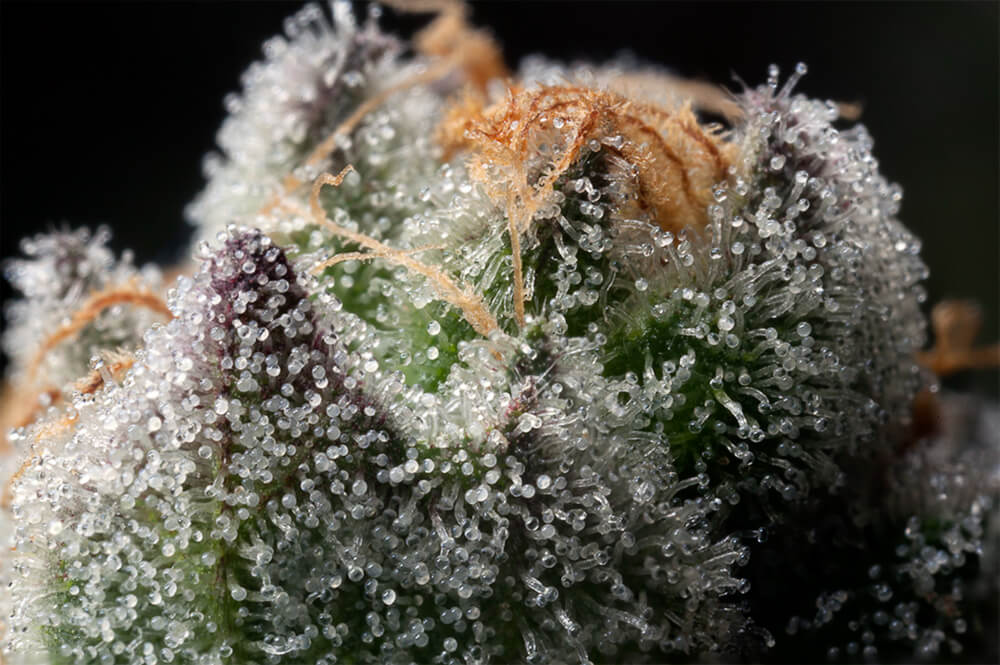
1. Trichomes Have Turned Mostly Cloudy
Trichomes are tiny mushroom-shaped resin glands that coat the flowers and sugar leaves. They contain the cannabinoids and terpenes responsible for the potency, flavor and aroma of your cannabis, making them the most reliable indicator of harvest readiness.
As cannabis matures, trichomes change color through three distinct stages.
- Clear trichomes indicate the plant is still developing. The resin heads are transparent and cannabinoids haven't fully matured.
- Cloudy or milky trichomes indicate the plant has reached peak cannabinoid production and is inside the ideal harvest window.
- Amber trichomes show that some THC has begun to oxidize into CBN, producing a more relaxing and body-focused effect.
For most cultivars, I harvest when approximately 80–90% of the trichomes are cloudy, with around 10–20% turning amber. This consistently provides an excellent balance between potency, flavor and terpene preservation.
One mistake I see beginners make is checking trichomes on the sugar leaves. These mature earlier than the trichomes on the flowers themselves, which can lead to harvesting several days too soon. Always inspect the trichomes directly on the calyxes using a jeweler's loupe or digital microscope.

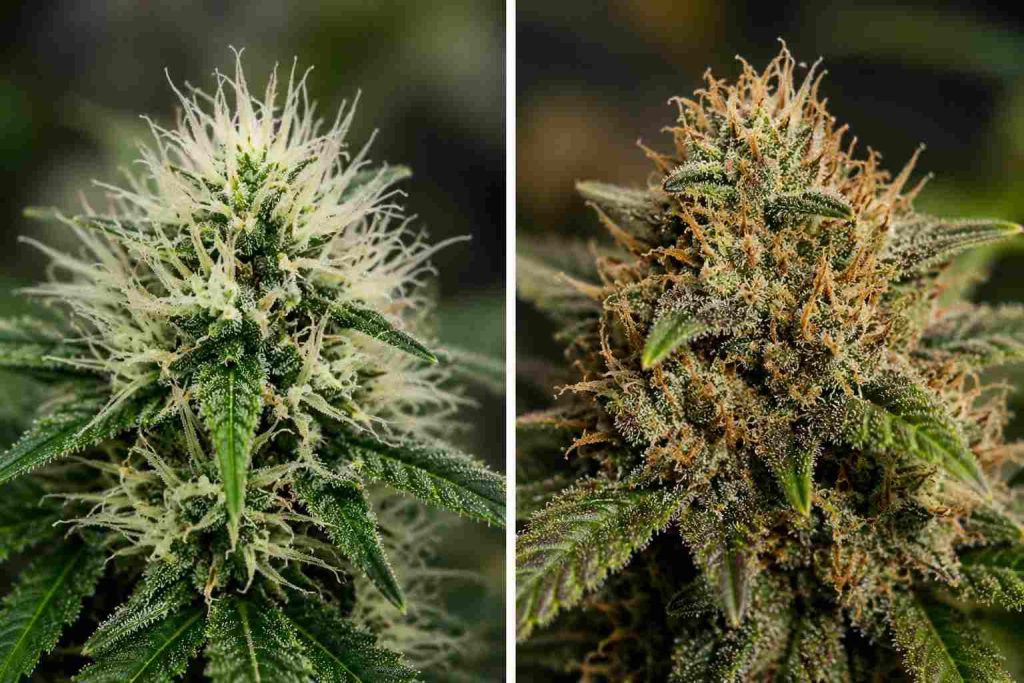
2. Most Pistils Have Darkened and Curled Inward
Understanding stigmas vs pistils helps growers identify one of the most reliable visual signs that harvest is approaching. Early in flowering they're bright white, long and upright. As the buds mature, they gradually darken to orange, amber, red or brown before curling back into the flower.
While pistils are a useful maturity indicator, they should never be used on their own. Heat stress, intense lighting and certain genetics can cause pistils to darken earlier than expected.
As a general guide, I begin inspecting trichomes closely once 70–90% of the pistils have changed color and curled inward.
If most pistils are still white and sticking straight out from the buds, your plant usually needs more time to mature.
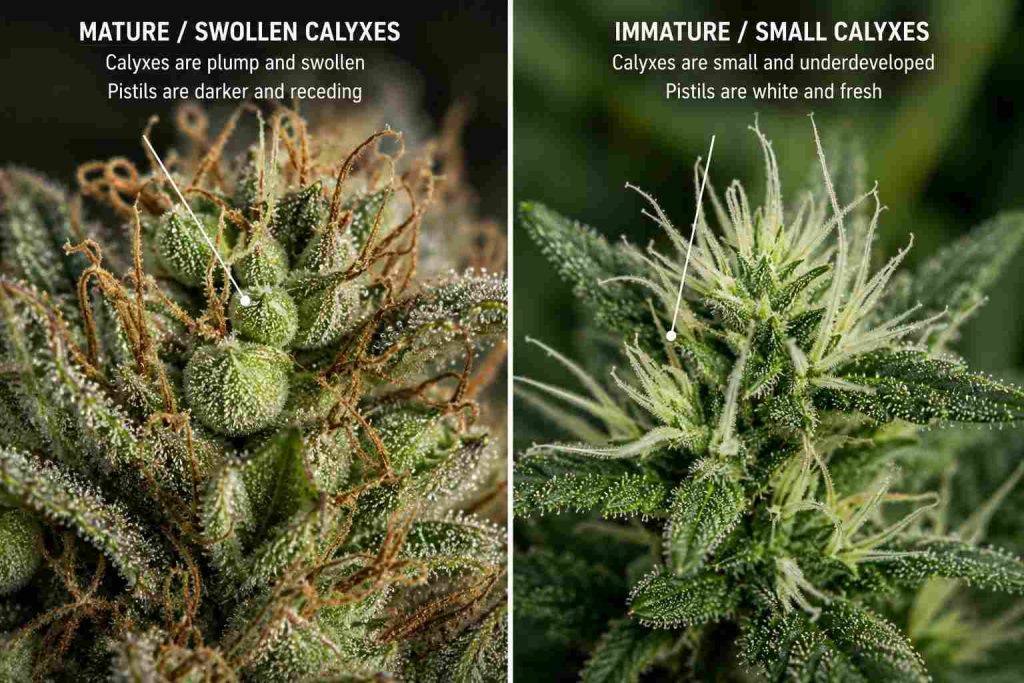
3. The Calyxes Become Swollen
This is one of the most overlooked harvest indicators, yet experienced growers pay close attention to it.
The calyx is one part of the anatomy of a cannabis bud, and one of the easiest structures to monitor as flowers mature. During the final weeks of flowering, these calyxes swell as the buds finish developing, creating a fuller, denser appearance.
Immature buds often look loose and airy because the calyxes haven't fully expanded. As harvest approaches, the flowers become tighter, more compact and noticeably heavier.
When I inspect a plant near harvest, I always look for swollen calyxes alongside mature trichomes. If both indicators are present, it's usually a strong sign that the plant has reached its harvest window.
4. Buds Feel Dense, Sticky and Fully Developed
Bud density changes dramatically during the last two weeks of flowering. Many cultivars continue stacking calyxes and producing resin right up until harvest.
Gently squeeze one of the larger buds without compressing it. Mature flowers should feel firm, dense and coated in sticky resin. Immature buds often feel lighter, softer and less compact.
This is also the stage where resin production reaches its peak. When brushing against the flowers, you'll usually notice a thick coating of trichomes left on your gloves or fingers.
While bud density varies between cultivars—sativas naturally produce airier flowers than many indicas, you should always notice a clear increase in weight and firmness as harvest approaches.
5. Fan Leaves Begin to Fade Naturally
During late flowering, many growers also begin considering when to flush cannabis before harvest, although the timing depends on your growing method and nutrient programme. As this happens, the larger fan leaves often begin fading from deep green to lighter green before eventually turning yellow.
This natural fade shouldn't be confused with cannabis leaf symptoms caused by deficiencies or disease or why cannabis leaves turn yellow during the wrong stage of growth.. Healthy senescence occurs gradually while the buds continue developing normally.
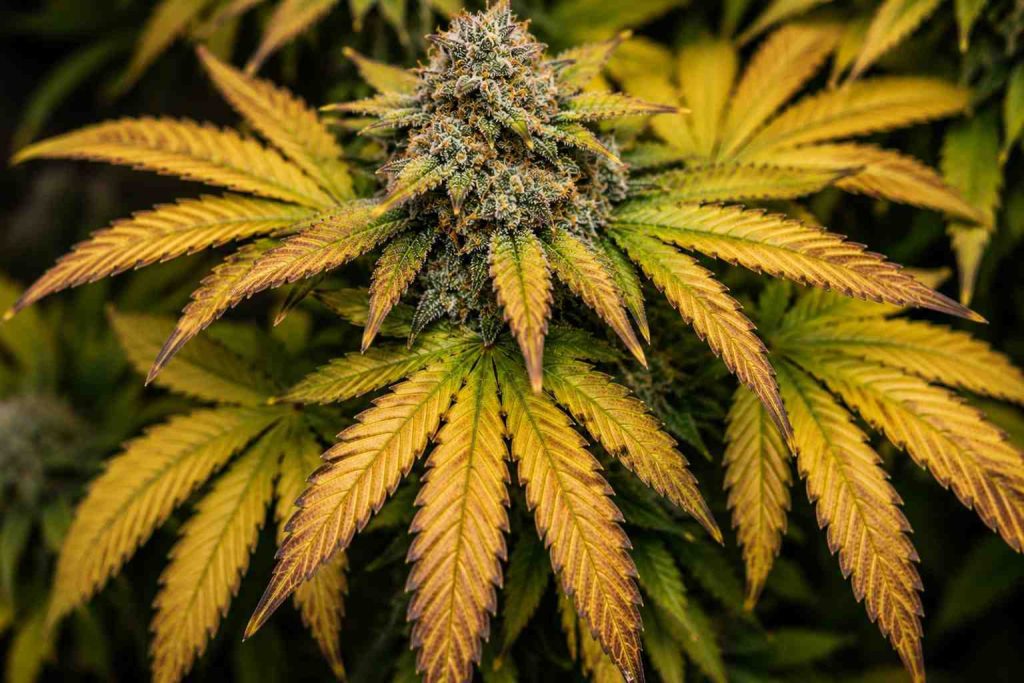
If your leaves are rapidly browning, spotting or dying much earlier in flower, the problem is more likely related to nutrition, pH or environmental stress rather than harvest readiness.
Alongside this color change, you'll often notice the aroma becoming much stronger. Terpenes are usually at their most expressive during the final stages of flowering, filling the grow room with the cultivar's distinctive scent.
A naturally fading canopy combined with swollen buds, mature trichomes and a strong aroma is one of the clearest signs your cannabis is ready to harvest.
| Harvest Sign | What You're Looking For |
| Trichomes | Mostly cloudy with around 10–20% amber |
| Pistils | 70–90% have darkened and curled inward |
| Calyxes | Swollen, stacked, and fully developed |
| Bud Density | Firm, dense, and resinous flowers |
| Fan Leaves | Natural yellowing during late flower |
| Aroma | Strong, rich terpene profile |
I always confirm at least four or five of these signs before harvesting. Looking at the whole plant rather than one feature alone produces much more consistent results.
Understanding Trichome Maturity
Trichomes are tiny resin glands that cover the flowers and sugar leaves. They produce the cannabinoids and terpenes responsible for the potency, aroma, and flavor of your cannabis. Because trichomes change appearance as they mature, they remain the most accurate way to determine when cannabis is ready to harvest.
Always inspect trichomes on the calyxes rather than the sugar leaves. Sugar leaf trichomes often mature earlier, which can lead to harvesting before the flowers have fully developed.
A jeweler's loupe with 30x–60x magnification or a digital microscope makes inspection much easier.
| Trichome Stage | Appearance | Harvest Recommendation | Typical Effects |
| Immature | Clear and transparent | Too early to harvest | Lighter potency with less developed flavor |
| Peak Maturity | Mostly cloudy or milky | Ideal harvest window | Strong potency with balanced effects |
| Mature | Cloudy with 10–20% amber | Preferred by most growers | Balanced cerebral and body effects |
| Overripe | Mostly amber | Harvest immediately | Heavier, more relaxing effects as THC gradually oxidizes |
While many growers chase a specific percentage of amber trichomes, remember there isn't a single "perfect" harvest point. The best time depends on the type of experience you're aiming to produce. Personally, I prefer harvesting when the majority of trichomes are cloudy with a small percentage turning amber, as this consistently produces excellent potency while preserving a vibrant terpene profile.
Equipment You'll Need for a Successful Cannabis Harvest
Preparing your equipment before harvest makes the entire process smoother and helps protect the quality of your flowers. The last thing you want is to be searching for scissors while freshly cut branches are sitting on the floor.
Before I begin harvesting cannabis, I always prepare my drying room first and make sure every tool is clean, organized, and within reach.
| Equipment | Why You Need It |
| Sharp pruning shears | Make clean cuts through branches without crushing stems. |
| Precision trimming scissors | Remove leaves neatly while preserving the flowers. |
| Jeweler's loupe or digital microscope | Inspect trichomes accurately before harvesting. |
| Disposable nitrile gloves | Prevent sticky resin from coating your hands. |
| Isopropyl alcohol and cloth | Clean resin build-up from scissors during trimming. |
| Drying rack or hanging lines | Dry harvested branches evenly. |
| Hygrometer and thermometer | Monitor the drying environment. |
| Glass curing jars | Cure and store dried cannabis correctly. |
| Plant labels | Keep different cultivars or phenotypes organized. |
Having everything ready before harvest also reduces unnecessary handling of your buds, helping preserve the delicate trichomes that contain the cannabinoids and terpenes you've spent months growing.
How to Harvest Cannabis Step by Step
Once you've confirmed your cannabis is ready to harvest, it's time to cut the plant and prepare the flowers for drying. At this stage, your goal is simple: preserve as many trichomes as possible while handling the buds as little as you can. Every unnecessary squeeze, drop or knock can remove resin, so taking your time is well worth the extra effort.
Step 1: Prepare Your Harvest Area
Before making the first cut, have your drying space completely ready. Your pruning shears, trimming scissors, gloves and drying lines should all be within easy reach so harvested branches can be moved straight into the drying room.
I always prepare my drying room before harvesting because once branches are cut, I don't want them sitting under grow lights or being handled while I organize equipment.
Step 2: Cut the Plant or Individual Branches
Using sharp, sterilized pruning shears, cut either the main stem at the base or harvest one branch at a time where it joins the main stem. If you're new to harvesting cannabis, I generally recommend cutting individual branches. They're easier to handle, dry more evenly and allow you to inspect each flower as you work.
Support each branch with your free hand before cutting so it doesn't fall onto the floor or knock against other branches.
If you're growing outdoors, avoid harvesting immediately after rain or while morning dew is still on the buds. Wet flowers are much more likely to develop mold during drying.
Step 3: Remove the Large Fan Leaves
Once a branch has been removed, strip away the large fan leaves that contain very few trichomes. Leave the smaller sugar leaves attached if you plan to dry trim later, or remove them now if you prefer wet trimming.
I work on one branch at a time rather than cutting the whole plant down first. It keeps the harvest organized and prevents unnecessary handling of the flowers.
Step 4: Handle the Buds Carefully
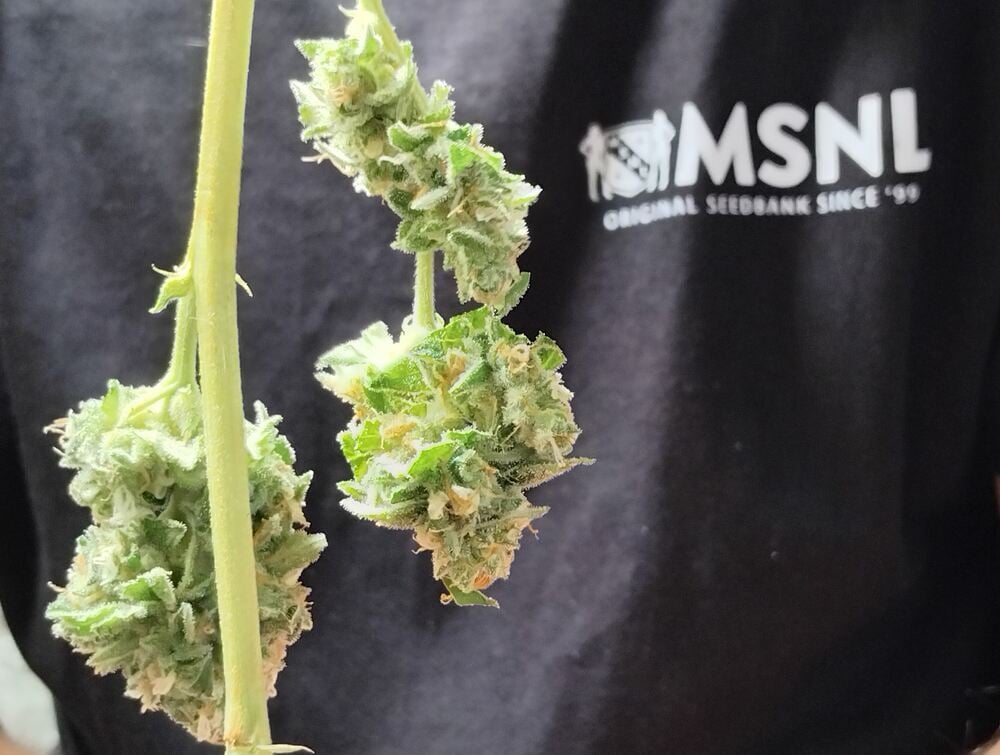
Always hold harvested branches by the stem rather than touching the flowers. The trichomes covering the buds are surprisingly fragile and can break away through repeated handling.
Avoid piling branches on top of each other or squeezing the buds while moving them. Instead, hang each branch as soon as it's prepared. I've found this simple habit does a much better job of preserving the resin and keeping the flowers looking their best.
Step 5: Hang the Branches to Dry
Hang each branch upside down with enough space between them for air to circulate freely. Crowding branches together slows drying, traps moisture and increases the risk of mold, particularly with dense indica cultivars.
Once every branch is hanging in your drying room, the harvesting process is complete. The next stage is drying your cannabis slowly under controlled conditions, which plays just as important a role in preserving flavor, aroma and potency as harvesting at the right time.during drying. Treat your harvested buds with care, they’re covered in delicate resin glands you want intact.
How to Dry, Trim and Cure Cannabis
Harvesting your cannabis is only half the process. How you dry, trim and cure your buds has just as much influence on the final quality as harvesting at the right time. Drying too quickly can reduce aroma and create a harsh smoke, while poor curing can lead to mold or flavorless flowers. Taking your time during these final stages is one of the easiest ways to improve the quality of your harvest.
Dry Your Cannabis Slowly
After harvesting, hang each branch upside down on drying lines or place them on mesh drying racks if space is limited. Leave enough space between each branch so air can circulate freely, but avoid pointing fans directly at the buds. Gentle airflow around the room helps remove moisture evenly, while direct airflow can dry the outside of the flowers too quickly and trap moisture inside.
If you decided to dry trim, leave the sugar leaves attached during drying. They slow the drying process slightly and help protect the flowers. If you chose wet trimming, make sure there is extra space between the buds to improve airflow.
Try to maintain a consistent drying environment throughout the process. Although drying requires different conditions than cultivation, understanding the best temperature to grow cannabis helps avoid heat stress throughout the grow cycle.
| Factor | Ideal Range |
| Temperature | 60–70°F (15–21°C) |
| Relative Humidity | 50–60% |
| Light | Complete darkness |
| Airflow | Gentle, indirect air circulation |
| Drying Time | Usually 7–14 days |
I always aim for a slow, even dry rather than trying to finish as quickly as possible. In my experience, slower drying preserves more of the cultivar's aroma and produces a noticeably smoother smoke after curing.
Maintaining the correct drying environment is much easier when you understand grow room humidity control.
How to Tell When Your Buds Are Dry
Don't rely on the number of days alone. Larger colas often take longer to dry than smaller lower branches, so it's important to check the buds rather than the calendar.
A simple way to test your flowers is the stem snap test. Bend one of the smaller stems. If it snaps cleanly instead of folding over, the buds are usually ready for trimming and curing. The outside of the flowers should feel dry to the touch, while the inside should still have a slight amount of moisture.
If you're unsure, place a few buds into a sealed glass jar with a hygrometer for several hours. If the humidity inside the jar rises above 65%, the buds need additional drying before curing.
I always check several branches from different parts of the plant because flowers don't always dry at exactly the same rate.
How to Trim Cannabis Buds
Once the buds have dried, it's time to trim away the remaining sugar leaves. These are the small leaves covered in trichomes that sit close to the flowers. Some growers save this trim for making hash, rosin or edibles because it still contains valuable resin.
Hold each branch by the stem and use sharp trimming scissors to carefully remove the sugar leaves without cutting into the buds themselves. Rotate the branch as you work rather than squeezing the flower in your hand. This helps preserve the trichomes and gives the finished buds a cleaner appearance.
Resin quickly builds up on trimming scissors, making them harder to use. I usually clean my scissors with isopropyl alcohol every few plants to keep the blades cutting cleanly and prevent sticky resin from tearing the flowers.
Step-by-Step Guide to Curing Cannabis
Once trimming is complete, place the buds into clean glass jars, filling each jar to around 75% capacity. Leaving some empty space allows air to circulate while preventing moisture from becoming trapped.
Store the jars somewhere cool, dark and away from direct sunlight. During the first week, open each jar once a day for five to ten minutes. This process, known as burping, releases excess moisture while allowing fresh air to enter the jar.
After the first week, reduce burping as the moisture inside the flowers begins to stabilize.
| Curing Stage | What to Do |
| Week 1 | Burp jars once each day for 5–10 minutes. |
| Week 2 | Burp every other day. |
| Weeks 3–4 | Burp every three to four days. |
| After 1 Month | Store sealed jars in a cool, dark place for long-term curing. |
Most cannabis is enjoyable after two to four weeks of curing, although many cultivars continue improving for several months when stored correctly.
Once your buds have finished curing, learning how to keep weed fresh for longer helps preserve potency and aroma for months.
Common Drying and Curing Mistakes
Many problems during drying and curing are easy to avoid once you know what to look for.
| Mistake | Why It's a Problem | How to Avoid It |
| Drying too quickly | Harsh smoke and reduced terpene retention | Dry slowly in a cool, stable environment. |
| Direct airflow on buds | Uneven drying and brittle flowers | Use indirect airflow around the room. |
| Jarring buds too early | Excess moisture can lead to mold | Wait until smaller stems snap cleanly. |
| Overfilling jars | Restricts airflow inside the jar | Fill jars to around 75% capacity. |
| Forgetting to burp jars | Moisture becomes trapped inside | Burp jars regularly during the first few weeks. |
During curing, I rely on both my hygrometer and my senses. Healthy buds should gradually develop a richer aroma while remaining slightly springy when gently squeezed. If I ever notice a musty smell, an ammonia odor or excessive moisture inside the jar, I remove the buds immediately and allow them to dry for longer before continuing the cure. Catching these issues early can save an entire harvest.
Frequently Asked Questions About Harvesting Cannabis
How do you know when cannabis is ready to harvest?
The most reliable way to tell if cannabis is ready to harvest is by inspecting the trichomes on the flowers using a jeweler's loupe or digital microscope. Most growers harvest when the majority of trichomes are cloudy or milky, with around 10–20% turning amber. You should also look for supporting signs such as swollen calyxes, 70–90% darkened pistils, dense buds, and naturally fading fan leaves rather than relying on a single indicator.
How long should cannabis dry before curing?
Most cannabis takes between 7 and 14 days to dry, although the exact time depends on bud size and the drying environment. Instead of relying on the number of days, check the smaller stems. When they snap cleanly rather than bend, and the outside of the buds feels dry while the inside remains slightly springy, they're usually ready to move into curing jars.
Should you harvest cannabis in the morning or after the dark period?
Many growers prefer harvesting cannabis at the end of the dark period or shortly before the lights come on for indoor plants, believing terpene retention may be slightly better. Outdoor growers should wait until any morning dew has dried before harvesting to reduce the risk of mold. While these practices are common among experienced growers, scientific evidence supporting a significant improvement is limited.
What is the 60/60 drying method?
The 60/60 drying method refers to drying cannabis at approximately 60°F (15–16°C) with 60% relative humidity. These conditions slow the drying process, helping preserve terpenes while reducing the risk of overdrying or mold. Although not every grow room can achieve these exact conditions, they provide an excellent target for producing high-quality dried flower.
Can cannabis be harvested in stages?
Yes. If the upper colas have reached peak maturity while the lower buds still have mostly clear trichomes, you can harvest the top of the plant first and allow the lower flowers to continue ripening for several more days. I regularly use this approach with larger indoor plants because it gives the lower canopy more time under the grow lights and often results in a more even, higher-quality harvest.

