




Spider mites on cannabis can be easy to miss at first, but populations spread quickly when conditions are warm and dry. Early warning signs include yellow dots on leaves, pale stippling, fading foliage, and tiny mites or eggs underneath the leaves. As spider mite damage becomes more severe, growers may notice dry leaves and fine webbing on cannabis leaves and stems. The sooner spider mites on weed are identified, the easier they are to manage. This guide explains what causes infestations, how to identify damage, how to prevent spider mites, and how to remove them from plants step by step.
Key Takeaways
- Yellow or white dots are often the first warning sign. Spider mite feeding creates tiny pale marks known as stippling, which can gradually spread across the leaf as feeding continues.
- Always check underneath affected leaves. Spider mites and their eggs commonly gather around the undersides and veins, making a hand lens one of the most useful tools for confirming an infestation.
- Heavy webbing usually means the infestation is established. Fine webbing may develop around leaves and stems before eventually spreading across larger areas of the plant.
- Prevention starts with cleanliness and regular inspections. Quarantine new plants and clones, maintain a clean grow space, avoid prolonged hot and dry conditions, and routinely inspect your foliage.
- Getting rid of spider mites requires more than one action. Isolate affected plants, physically reduce mite numbers, use an appropriate control method, monitor for newly hatched mites, and continue checking until there are no new eggs, feeding marks, mites, or webbing.
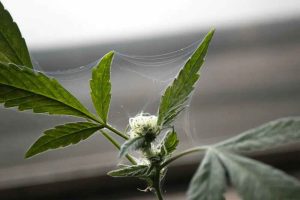
What are spider mites on cannabis?
Spider mites are tiny pests related to spiders and ticks rather than insects, and are one of several cannabis pests and diseases growers should learn to identify early. Adult mites have eight legs and feed on cannabis by piercing individual plant cells and removing their contents. They usually gather on the undersides of leaves, where they can remain hidden while their numbers increase.
As feeding continues, the affected leaves develop tiny pale, white, or yellow dots known as stippling. This is often one of the first visible signs of spider mites on cannabis, although similar cannabis leaf symptoms can also be caused by nutrient problems or other pests.
What do spider mites look like?
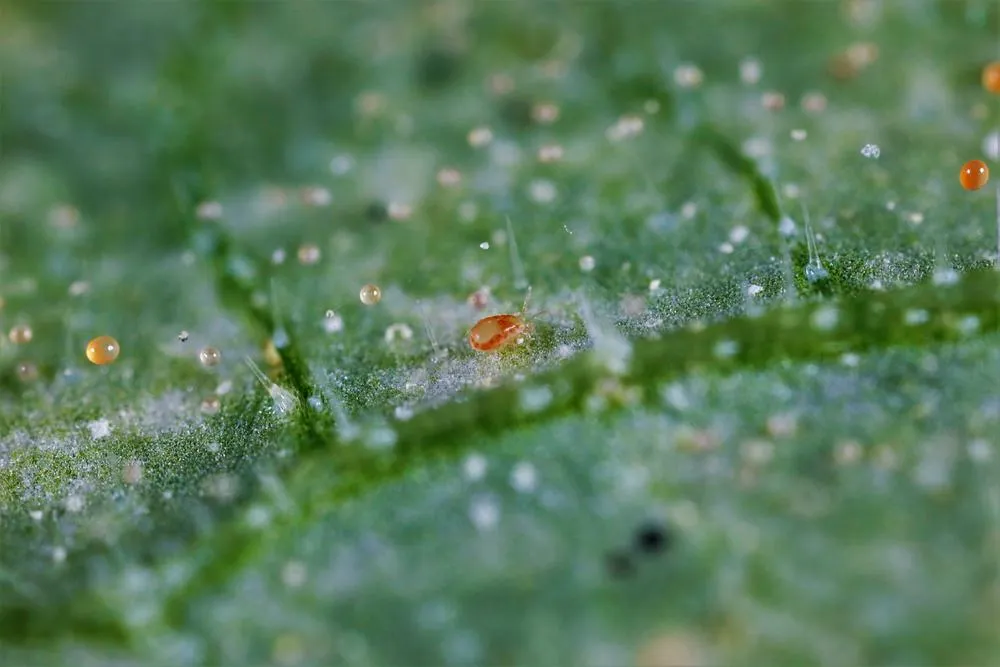
Adult spider mites are extremely small, generally around 0.4–0.6 mm long, making them difficult to identify with the naked eye. Under magnification, they appear as tiny oval-bodied mites moving across the leaf surface or between the veins. Small, round eggs may also be visible nearby.
Their colour can vary depending on the species and life stage, so colour alone should not be used for identification.
Grower tip: Keep a 10x hand lens or stronger magnifier in your grow room. If you notice unexplained yellow dots on leaves, turn the affected leaf over and inspect the underside before assuming the plant has a nutrient deficiency.
The two-spotted spider mite and cannabis plants
The two-spotted spider mite (Tetranychus urticae) is one of the most widespread spider mite species affecting cultivated plants. Adults are commonly pale yellow to green, with two darker areas visible through the body.
They prefer feeding and reproducing on leaf undersides, which makes early infestations easy to overlook. By the time a grower notices obvious spider mite damage or webbing, the population may already have spread beyond the first affected leaves.
Understanding the spider mite life cycle
Spider mites develop through four main stages: egg, larva, nymph, and adult. Under favourable conditions, two-spotted spider mites can complete a generation in approximately 7–20 days, with females laying several eggs each day.
| Life stage | What growers should know |
| Egg | Usually found on leaf undersides and easily overlooked |
| Larva | Newly hatched and extremely small |
| Nymph | Feeds and develops before becoming an adult |
| Adult | Continues feeding and produces the next generation |
Several generations can overlap, meaning eggs, young mites, and adults may all be present on the same cannabis plant. This is important because removing or killing the visible mites does not necessarily remove every egg. Newly hatched mites can therefore appear after the initial treatment, which is why continued inspection is essential.
Why spider mites spread so quickly in cannabis grows
Warm, dry conditions favour rapid spider mite development. Indoor grow rooms can therefore provide suitable conditions for a population to increase quickly once mites are introduced.
Spider mites may enter a grow on clones, other plants, clothing, tools, or equipment that has been exposed to an infestation. Because they are so small, growers can unknowingly move them between plants before realizing there is a problem.
Once populations increase, mites move onto neighboring leaves and plants. Heavy infestations can eventually produce the fine webbing commonly associated with spider mites on weed.
Grower tip: Catching spider mites early makes a major difference. A few mites confined to one or two leaves are much easier to manage than an established infestation that has spread throughout several cannabis plants.
How to identify spider mites on cannabis plants
If you are new to growing cannabis, spider mites can be difficult to spot because they are extremely small. In many cases, you will notice the damage they cause before you see the mites themselves.
The easiest way to identify spider mites on cannabis is to work through the plant step by step. Start by checking the tops of the leaves, then look underneath them for mites and eggs, inspect for webbing, and finally compare the symptoms with other common problems.
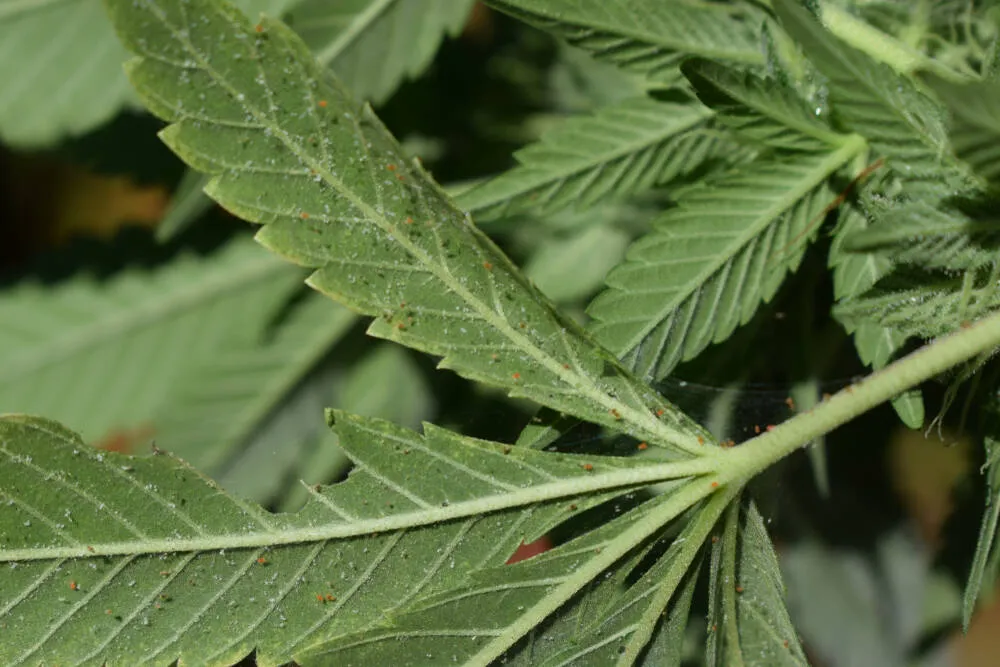
Step 1: Look for yellow dots and white spots on the leaves
Start by checking the upper surface of your cannabis leaves under good lighting.
One of the first signs of spider mites is a scattering of tiny yellow, white, or pale dots. These marks are known as stippling and appear where the mites have fed on individual plant cells.
At first, you may only notice a few dots in one area.
Grower tip: If you notice unexplained yellow dots on leaves, do not immediately assume the plant needs more nutrients. Check underneath the leaf first, as pest damage can sometimes look similar to a nutrient problem.
Step 2: Turn the leaf over and check underneath
Once you find a leaf with suspicious markings, gently turn it over.
Spider mites usually spend much of their time on the underside of cannabis leaves, so this is one of the most important places to inspect.
Use a 10x hand lens or stronger magnifier and look closely around the leaf veins. You are looking for tiny moving specks and small, round eggs.
If you do not have a magnifier, hold a sheet of white paper underneath the leaf and gently tap it. Any mites that fall onto the paper should be easier to see as they move across the white surface.
Step 3: Look for fine spider mite webbing
Next, check the affected plant for thin strands of webbing.
Early spider mite webbing on cannabis leaves can be very fine, so inspect the undersides of leaves, leaf stems, new growth, and areas where leaves meet.
As an infestation becomes more established, the webbing usually becomes easier to see and may spread across larger parts of the plant.
Grower tip: Do not wait until you see heavy webbing before taking the problem seriously. If you find mites, eggs, and stippling without much webbing, you may have caught the infestation earlier.
Step 4: Check nearby leaves and plants
Finding mites on one leaf does not tell you how far they have spread.
Inspect the leaves directly above, below, and beside the affected area, then check nearby cannabis plants as well.
If mites are limited to one or two leaves, you may have found the infestation relatively early. If you are finding them across several branches or neighboring plants, the infestation is likely more established.
Step 5: Make sure it is actually spider mites
Before deciding how to treat the plant, compare what you have found with thrips on cannabis plants and other common causes of leaf damage.
| What to check | Spider mites | Thrips | Nutrient problems |
| Leaf damage | Tiny yellow or white dots | Silvery streaks or irregular patches | Larger or patterned areas of discoloration |
| Under the leaves | Tiny mites and round eggs | Thin, elongated insects may be visible | No insects or eggs |
| Webbing | May appear as numbers increase | No | No |
| Dark fecal spots | Not usually a main sign | Often present | No |
| Best way to confirm | Find mites or eggs with magnification | Find elongated thrips or larvae | No visible pests present |
For a beginner, the best way to confirm spider mites on weed is to look for several signs together rather than relying on one symptom. Tiny yellow or white spots on the upper leaf, mites or eggs underneath, and fine webbing are the clearest combination to look for.
Once you have confirmed spider mites, the next step is to work out how much spider mite damage has already occurred and how far the infestation has spread.
What damage do spider mites cause to cannabis?
Spider mites damage cannabis by piercing individual leaf cells and feeding on their contents. At first, the damage can look minor, but continued feeding removes chlorophyll from more of the leaf and reduces the amount of healthy tissue available for photosynthesis. Heavy infestations can eventually cause bronzing, drying, premature leaf loss, and widespread webbing.
The symptoms themselves are similar throughout the cannabis life cycle, but when the infestation happens matters. A young seedling has very little healthy foliage to spare, while a flowering plant can become much harder to treat once mites and webbing reach the developing buds.
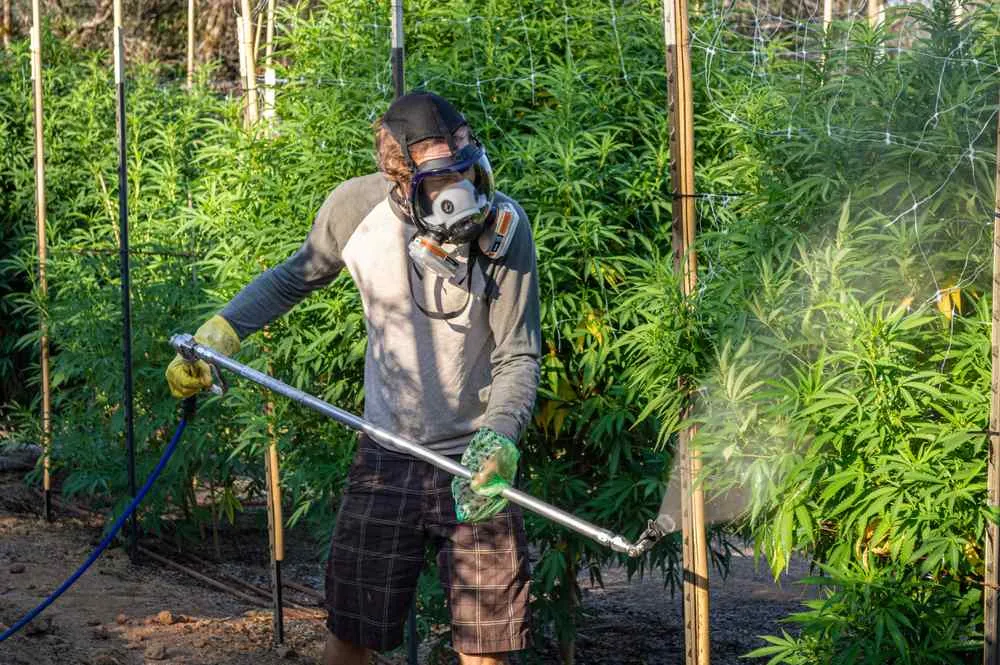
Early signs of spider mite damage
Early spider mite damage is normally easiest to see on the leaves. At this point, the goal is to recognise the individual symptoms before large areas of the plant become affected.

Tiny yellow or white dots
Small yellow, white, or pale pinpricks are usually the first visible signs. Each dot represents an area where feeding has damaged individual leaf cells.

Speckled or stippled leaves
As more feeding points develop, the individual dots create a speckled appearance known as stippling. A leaf may still look mostly green at this stage, but the pale pattern becomes increasingly noticeable.
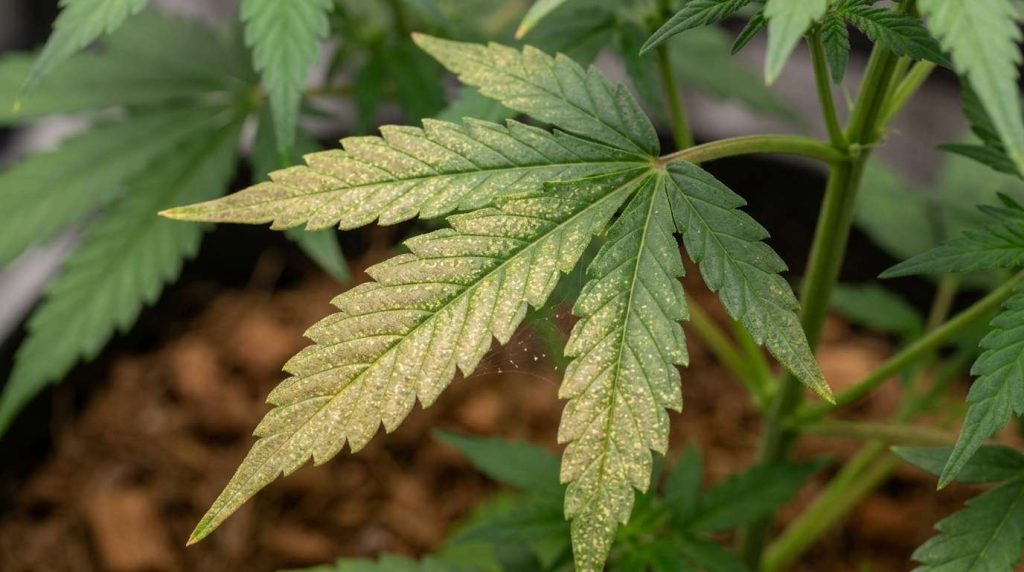
Fading green leaves
Continued damage causes affected sections to lose their healthy green colour. Leaves can begin looking washed out or pale before more obvious yellowing develops. If discolouration becomes widespread, compare it with other causes of cannabis leaves turning yellow before assuming spider mites are responsible.
What happens as an infestation becomes more severe?
As spider mite numbers increase, the symptoms move beyond isolated dots and start affecting larger areas of foliage.
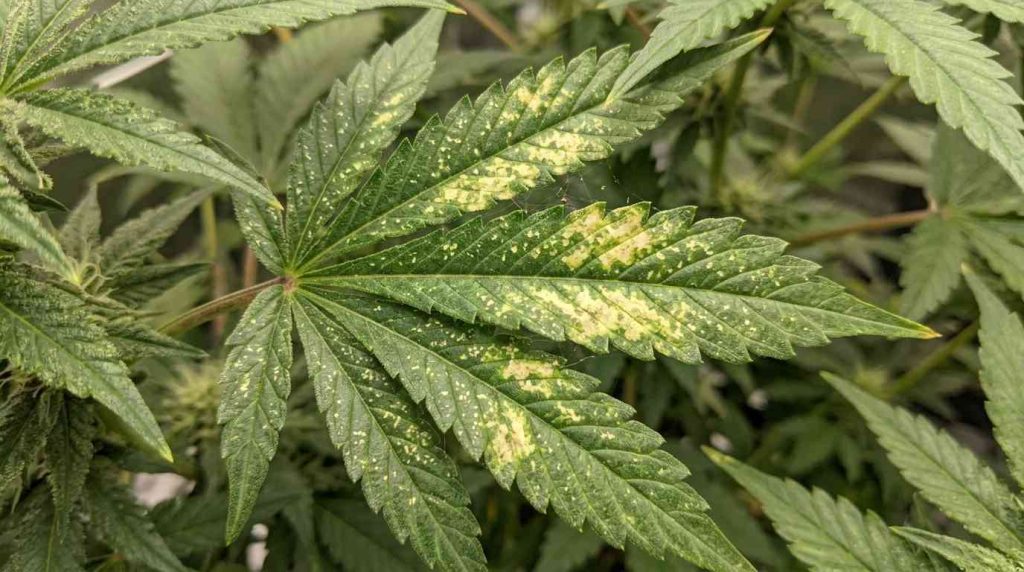
Patchy yellowing
Previously scattered feeding marks begin joining together, causing larger yellow or pale sections across the leaf.
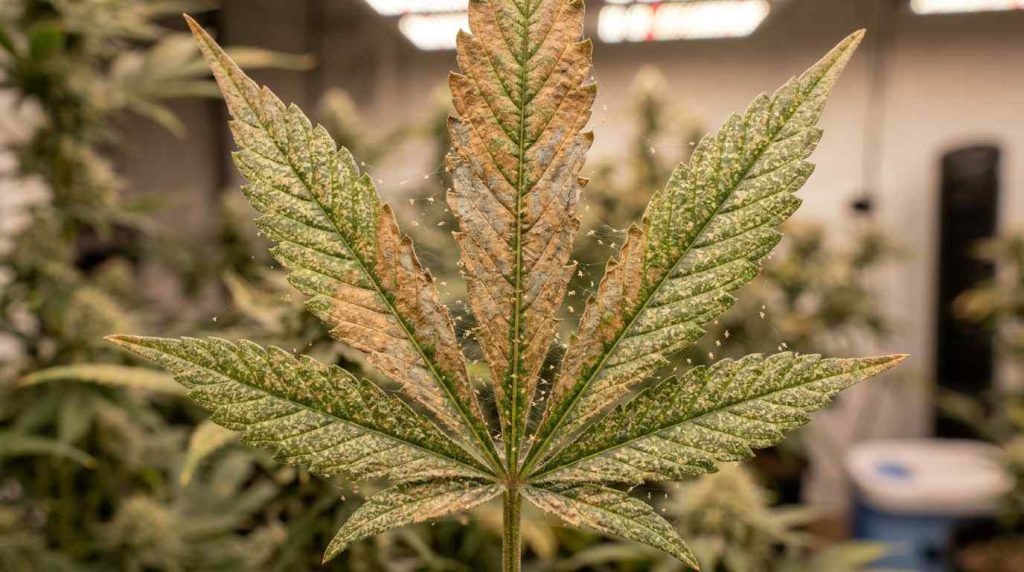
Bronze or rusty-looking leaves
Heavier feeding can give leaves a dull bronze, tan, or grayish appearance. Bronzing is generally a sign that substantially more leaf tissue has been damaged.
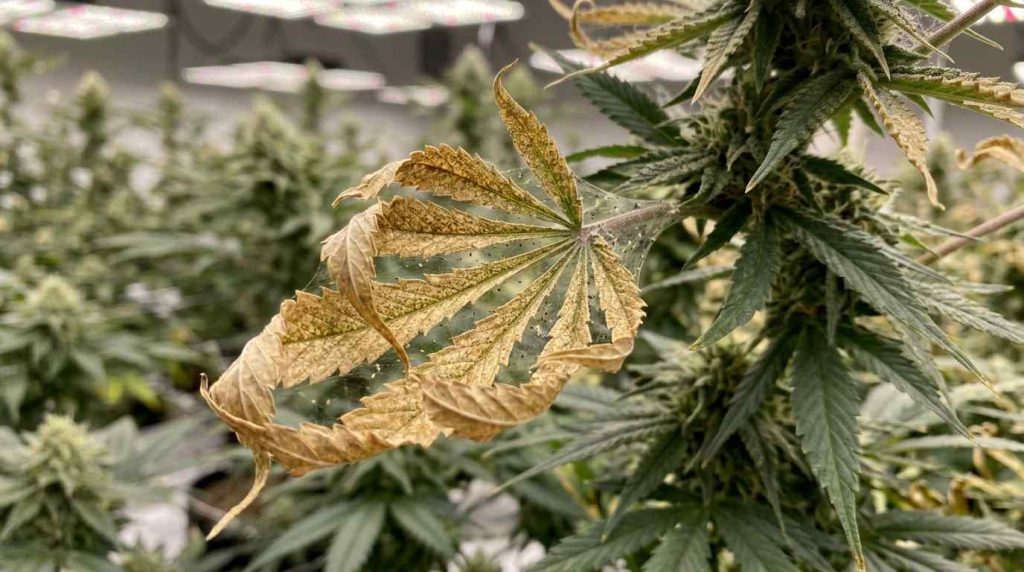
Dry and brittle leaves
Badly affected leaves can become dry, crisp, or brittle as their condition deteriorates. This is much more serious than a few isolated feeding spots.
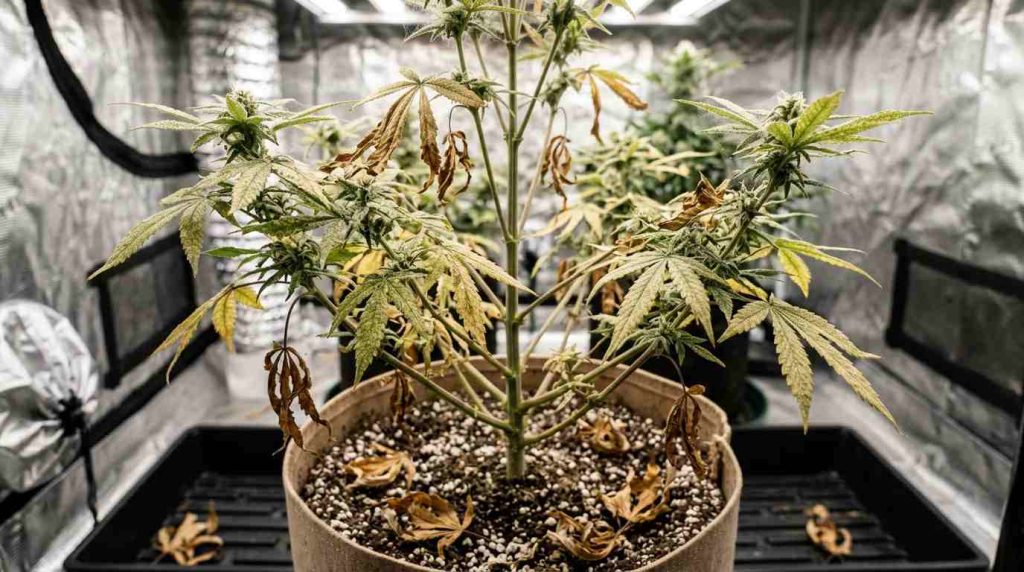
Premature leaf loss
Severely damaged leaves may eventually die and fall from the plant. Losing too much healthy foliage reduces the plant's available photosynthetic surface.
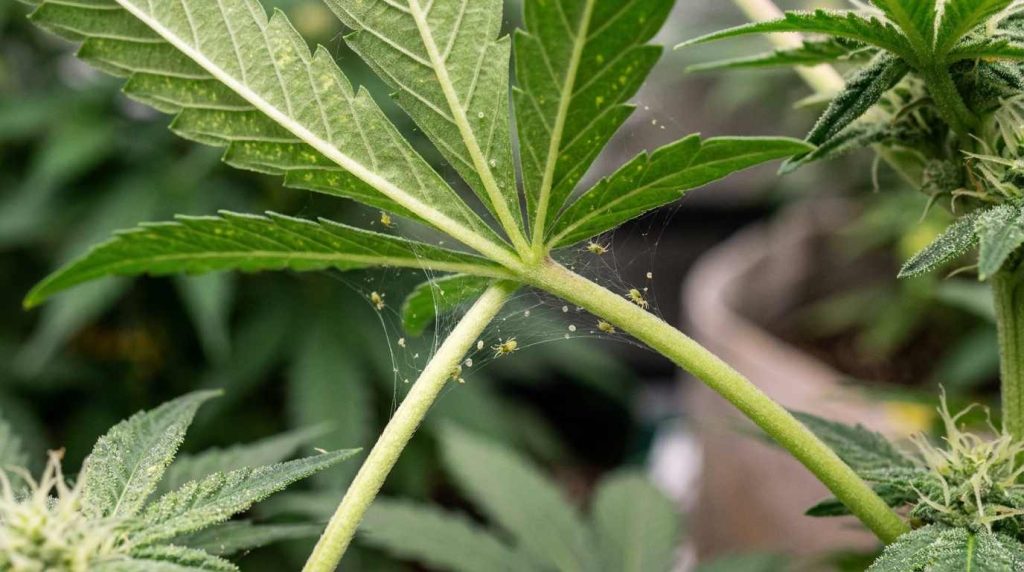
Fine spider mite webbing
Fine silk may appear beneath leaves and around stems as colonies increase. Heavy webbing on cannabis leaves usually indicates that the infestation is already well established rather than just beginning.
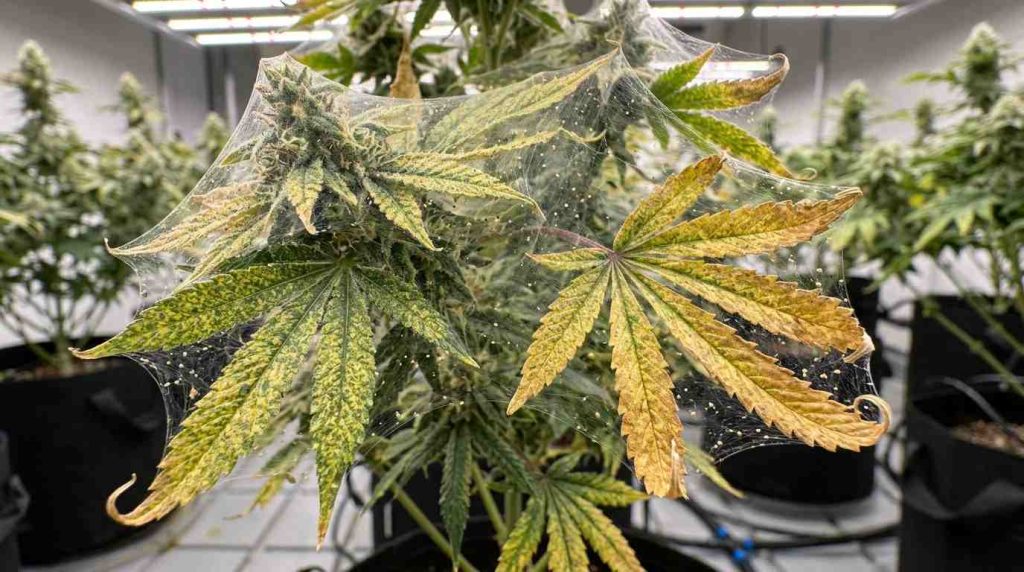
Heavy webbing across the plant
In severe cases, webbing can extend between leaves, branches, and other plant tissue. If you are seeing thick or widespread webbing, inspect the entire crop rather than assuming the problem is limited to the visibly affected area.
| Infestation stage | What you may see | What it tells the grower |
| Early | A few yellow or white dots and light stippling | Feeding has started but damage may still be localized |
| Developing | Widespread stippling and patchy yellowing | The population is increasing |
| Established | Yellowing, bronzing, dry leaves, and fine webbing | Mites have spread through more of the canopy |
| Severe | Brittle or dying leaves, leaf loss, and heavy webbing | The infestation is affecting overall plant health |
How spider mite damage changes through each cannabis growth stage
Spider mites can attack cannabis at any point in the grow. The visible symptoms remain broadly similar, but the consequences can differ depending on the amount of healthy foliage the plant has and how much time remains before harvest.
Spider mite damage on seedlings
During the cannabis seedling stage, plants only have a small amount of leaf tissue, so even a relatively limited infestation can affect a greater proportion of the plant.
Look especially closely if the first true leaves develop unusual stippling, yellow dots, or fading colour. A young plant cannot afford to lose as much functional foliage as a larger established plant.
Spider mite damage during vegetative growth
During the cannabis vegetative stage, the plant is actively developing leaves, branches, and canopy structure. A light infestation may remain localized, but a growing population can damage an increasing amount of the foliage the plant relies on for photosynthesis.
Grower tip: Vegetative growth gives you an important opportunity to find the problem before flowers form. Make leaf inspections part of your normal canopy checks rather than waiting until the plant looks unhealthy.
Spider mite damage during flowering
Spider mites become particularly troublesome during the cannabis flowering stage because mites and webbing can move from fan leaves toward sugar leaves and developing flowers.
Symptoms can include stippled fan leaves, yellowing around the canopy, drying foliage, webbing between sugar leaves, and in severe infestations webbing directly around buds.
Flowering also reduces your treatment options because you should be much more cautious about applying sprays, oils, or other residues around developing flowers.
Are spider mites different on autoflowers?
Spider mites cause the same type of feeding damage on autoflowers as they do on photoperiod cannabis. The important difference is the amount of recovery time available.
Autoflowers begin flowering according to their internal life cycle rather than waiting for the grower to change the light schedule. A photoperiod plant can usually be kept in vegetative growth for longer if extra recovery time is needed, whereas an autoflower continues progressing toward flowering.
This makes early identification especially important with autos. Damage during the seedling or early vegetative stage can use up valuable growing time that cannot simply be added back before flowering begins.
Grower tip: With autoflowers, check leaf undersides routinely from the seedling stage onward. The goal is not to treat spider mites differently, but to catch them before substantial leaf damage occurs during the plant's shorter, predetermined growth cycle.
How to prevent spider mites on cannabis

Step 1: Quarantine and inspect new cannabis plants and clones
New plants and clones are one of the easiest ways for spider mites to enter a clean grow room. A plant can carry mites or eggs underneath its leaves without showing obvious damage.
Keep new plants separate from your main crop before introducing them. During this period, inspect the tops and undersides of the leaves with a hand lens, paying particular attention to yellow stippling, moving mites, eggs, or fine webbing.
Do the same with any mother plant or clone returning from another growing space.
Grower tip: Never assume a healthy-looking clone is pest-free. Spider mites are much easier to deal with while the plant is still isolated than after it has been placed beside the rest of your crop.
Step 2: Keep the grow room clean between crops
Spider mite prevention should continue even when there are no plants in the room.
After harvest, remove fallen leaves, dead plant material, used growing media, and other debris. Clean trays, pots, tools, floors, shelving, and surrounding surfaces before beginning the next crop.
Pay particular attention to cracks, corners, and equipment around the growing area rather than only cleaning the visible floor space.
Avoid moving unclean tools or equipment between separate grow rooms. If you work with several growing areas, clean tools before using them around healthy plants.
Step 3: Manage temperature, humidity, and airflow
Two-spotted spider mite populations develop particularly well during hot, dry conditions, with plant moisture stress also favouring outbreaks.
You do not need to make the grow room excessively humid to prevent them. Instead, keep temperature and grow room humidity within the appropriate range for the current cannabis growth stage and avoid prolonged hot, dry conditions.
Maintain consistent air movement around and through the canopy as plants grow. Fans should create gentle circulation rather than blasting one section of the plant continuously.
During flowering, humidity still needs to be managed carefully because increasing moisture simply to discourage mites can create unwanted conditions around dense flowers.
Step 4: Keep cannabis plants properly watered and healthy
Spider mites can become more problematic on plants already experiencing moisture stress. University extension guidance therefore recommends keeping plants adequately watered while also avoiding overwatering.
Check the root zone regularly and water your cannabis plants according to their needs and growing medium rather than following a fixed calendar.
A healthy cannabis plant is not immune to spider mites, but avoiding unnecessary drought stress removes one condition that can help infestations develop.
Grower tip: Do not try to compensate for spider mite damage by suddenly increasing nutrients or water. Confirm the pest first and correct the actual problem.
Step 5: Inspect leaves regularly to catch spider mites early
The final step is also the most important: make pest checks part of your normal growing routine.
Look across the canopy for new yellow or white dots, then turn several leaves over and inspect them with magnification. Pay extra attention to leaves showing fresh stippling and plants positioned close to doors, new clones, or other possible entry points.
Regular scouting is recommended because spider mites can build populations quickly under favourable conditions.
| Prevention check | What to do | When to do it |
| New plants and clones | Quarantine and inspect leaf undersides | Before entering the main grow |
| Grow room hygiene | Remove debris and clean equipment and surfaces | Between crops and throughout the grow |
| Environment | Avoid prolonged hot, dry conditions and maintain airflow | Daily |
| Plant health | Prevent unnecessary water stress | Throughout each growth stage |
| Leaf inspection | Check for stippling, mites, eggs, and webbing | Regularly throughout the grow |
For autoflowers, the prevention process is the same. However, their shorter, predetermined life cycle makes early detection particularly useful because there is less flexibility to extend vegetative growth while a stressed plant recovers. A few minutes spent checking leaf undersides regularly can prevent a small spider mite problem from becoming a much more difficult infestation later in the cycle.
How to get rid of spider mites on cannabis
Once you have confirmed spider mites on cannabis, begin treatment as soon as possible. The aim is to stop the mites spreading, physically reduce their numbers, treat the mites that remain, and keep checking for newly hatched mites until the infestation is no longer active.
For a new grower, work through the following steps in order.
Step 1: Isolate the affected plant and check how bad the infestation is
If possible, move the affected plant away from healthy plants. Move it carefully so infested leaves do not brush against neighboring plants.
Then inspect the whole plant from bottom to top.
Check:
- The tops of the leaves
- The undersides of the leaves
- Leaf stems and branch joints
- New growth
- Any areas containing webbing
Use a hand lens to look for live mites and eggs.
If mites are only present on one or two leaves, you may have caught the infestation early. If you find them across several branches or see webbing throughout the canopy, treat the whole plant as infested.
Grower tip: Check every plant beside the affected one before you start treatment. Spider mites can spread before the neighboring plant shows obvious damage.
Step 2: Remove the worst affected leaves
Place a bag beside the plant before you start.
Remove leaves that are heavily webbed, badly dried, or carrying large numbers of mites. Put each leaf directly into the bag rather than dropping it onto the floor or carrying it through the grow room.
Do not remove every leaf showing a few yellow dots. If you are unsure when it is appropriate to defoliate cannabis plants, remember that lightly damaged leaves can still photosynthesize and removing too much foliage may create additional stress.
When finished, seal the bag and remove it from the grow area.
Step 3: Physically knock down the mite population
For plants still in vegetative growth, you can reduce the number of mites before applying another control.
Move the plant somewhere that allows water to drain safely. Starting near the top of the plant, gently hold each affected leaf and direct a controlled stream of water onto the underside.
Work downward through the plant and concentrate around the main veins, leaf edges, and places where mites are visible.
The goal is to dislodge mites rather than blast or damage the leaf tissue.
Allow excess water to drain and make sure the plant returns to suitable airflow afterward.
This will not remove every mite or egg, but lowering the population makes the next stage easier.
Step 4: Apply an appropriate contact treatment
If you are using a cannabis-approved insecticidal soap, horticultural oil, or another permitted contact treatment, read the entire product label before applying it.
Do not guess the concentration or application interval.
Start at the bottom of the plant and work upward so you do not miss leaves.
For each affected leaf:
- Hold the leaf gently so you can see the underside.
- Apply the treatment across the underside first.
- Cover the main veins, smaller veins, and leaf edges.
- Treat the upper surface where appropriate.
- Move onto the next leaf until the affected foliage has been covered.
Aim for even coverage, not excessive runoff.
Contact treatments need to reach the mites directly, so lightly misting the top of the canopy while ignoring the leaf undersides is unlikely to give good control.
Grower tip: Test the treatment on a small area first. Check the foliage for unwanted damage before applying it across the whole plant.
Step 5: Decide whether predatory mites are a better option
Predatory mites can be useful when you want biological control instead of relying entirely on sprays.
Two commonly used species are Neoseiulus californicus and Phytoseiulus persimilis.
Order them from a biological-control supplier and follow that supplier's instructions for:
- How many predators to release
- Where to place them
- Temperature and humidity requirements
- How often additional releases may be needed
Predatory mites are usually released directly onto the plants or through supplied sachets or carrier material.
Do not apply a pesticide or contact spray immediately before or after releasing beneficial mites unless the supplier confirms the products are compatible. A treatment that kills spider mites may also kill the predators you have just introduced.
| What you find | Practical next step |
| A few mites on isolated leaves | Remove badly affected leaves and physically reduce the mites |
| Mites across several branches | Treat the whole plant and inspect neighboring plants |
| Mites with little webbing | Contact treatment or biological control may be suitable |
| Heavy webbing | Remove heavily affected material before treating what remains |
| Mites during flowering | Avoid indiscriminate spraying of developing buds |
| Mites keep returning | Check for surviving eggs, missed leaves, nearby plants, and contaminated equipment |
Step 6: Treat flowering cannabis more carefully
Once buds are developing, be much more selective about what you apply to the plant.
Do not spray oils, soaps, homemade mixtures, or pesticides directly over developing flowers unless the specific product is approved and labeled for that use.
Instead, begin by removing heavily infested leaves and inspecting the foliage surrounding each flower.
Where a suitable treatment can legally and safely be used, target the affected leaf surfaces rather than soaking the flowers.
Biological controls may also be worth considering during flowering because they do not rely on coating the flowers with a contact spray.
Grower tip: The later you are in flowering, the more important it becomes to prevent unwanted residues or excess moisture from collecting inside dense buds.
Step 7: Check for eggs and newly hatched mites
Do not assume one treatment has killed everything.
Return to the plant and inspect the same areas you originally found mites. Use magnification and look underneath the leaves for:
- Live moving mites
- Newly hatched mites
- Round eggs
- Fresh yellow stippling
- New webbing
Pay particular attention to leaf veins and areas that may have been missed during the first treatment.
Follow the product label or biological-control instructions for any repeat treatment. Different products have different reapplication intervals, so do not automatically repeat every method on the same schedule.
Step 8: Clean the grow room and confirm the infestation is gone
Remove fallen leaves and plant material from the floor.
Clean tools, trays, pots, shelving, and surrounding surfaces before using them around healthy plants again. Avoid moving unclean equipment between growing areas.
Then continue inspecting the plants even after the visible webbing disappears.
You are looking for four signs that control is working:
- No live mites
- No new eggs
- No fresh yellow stippling
- No new webbing
If fresh damage appears, go back through the plant and look for areas you may have missed rather than assuming the treatment simply failed.
The same process applies to autoflowers, but quick action is especially important. An autoflower continues moving toward flowering on its own schedule, so you cannot simply extend vegetative growth to give a badly stressed plant more recovery time. Catching and treating a small infestation early gives the plant the best chance of continuing its normal development.

Conclusion
Spider mites on cannabis are much easier to manage when growers recognise the first signs rather than waiting for heavy webbing to appear. Regularly check for yellow dots on leaves, inspect leaf undersides for mites and eggs, and treat any confirmed infestation before it spreads throughout the canopy.
Good prevention is just as important as treatment. Quarantine new plants, keep the grow area clean, maintain suitable environmental conditions, and inspect your plants throughout every growth stage. If spider mites do appear, work methodically: isolate the affected plant, reduce the mite population, choose an appropriate control method, monitor for newly hatched mites, and continue checking until there is no sign of fresh spider mite damage.
Frequently Asked Questions
Can spider mites kill a cannabis plant?
Yes, a severe and untreated infestation can seriously weaken a cannabis plant. Spider mites damage leaf cells as they feed, reducing the amount of healthy foliage available for photosynthesis. Over time, leaves can become yellow, bronze, dry, or brittle before eventually dying and falling from the plant. A small infestation is much easier to manage, which is why early identification and treatment are important.
How quickly do spider mites spread on cannabis?
Spider mites can spread quickly when conditions are warm and dry. Because eggs, young mites, and adults can all be present at the same time, populations can continue increasing even after some visible mites have been removed. They can also move between neighboring plants, which is why growers should inspect the entire crop whenever spider mites are found on one plant.
How do I know if spider mites are completely gone?
Do not rely on the disappearance of webbing alone. Use a hand lens to continue checking the undersides of previously affected leaves and nearby foliage. You want to see no live mites, no new eggs, no fresh yellow or white stippling, and no new webbing. Continue inspecting the plants after the infestation appears to be under control in case any remaining eggs hatch.
Can I get spider mites during cannabis flowering?
Yes. Spider mites can infest cannabis during the seedling, vegetative, or flowering stage. Flowering infestations can be more difficult to manage because growers need to be careful about applying sprays or other treatments around developing buds. If mites appear during flowering, assess how widespread the infestation is, remove heavily affected foliage where appropriate, and only use products that are specifically permitted and suitable for that crop and growth stage.
Are spider mites more dangerous for autoflowers?
Spider mites cause the same type of damage to autoflowers and photoperiod cannabis plants. However, an infestation can be especially disruptive for an autoflower because the plant progresses toward flowering on its own schedule. You cannot simply extend the vegetative stage to allow extra recovery time, making early detection and quick control particularly important.


