




Drying cannabis is one of the most overlooked stages of cultivation, yet it has one of the biggest impacts on the quality of your finished harvest. You can grow healthy, resin-covered plants with exceptional genetics, but if you don't maintain the right temp and humidity for drying weed, you'll lose valuable terpenes, reduce potency, and increase the risk of mould. Getting the drying process right is what separates average cannabis from smooth, flavourful, top-shelf flower.
In this guide, I'll explain how to dry cannabis step by step, including the best temp and humidity for drying cannabis, how long the process should take, and how to avoid common mistakes that can ruin a harvest. I'll also share the methods I've used over years of growing cannabis to consistently produce aromatic, potent buds that cure well and store for months. Whether this is your first harvest or you're looking to improve your drying process, this guide will help you achieve better results every time.
Key Takeaways
- Maintain the ideal drying environment by keeping temperatures between 60–68°F (15–20°C) and relative humidity at 55–60% RH to preserve terpenes, cannabinoids, and flavour.
- Dry cannabis slowly over 7–14 days to avoid harsh smoke, terpene loss, uneven moisture, and mould while preparing the buds for a successful cure.
- Monitor your drying room every day using a digital thermometer and hygrometer, making small environmental adjustments rather than large corrections.
- Protect your harvest from mould and overdrying by maintaining gentle indirect airflow, complete darkness, and proper ventilation throughout the drying process.
- Wait until the smaller stems snap cleanly before transferring your buds into airtight curing jars, allowing the curing process to maximise aroma, smoothness, and long-term storage quality.
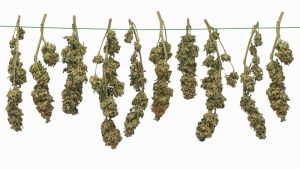
Why Drying Cannabis Properly Matters
Harvesting your cannabis plants is one of the most rewarding moments of the entire growing cycle. Before you begin drying, make sure you've harvested at the right time by following our guide on when to harvest cannabis, but cutting them down is not the finish line. In my experience, the drying stage is where good cannabis becomes exceptional cannabis. You can spend months growing high THC cannabis strains, perfecting your nutrients and environment, only to lose quality if your drying process is rushed or poorly controlled.
Drying cannabis is the process of slowly removing moisture from freshly harvested flowers while preserving the compounds that define each strain. The correct temp and humidity for drying weed allow buds to dry evenly, protecting terpene content, cannabinoid levels, aroma, and overall smoking quality. If you dry too quickly, you lose flavour and smoothness. If you dry too slowly, you increase the risk of mould and bud rot.
I always treat drying as the final stage of cultivation rather than an afterthought. Every decision you make during this phase directly impacts the finished product. By maintaining the best temp and humidity for drying cannabis, you give your harvest the best chance to reach its full potential before curing.
How Drying Affects Potency, Terpenes and flavour
Fresh cannabis contains moisture, chlorophyll, sugars, and starches that need time to break down. Drying is not just about removing water, it is about allowing these processes to happen gradually without damaging delicate compounds.
Terpenes are highly sensitive to heat and airflow. These aromatic oils give cannabis its unique scent and flavour, whether citrus, pine, or fuel-like. Maintaining the best humidity for drying weed alongside stable temperatures helps preserve these compounds. Slower drying results in richer aroma and a more enjoyable smoking or vaping experience.
Cannabinoids also benefit from controlled drying. THC and other compounds degrade when exposed to heat, light, and oxygen. I always dry cannabis in darkness with gentle airflow to reduce degradation and preserve potency.
Proper drying also improves flavour by allowing chlorophyll to break down. If cannabis dries too quickly, chlorophyll remains trapped, producing the harsh “hay” smell many beginners encounter. A slow dry creates smoother smoke and allows the strain’s natural profile to stand out.
Drying vs Curing Cannabis: What's the Difference?
Drying and curing are often confused, but they serve different purposes.
Drying is the first step after harvest. It removes most of the moisture over 7–14 days while preserving terpenes and preventing mould. Curing begins once drying is complete. If you're new to the process, our beginner's guide to curing cannabis explains how to maximise flavour, aroma and smoothness after drying.
| Factor | Drying Cannabis | Curing Cannabis |
| Purpose | Remove excess moisture | Improve flavor, aroma, and smoothness |
| Timing | After harvest | After drying |
| Duration | 7–14 days | 2–8 weeks or longer |
| Environment | 60–68°F, 55–60% RH | 58–62% RH in sealed containers |
| Airflow | Gentle airflow | Minimal airflow, jars opened periodically |
| Light Exposure | Darkness | Darkness |
| Outcome | Dry buds ready for curing | Smooth, flavorful finished cannabis |
I compare drying and curing to cooking and resting a steak. Drying prepares the flower, while curing refines it. Skipping either step limits quality.
Common Mistakes That Ruin a Harvest
Most drying issues come from poor environmental control. Even experienced growers make mistakes, but beginners can avoid them with proper setup and monitoring.
Common mistakes include:
- Drying too quickly with high heat or direct airflow
- Allowing humidity to stay too high, leading to mould
- Letting humidity drop too low, causing uneven drying
- Drying in bright light, which degrades cannabinoids
- Handling buds too often, damaging trichomes
- Not using a thermometer or hygrometer
I recommend checking conditions daily during the first week. Small adjustments are easier than fixing major problems. Once you understand what humidity for drying weed works best, the process becomes consistent, allowing you to produce smooth, potent, and aromatic cannabis every time.
Best Temp and Humidity for Drying Weed
Creating the ideal drying environment is one of the most important steps in producing premium-quality cannabis. In my experience, growers often spend months perfecting lighting, nutrients, genetics, and environmental control, only to overlook what happens after harvest. Drying is where you either preserve everything your plants have produced or begin to lose it. The right temp and humidity for drying weed allow moisture to leave the flowers gradually while preserving terpenes, cannabinoids, aroma, flavour, and bag appeal.
Rather than chasing exact numbers every hour, I focus on creating a stable environment. Consistency is far more important than making constant adjustments. For most home growers, the ideal drying conditions are:
| Factor | Ideal Range |
| Temperature | 60–68°F (15–20°C) |
| Humidity | 55–60% RH |
| Airflow | Gentle, indirect air circulation |
| Light | Complete darkness |
| Drying Time | 7–14 days |
This combination slows moisture loss, allowing chlorophyll to degrade naturally while protecting the volatile compounds that give cannabis its distinctive aroma and flavour. It also creates the ideal conditions for transitioning into the curing stage.
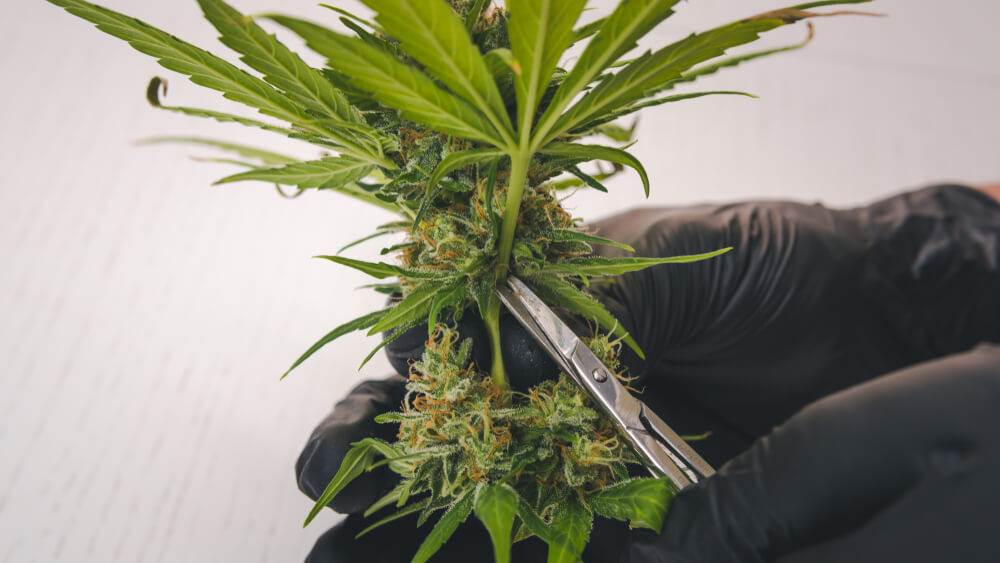
What Humidity for Drying Weed Produces the Best Results?
One of the questions I hear most often is, "What humidity for drying weed produces the best results?" For nearly every harvest I've dried, I aim to keep relative humidity between 55% and 60% RH.
Humidity controls the speed at which moisture leaves the flower. If the humidity drops too low, the outer layer of the buds dries before the moisture inside has a chance to migrate outward. This is commonly known as case hardening, and it often leaves growers with buds that feel dry on the outside but remain damp in the center. Those buds rarely cure evenly and frequently produce harsh smoke.
If humidity climbs above 60%, the opposite problem occurs. Moisture remains trapped inside dense flowers for too long, creating ideal conditions for mould, mildew, and Botrytis (bud rot). Large colas produced by many indica cannabis seeds are particularly susceptible because airflow struggles to penetrate deep into the dense flower structure.
Here is a quick reference:
| Relative Humidity | Result |
| Below 50% RH | Rapid drying, terpene loss, harsh smoke, uneven curing |
| 55–60% RH | Ideal slow drying, terpene preservation and balanced moisture loss |
| Above 60% RH | Increased mold, mildew and bud rot risk |
I always monitor my drying room using a quality digital hygrometer positioned close to the hanging plants rather than near the floor or ventilation equipment. This gives me a far more accurate picture of the environment surrounding the flowers. Once I have the room stabilized, I avoid making unnecessary adjustments because frequent fluctuations are often more damaging than remaining a degree or two outside your target range.
Best Temperature for Drying Cannabis
The best temperature for drying cannabis works alongside humidity to determine how quickly moisture evaporates from the flowers. I generally recommend maintaining temperatures between 60°F and 68°F (15–20°C) throughout the drying period.
Many cannabis terpenes are highly volatile compounds that begin evaporating long before temperatures feel particularly warm. Research into cannabis chemistry has shown that excessive heat accelerates the loss of these aromatic compounds, particularly lighter monoterpenes, reducing the distinctive smell and flavour of the finished flower. Lower temperatures slow this process while also reducing cannabinoid degradation caused by heat, light, and oxygen exposure.
Temperature also influences how evenly the buds dry. Higher temperatures remove moisture rapidly from the surface while the center remains wet. Lower temperatures encourage a slower and more consistent drying process, resulting in smoother smoke and better terpene retention.
I never point oscillating fans directly at hanging plants. Instead, I use them to keep air gently moving throughout the room while exhausting stale, moisture-rich air outside the drying space. The objective is air exchange, not wind. Direct airflow dries the exterior too quickly, while also increasing the risk of uneven moisture distribution inside each bud.
The 60/60 Drying Method Explained
The 60/60 drying method has become one of the most widely recommended approaches for drying cannabis, and for good reason. It involves maintaining your drying room at approximately 60°F (15.5°C) and 60% relative humidity throughout most of the drying period.
The slower drying process gives chlorophyll additional time to break down naturally while preserving delicate terpenes that would otherwise evaporate under warmer conditions. This often results in smoother smoke, stronger aroma, and a cleaner expression of the cultivar's unique characteristics.
I consider the 60/60 method an excellent starting point rather than an absolute rule. Every harvest is different. Dense indica flowers, airy sativa buds, whole-plant drying, trimmed branches, and your local climate all influence how quickly moisture leaves the plant. My goal is always consistency rather than chasing perfect numbers.
Commercial cultivation facilities often take environmental control even further by monitoring Vapor Pressure Deficit (VPD) during drying. While most home growers do not need to calculate VPD, understanding that temperature and humidity work together helps explain why maintaining stable conditions produces consistently better results.
How Long Should Drying Cannabis Take?
Under the best temp and humidity for drying cannabis, most harvests require between 7 and 14 days to dry properly. Larger plants, whole-plant hanging, and dense flowers may naturally take a little longer.
| Drying Time | Typical Result |
| 3–5 days | Too fast, terpene loss, harsh smoke and poor curing potential |
| 7–10 days | Ideal drying window for most cannabis cultivars |
| 10–14 days | Slow drying with excellent flavor, aroma and smoothness |
I never rely solely on the calendar because every drying room behaves differently. Instead, I monitor the flowers themselves. Smaller stems should bend slightly before snapping cleanly, while the buds should feel dry on the outside but retain a slight amount of internal moisture ready for curing.
Some commercial producers also measure water activity (aw) before packaging cannabis. Water activity measures the amount of available moisture that can support microbial growth and is considered one of the most reliable indicators of safe long-term storage. Although most home growers won't own a water activity meter, understanding this concept reinforces why patience during drying is so important. Allowing your cannabis to dry naturally produces smoother smoke, richer terpene expression, improved shelf life, and a noticeably higher-quality finished product.
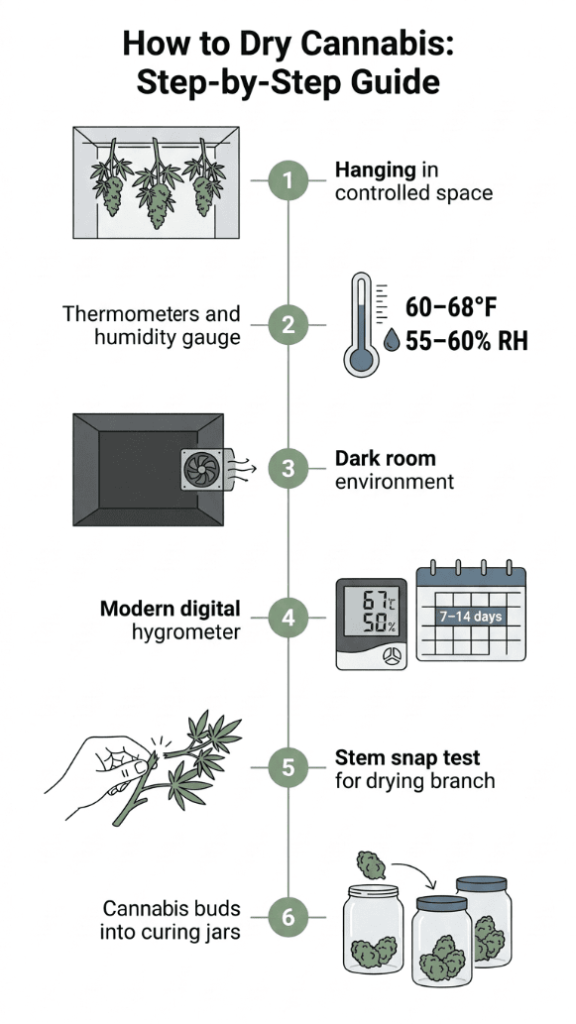
How to Dry Cannabis Step by Step
Now that you've created the best temp and humidity for drying cannabis, it's time to begin the drying process itself. In my experience, producing top-shelf cannabis isn't about rushing to the finish line—it's about following a consistent process from harvest through to curing. Every step contributes to preserving cannabinoids, terpenes, flavour, aroma, and potency.
If you're wondering how to dry cannabis, I follow these five simple steps for every harvest:
- Harvest your plants and remove any damaged leaves or unhealthy plant material.
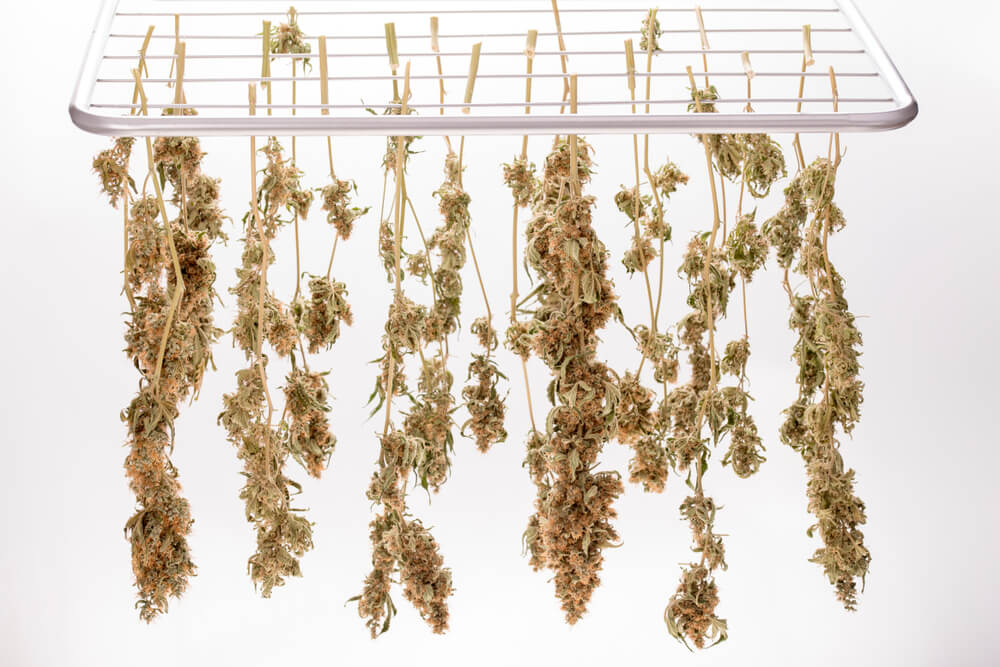
- Hang the whole plant or individual branches upside down inside a prepared drying room.
- Maintain temperatures between 60–68°F (15–20°C) with 55–60% relative humidity in complete darkness.
- Monitor the drying room every day while avoiding unnecessary handling of the buds.
- Once the smaller stems snap cleanly and the flowers feel dry on the outside, transfer them into curing jars.
Following this routine allows the flowers to dry gradually without sacrificing the qualities you've spent months developing during cultivation.
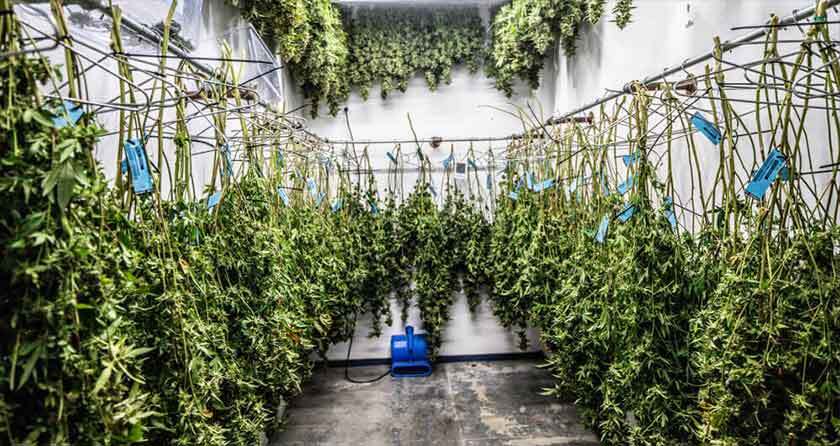
Preparing Your Plants After Harvest
The drying process starts the moment you harvest your cannabis. After cutting each plant at the base of the main stem with clean, sharp pruning shears, I move it straight into the drying area rather than leaving it exposed to light or heat.
Before hanging the plants, inspect every branch carefully. Remove damaged fan leaves, dead foliage, or any signs of mould, pests, or disease. It's much easier to remove affected material now than after the plants have been hanging for several days.
At this stage, decide whether you'll wet trim or dry trim. Our guide on how to trim weed explains the advantages of each approach in more detail.
- Wet trimming involves removing the sugar leaves immediately after harvest. I recommend this if you're drying cannabis in a humid climate because it improves airflow around the buds and slightly reduces drying time.
- Dry trimming means leaving the sugar leaves attached until after drying. This is the method I generally prefer because it slows moisture loss and often preserves more of the flower's natural aroma and terpene profile.
Always carry the plants by the main stem instead of the buds. Fresh trichomes break away easily, and minimizing contact helps maintain both potency and appearance.
Hanging Whole Plants vs Individual Branches
Once your plants have been prepared, hang them upside down inside your drying room. You can either suspend the entire plant or separate it into individual branches before hanging.
Whenever I have enough space, I dry the whole plant. The thicker stem retains moisture longer, allowing water to move gradually from the center of the flowers toward the surface. This slower drying process usually produces smoother smoke and better terpene retention.
If you're working in a smaller drying tent or have harvested particularly large plants, cut the plant into individual branches instead. Leave several inches of stem attached to each branch so it can easily be hung from drying lines, wire, or drying racks.
Whichever method you choose, leave several inches of space between each branch. Good spacing improves airflow while reducing the chance of mould developing inside dense flowers.
| Method | Best For | Advantages |
| Whole Plant Drying | Smaller harvests with plenty of space | Slower drying, improved terpene retention, more even moisture loss |
| Individual Branches | Larger harvests or limited drying space | Better airflow, easier handling, more efficient use of space |
Setting Up the Ideal Drying Room
Before hanging your harvest, make sure your drying room is completely prepared. I always stabilize the environment before bringing any cannabis inside because the first 24 hours after harvest are particularly important.
Your drying room doesn't need expensive equipment, but having the right tools makes controlling the environment much easier. If you're creating a dedicated space, our guide on setting up a cannabis grow tent covers everything you'll need.
Recommended Drying Equipment
- Digital thermometer
- Digital hygrometer
- Oscillating fan
- Exhaust fan with passive air intake
- Humidifier (if your room is too dry)
- Dehumidifier (if humidity is too high)
- Drying lines, hooks, or drying racks
- Timer or environmental controller (optional)
Once everything is installed, adjust your room to the following conditions before hanging your plants.
| Environmental Factor | Recommended Setting |
| Temperature | 60–68°F (15–20°C) |
| Relative Humidity | 55–60% RH |
| Light | Complete darkness |
| Airflow | Gentle indirect circulation |
I also clean and sanitize the drying room before every harvest. Sticky cannabis flowers collect dust, pet hair, and airborne debris surprisingly easily, so starting with a clean environment helps protect the finished product.
Airflow, Darkness and Ventilation Best Practices
Once the plants are hanging, the objective is to maintain a stable environment rather than making constant adjustments.
Position an oscillating fan so it gently circulates air around the room without blowing directly onto the flowers. Direct airflow causes the outer layer of the buds to dry much faster than the center, increasing the likelihood of uneven drying.
Run an exhaust fan continuously, or connect it to a humidity controller if you have one available. Proper grow room humidity control is one of the best ways to prevent drying issues. This removes stale, moisture-rich air while drawing fresh air into the drying room, helping maintain stable humidity throughout the process.
Keep the room completely dark except when carrying out inspections. Exposure to light after harvest accelerates cannabinoid degradation, particularly THC, reducing both potency and shelf life.
While many commercial cultivation facilities monitor Vapor Pressure Deficit (VPD) during drying, most home growers can achieve excellent results simply by maintaining stable temperature, humidity, airflow, and darkness.
How to Tell When Cannabis Is Ready for Curing
The final stage of drying is knowing when to stop. Rather than relying solely on the number of days, I monitor both the plants and the drying environment throughout the process.
Here is the routine I follow during drying:
| Day | What to Check |
| Day 1 | Confirm temperature, humidity, and airflow are stable after hanging the plants. |
| Days 2–5 | Check the thermometer and hygrometer daily. Inspect flowers for any signs of mold while avoiding unnecessary handling. |
| Days 6–10 | Begin testing smaller stems once per day. Continue monitoring humidity and temperature. |
| Days 7–14 | Once the smaller stems snap cleanly and the buds feel dry on the outside, prepare the flowers for curing. |
When checking readiness, I never squeeze every bud. Instead, I bend one of the smaller stems supporting a flower. If it folds over, the buds still contain too much moisture. When it bends slightly before snapping cleanly, I inspect one flower from the middle of the plant. The outside should feel dry without becoming brittle, while the center should still contain a small amount of moisture ready for curing.
Some commercial cultivators also measure water activity (aw) before packaging cannabis to verify it has reached a safe moisture level for long-term storage. Although most home growers won't own a water activity meter, combining the traditional stem snap test with stable environmental conditions produces consistently reliable results.
Once your buds pass the stem snap test, trim them if you've chosen to dry trim, place them into airtight glass jars or dedicated curing containers, and begin the curing process. At this point, you've successfully completed the drying stage and are ready to develop the smooth flavour, rich aroma, and full terpene expression that only a proper cure can achieve.
Managing Temperature and Humidity During Drying Cannabis
Once your cannabis is hanging, your job shifts from preparing the drying room to maintaining a stable environment every day. Even small changes in temperature or humidity can affect how evenly your flowers dry, so I always monitor the room closely rather than assuming everything will stay where I left it.
Temperature and humidity work together throughout the drying process. If humidity rises, moisture leaves the flowers more slowly. If temperatures increase, moisture evaporates faster and delicate terpenes become more vulnerable to degradation. Rather than chasing perfect numbers every hour, I focus on keeping both environmental conditions as stable as possible.
The table below provides a quick overview of how environmental conditions affect drying cannabis.
| Condition | Ideal Range | Too High | Too Low |
| Temperature | 60–68°F (15–20°C) | Faster drying, terpene loss, reduced aroma | Slower drying and extended drying time |
| Relative Humidity | 55–60% RH | Mold, mildew, bud rot, slow drying | Case hardening, brittle buds, harsh smoke |
What Happens If Humidity Is Too High?
Humidity that consistently stays above 60% RH is one of the quickest ways to compromise a cannabis harvest and increases the risk of bud rot developing in dense flowers. Excess moisture slows evaporation, leaving the flowers damp for longer than intended and creating ideal conditions for fungal pathogens to develop.
One of the biggest problems is Botrytis, commonly known as bud rot. It usually develops inside large, dense flowers where airflow is naturally limited, making it difficult to detect until visible damage appears.
In my experience, the earliest warning signs usually appear before mould becomes visible.
Watch for:
- A damp, musty, or ammonia-like smell.
- Humidity levels rising overnight.
- Dense buds remaining soft after several days.
- Condensation on walls, ducting, or windows.
- Areas of poor airflow within the drying room.
Whenever I notice humidity climbing above my target range, I check the exhaust system first before making other adjustments. Poor ventilation is often the cause rather than the humidity itself.
What Happens If Humidity Is Too Low?
Low humidity creates a different set of problems. When relative humidity falls below 55% RH, moisture leaves the outer layer of the buds much faster than it leaves the center.
This uneven moisture movement causes case hardening, where the outside of the flower feels dry while moisture remains trapped inside. Many beginner growers mistake this for properly dried cannabis and begin curing too early.
Drying too quickly also limits several natural processes that improve flower quality after harvest.
Common symptoms include:
- Buds becoming brittle within a few days.
- Reduced aroma during trimming.
- Harsh smoke after curing.
- Flowers that crumble easily.
- Uneven moisture inside curing jars.
If I notice humidity dropping too quickly, I increase moisture gradually using a humidifier rather than making large environmental changes all at once. Small corrections produce much more predictable drying conditions.
How to Control Drying Cannabis Humidity
Maintaining stable drying cannabis humidity is much easier when you make gradual adjustments instead of reacting to every small fluctuation. Cannabis naturally releases moisture throughout the drying period, so humidity levels will often change slightly as the harvest progresses.
When humidity rises above the recommended range, I first confirm that all ventilation equipment is operating correctly. If air exchange is working as expected, I empty the dehumidifier reservoir if needed and allow the room time to stabilize before making further adjustments.
When humidity falls below the ideal range, I add moisture slowly using a humidifier while continuing to exchange stale air from the room. Closing vents or switching fans off entirely often creates stagnant air, which solves one problem while creating another.
I also avoid opening the drying room unnecessarily. Every time the door is opened, the surrounding environment influences the room's temperature and humidity, especially during very hot, cold, or humid weather.
Best Equipment for Monitoring Temperature and Humidity
Reliable monitoring equipment makes maintaining stable drying conditions much easier. While commercial cultivation facilities often use automated environmental control systems, home growers can achieve excellent results with a few well-chosen tools.
Here are the monitoring devices I recommend using:
| Equipment | Purpose |
| Digital hygrometer | Measures relative humidity accurately. |
| Digital thermometer | Monitors room temperature throughout drying. |
| Combination thermometer/hygrometer | Displays both readings in one unit for quick inspections. |
| Data-logging hygrometer | Records minimum and maximum readings to identify overnight fluctuations. |
| Environmental controller (optional) | Automatically controls humidifiers, dehumidifiers, heaters and fans. |
| Infrared thermometer (optional) | Checks for warm areas or hotspots within the drying room. |
One habit I've developed over the years is recalibrating my hygrometers every few months using a simple salt calibration test. Even high-quality sensors can gradually become inaccurate, and a small reading error can make a noticeable difference when you're trying to maintain the ideal drying environment.
Drying Cannabis in Different Climates
No two drying rooms behave exactly the same because your local climate has a direct influence on temperature and humidity. Understanding how your environment affects the drying process allows you to make adjustments before problems develop.
If you regularly grow outdoor cannabis seeds in humid climates, excess moisture is usually the biggest challenge during the drying process. I often rely on a dehumidifier alongside continuous exhaust ventilation to keep humidity within the recommended range.
In dry climates or during winter, indoor heating systems can reduce humidity well below the ideal level. A humidifier usually provides enough moisture to slow the drying process while preventing flowers from becoming brittle.
If you're drying cannabis inside a grow tent, you'll often find environmental conditions easier to control because the smaller volume of air responds more quickly to adjustments. Larger drying rooms, garages, or sheds usually require additional ventilation equipment to maintain consistent conditions throughout the space.
Regardless of where you're drying your harvest, consistency always produces the best results. Rather than trying to achieve perfect numbers every hour, I focus on maintaining stable environmental conditions throughout the entire drying period. That approach has consistently produced smoother smoke, stronger terpene expression, improved shelf life, and cannabis that reflects the full quality of the harvest.
Conclusion
Learning how to dry cannabis properly is one of the most valuable skills you can develop as a grower. While growing healthy plants takes time and effort, the drying stage is where you preserve the cannabinoids, terpenes, aroma, and flavour that make your harvest worth the wait. By maintaining the best temp and humidity for drying cannabis, monitoring your environment daily, and allowing the flowers to dry slowly, you'll consistently produce smoother, more potent cannabis with excellent bag appeal.
Don't worry if your first harvest isn't perfect. Every drying room behaves a little differently, and experience will teach you how your environment responds throughout the process. Focus on stability rather than perfection, make small adjustments when needed, and resist the temptation to rush your harvest. Once your buds have dried correctly, you're ready for the final stage curing. With a little patience, you'll be rewarded with cannabis that fully reflects the quality of the plants you've spent months growing.
Frequently Asked Questions
Can you dry cannabis in a grow tent?
Yes, a grow tent can make an excellent drying space because it provides greater control over temperature, humidity, airflow, and light exposure. Keep the tent between 60–68°F (15–20°C) with 55–60% relative humidity, use gentle indirect airflow, and ensure the tent remains completely dark while the buds are drying.
Should you wet trim or dry trim cannabis before drying?
Both methods can produce excellent results. Wet trimming removes the sugar leaves immediately after harvest and is often preferred in humid climates because it improves airflow around the buds. Dry trimming leaves the sugar leaves attached until after drying, slowing moisture loss and often preserving more terpenes and aroma. The best option depends on your drying environment and personal preference.
Can you dry weed too quickly?
Yes. Drying cannabis too quickly can reduce terpene retention, limit chlorophyll breakdown, and produce harsh smoke with less flavour. Fast drying also increases the risk of case hardening, where the outside of the buds dries before the center, making curing more difficult.
What is the ideal humidity inside curing jars after drying?
Once your cannabis has finished drying, the relative humidity inside curing jars should stabilize between 58% and 62% RH. This range allows the remaining moisture to redistribute evenly throughout the buds while helping preserve flavour, aroma, and potency during long-term storage.
Can you fix cannabis that has become too dry?
Over-dried cannabis cannot fully recover the terpenes or aroma that have already been lost, but you can improve its texture by slowly reintroducing moisture during storage. Using humidity control packs designed for cannabis is the safest method because they gradually restore moisture without increasing the risk of mould.


