Mould on cannabis plants is a common problem that can quickly reduce plant health, damage buds, and affect the quality of a harvest. It typically develops when excess moisture, high humidity, poor airflow, and crowded growing conditions create an environment where fungal spores can thrive. Some types of mould spread slowly, while others can destroy dense flowers before the problem becomes obvious. Understanding what causes mould, how to identify the most common types, and the steps growers can take to prevent and manage outbreaks can help protect plants throughout the growing cycle.
Key Takeaways
- Humidity above 60% significantly increases the risk of mould growth, especially in crowded grow spaces with poor airflow.
- Keep humidity between 40–45% during flowering to help reduce the likelihood of mold developing on buds and leaves.
- Powdery mildew appears as white, flour-like spots on leaves, while bud rot commonly starts hidden inside dense flowers.
- Overwatering, watering late in the day, and inadequate pruning can create conditions that encourage fungal growth.
- Inspect plants daily during the final weeks of flowering, as mould often develops in dense buds before visible symptoms appear.
- Mouldy cannabis should not be smoked or used for extracts, as contaminated plant material is generally considered unsafe for consumption.
What causes mould growth on cannabis plants?
Mould loves certain conditions, and unfortunately, some of these are exactly what cannabis plants also thrive in. Moisture, warmth, and a lack of airflow are the key culprits. Let’s break down the main causes and see how mould can enter the grow room in the first place
Environmental factors
Mould thrives in warm, humid conditions. High humidity levels (over 60%) create a breeding ground for mould, especially in tightly packed grow spaces where air circulation is poor. Temperature fluctuations can also lead to condensation, creating the moisture that mould spores need to grow.
Improper plant care
Overwatering your marijuana plants can create a moist environment that’s perfect for fungus. Similarly, watering late in the day can leave plants wet overnight, increasing the risk of mould especially during the final 4 weeks of flower production. Also, overcrowding your grow room without trimming or pruning leads to poor air circulation, the development of stagnant air, causing trapped moisture around the plants.
Common areas where mould develops
Mould can appear in various places on your cannabis plants. The most common spots include:
- On the buds (especially deep inside dense buds, where bud rot can form)
- Leaves, where moisture can easily get trapped
- The base of the stem, especially if there's standing water around the plant’s base
Common types of mould found on cannabis plants
There are a few types of moulds you’re likely to encounter on cannabis plants. Some are more difficult to deal with than others. Knowing what each looks like will help you spot trouble before it spreads too far.
Actionable Tip: Keep humidity below 50% during flowering to reduce mould risk
Powdery mildew
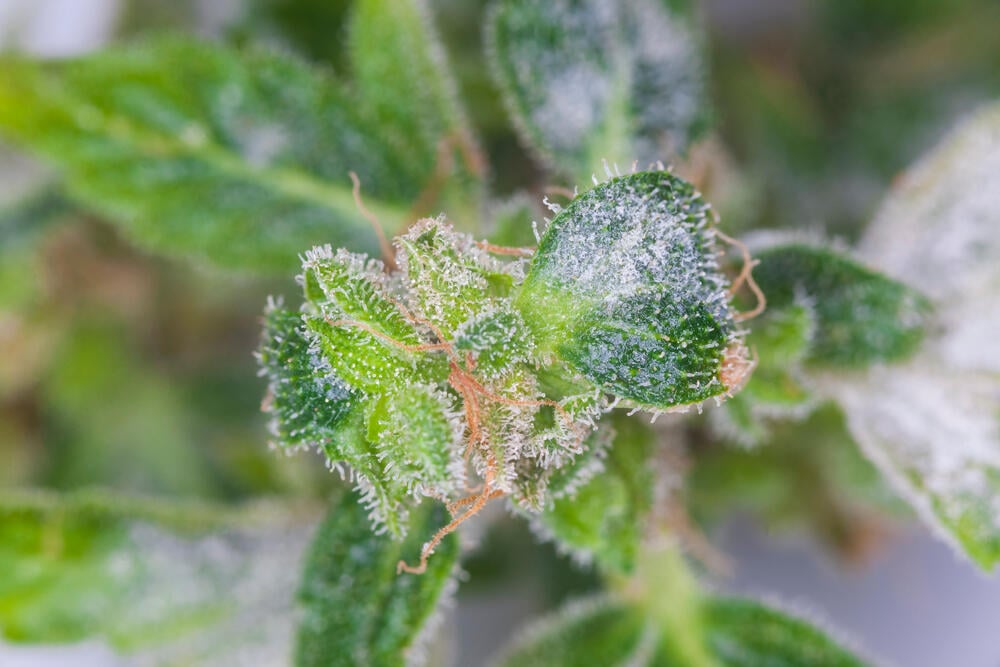
What causes it:
Powdery mildew is an air-borne pathogen which thrives in warm, or cold environments and spreads quickly when plants are overcrowded with poor air circulation. The spores can travel through the air, making it easy for the fungus to spread between plants. Colder and humid grow spaces are the main culprit for mould spores spreading.
Effects on plant:
This white powdery mould attacks the leaf tissue and attaches itself to the surface of the leaves. and around the stems, hindering the plant's ability to photosynthesize effectively. Left untreated, it weakens the plant, reduces growth, and significantly impacts yield quality. Buds that contain mildew are not safe to smoke and should be discarded.
How to identify:
Look for small white, flour-like spots on the leaves that expand over time. The mould typically appears on the top surface of the leaves and is easy to spot during regular inspections. Powdery mildew can end up covering all of the leaf surface and spread quickly.
How to treat:
Isolate infected plants to prevent the spread. Apply organic fungicides like potassium bicarbonate or neem oil. Ensure proper airflow and reduce humidity levels in the growing environment. However, if treating flowering plants, be careful not to spray the buds.
Actionable Tip: Isolate infected plants to protect the rest of your grow
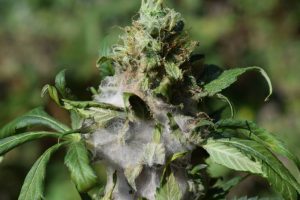
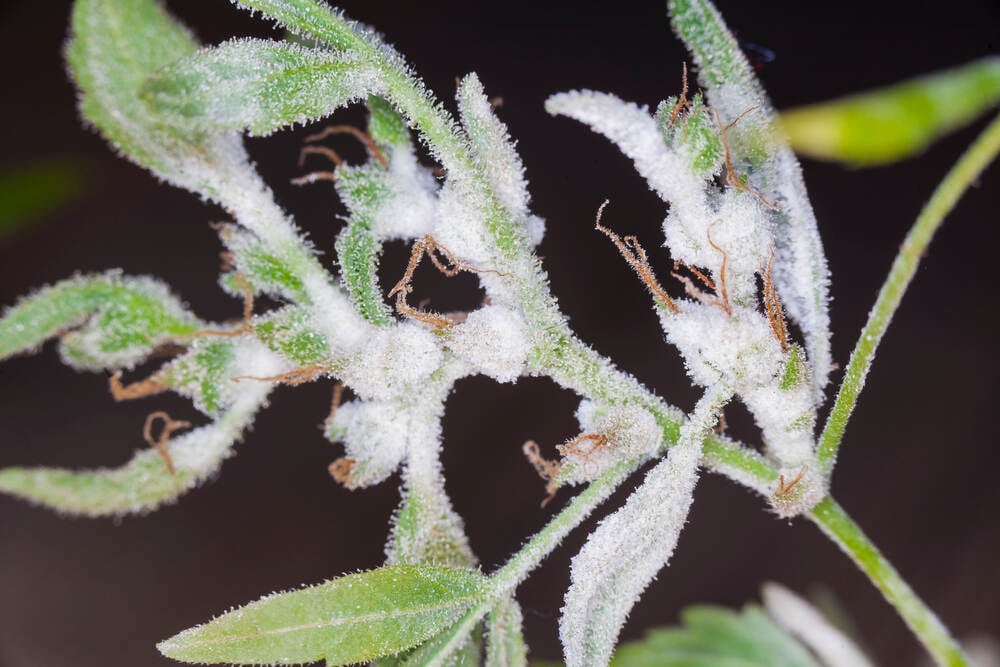
Botrytis (Bud Rot)
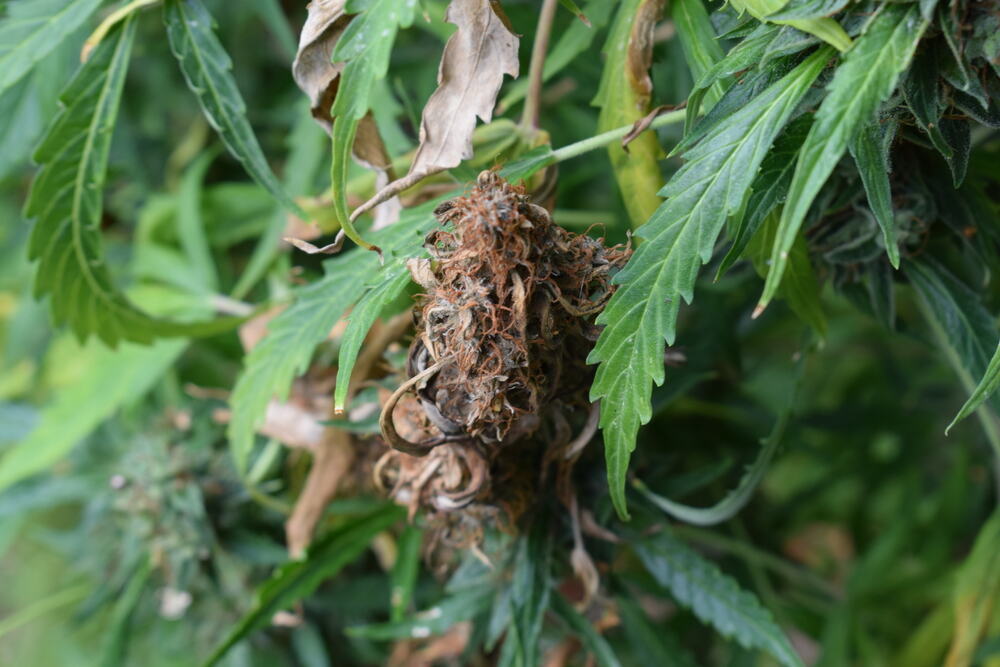
What causes it:
Botrytis develops in cool, damp conditions, often inside dense buds where moisture gets trapped. Poor ventilation and high humidity create the perfect environment for this mould to thrive. Bud rot can be devastating and most of the time, you will only notice it when harvesting and trimming your buds.
Effects on plant:
Bud rot starts by destroying the interior of the buds, turning them into a mushy brown and grey mess. It can spread rapidly, wiping out entire crops if not addressed quickly.
How to identify:
The first signs include small dark dots on the buds and browning or wilting leaves around the bud. Upon closer inspection, the bud’s interior will reveal a grey, mouldy centre. Regularly checking buds, especially in dense plants during the final 4 weeks of flowering, is crucial for early detection.
How to treat:
Remove infected buds immediately using a clean pair of scissors and gloves to prevent further spread. Use fungicides labeled for Botrytis control and improve air circulation and ventilation in the grow space. Reduce humidity and avoid overhead watering. Removing the infected cola and ensuring air flow has improved will usually stop Botrytis from spreading.
Actionable Tip: Inspect buds internally, bud rot often starts hidden inside
Cladosporium
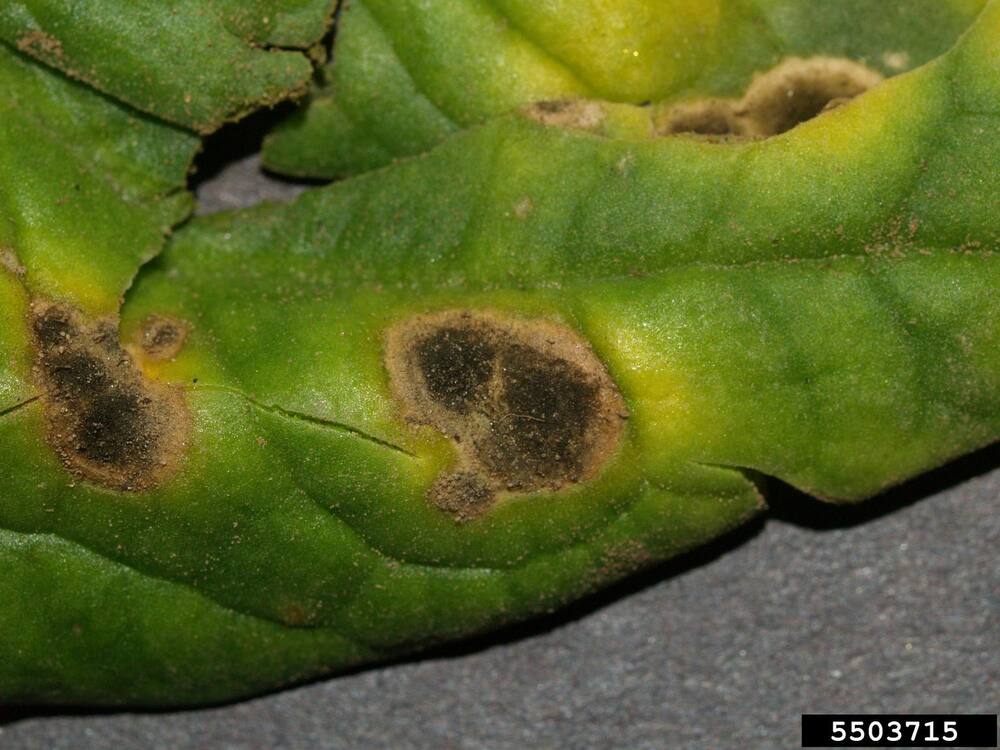
What causes it:
This mould thrives in cool, damp conditions and is more common in outdoor plants exposed to consistent moisture or rain. Contaminated soil and plant debris can also harbor the fungus.
Effects on plant:
Cladosporium causes dark spots on leaves and stems, reducing the plant’s ability to absorb light and perform photosynthesis. While not as aggressive as other moulds, it still weakens the plant over time and the infected leaves cannot be used for making hash.
How to identify:
Look for small, dark brown or black spots on the leaves and stems. These spots may be irregularly shaped and spread slowly compared to other moulds.
How to treat:
Prune infected leaves and dispose of them away from the growing area. Apply organic fungicides, such as copper-based products. Keep plants dry and improve drainage to reduce moisture exposure.
Actionable Tip: Remove infected leaves early to stop slow spread
Aspergillus
What causes it:
Aspergillus develops in overly moist conditions and can affect both plants and harvested buds. It is particularly dangerous as its spores can be harmful to humans when inhaled.
Effects on plant:
The mould appears as black or greenish fuzz on leaves and buds, reducing the plant’s vigor and making the crop unsafe for consumption, or useful for extraction or hash making
How to identify:
Check for black or green fuzzy patches on leaves, stems, and buds. This mould often appears on plants exposed to excessive moisture or humidity. It may look like small patches of dirt or debris, however cannot be rubbed or cleaned off the leaf.
How to treat:
Remove and discard infected plant material immediately. Sterilize tools using isopropyl alcohol and growing spaces to prevent contamination. Reduce humidity levels and monitor using a hygrometer, improve airflow, and ensure proper drying of harvested buds.
Actionable Tip: Remove infected material immediately and avoid inhaling spores
White mould (Sclerotinia)
What causes it:
White mould thrives in humid conditions and spreads through contact with contaminated soil, tools, or infected plants. It often appears near the base of the plant and the roots.
Effects on plant:
This mould causes stems to wilt and rot, cutting off nutrient flow to the upper parts of the plant. It weakens the plant structure and can quickly spread to surrounding plants. Mature plants that are exposed to Sclerotinia can become pale, mushy and soft.
How to identify:
Look for a cottony white growth on stems or branches, usually near the base of the plant. Wilting stems and sudden plant collapse are additional warning signs.
How to treat:
Remove affected parts of the plant and improve air circulation. Apply fungicides like Bacillus subtilis or copper-based treatments. Avoid overwatering and sterilize tools to prevent reinfection.
Actionable Tip: Avoid overwatering, wet soil increases risk significantly
How to remove mould from cannabis plants
If you spot mould, act fast to save your plants. Here’s what I do:
Physical removal
Carefully trim away the affected areas using sterilized scissors. Dispose of the mouldy parts far from your grow area to avoid spreading mould spores.
Application of natural remedies
Spray a mixture of water and hydrogen peroxide on the affected plants. This can help kill surface mould without harming the plant, however air flow must be the optimal milk spray (milk mixed with water) is another natural option that can help curb powdery mildew, however can be more difficult especially if the environmental settings are not in balance.
Using commercial anti-mould products
There are commercial fungicides designed specifically for cannabis. Always choose products safe for marijuana and follow the instructions carefully to avoid harming your plants.
Post-removal plant care
After removing mould from your cannabis plants, it’s essential to focus on creating an environment that discourages mould from returning while supporting the recovery of affected plants. Here’s a detailed guide to optimising your grow room conditions and ensuring plant health:
1. Adjust humidity and temperature
- Lower humidity: Maintain relative humidity levels between 40-45, especially during flowering, as high humidity encourages mould growth. Use a hygrometer to monitor humidity accurately.
- Temperature control: Keep the room temperature between 70-75°F (21-24°C) during the day and avoid drastic temperature drops at night. Cooler temperatures can lead to condensation, creating a favorable environment for mould.
2. Improve airflow and ventilation
- Air circulation: Use one or multiple oscillating fans to ensure constant air movement around and through your plants. Proper airflow helps prevent moisture from settling on leaves and buds.
- Ventilation: Install a top quality performance exhaust system with carbon filters to remove stale, humid air and bring in fresh air. This is especially critical in enclosed grow spaces like grow tents.
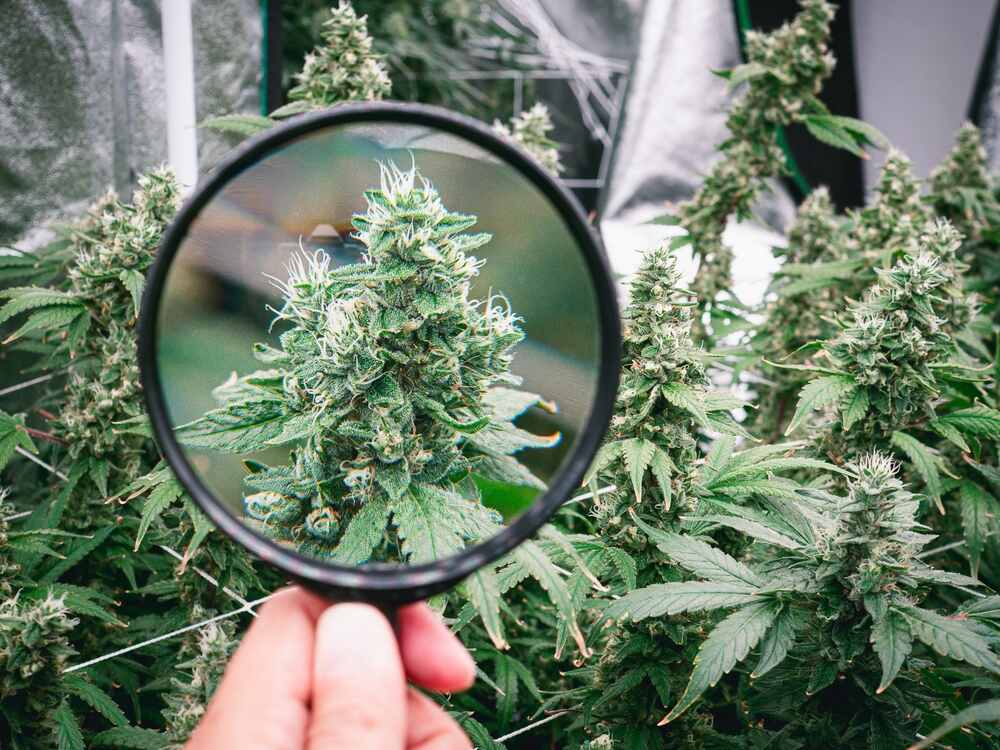
3. Regular plant inspection
- Daily checks: Inspect your plants daily, focusing on areas prone to mould, such as dense buds and lower leaves. Look for any signs of recurrence, such as discoloured spots or fuzzy growth.
- Use magnification: A magnifying glass or loupe can help you spot early signs of mould that might be missed by the naked eye.
4. Maintain cleanliness
- Sterilize tools: Disinfect pruning shears, scissors, and other tools using isopropyl alcohol before and after each use to prevent the spread of mould spores.
- Clean the grow space: Remove plant debris, sanitize surfaces, and replace contaminated soil if necessary and clean and sterilize pots. Mould spores can linger in the environment and reinfect plants.
5. Optimise watering practices
- Avoid overwatering: Only water your plants when the top inch of soil feels dry. Overwatering increases soil moisture, which can lead to soil borne pathogens and mould.
- Water early: Water your plants early in the day so that excess moisture evaporates before nightfall.
6. Support plant recovery
- Prune damaged leaves: Trim off any remaining damaged or weak leaves to encourage healthy new growth and improve air circulation around the plant.
- Use recovery supplements: Apply organic plant supplements like seaweed extract or humic acids to boost plant immunity and recovery.
- Monitor stress levels: Mould removal can stress plants, so avoid additional stressors like extreme pruning or abrupt environmental changes during the recovery phase.
7. Preventative measures
- Mould-resistant strains: Consider growing mould-resistant cannabis strains, especially outdoors in regions with high humidity.
- Prophylactic treatments: Use organic fungicides like neem oil or sulfur sprays as a preventative measure, even if no mould is currently visible.
- Spacing: Ensure plants are spaced adequately to allow for better airflow and reduce overcrowding.
How to detect mould before consumption

Look for fuzzy, powdery dark or grey coloured spots on your buds. Smell them too, as mouldy cannabis often has a musty and earthy odour. If you suspect mould, it’s better to be safe and avoid using that bud. Never smoke mouldy buds or use the buds or contaminated leaves for hash or extraction.
Safe usage and storage of cannabis to prevent mould growth
Store your cannabis in a cool, dark place in airtight containers. Keep humidity levels in check with humidity packs. Proper storage ensures your buds stay mould-free and fresh for longer.
FAQs
What causes mould to grow on cannabis plants?
High humidity, poor air circulation, and overwatering create ideal conditions for mould to grow on cannabis plants.
How can you tell if your cannabis plant has mould?
Look for white, grey, or black fuzzy spots on leaves and buds, brown wilted leaves, or a musty smell.
What are the different types of mould that affect cannabis plants?
Common moulds include powdery mildew, botrytis (bud rot), cladosporium, aspergillus, and white mould.
Is it safe to consume mouldy cannabis?
No, consuming mouldy cannabis can cause respiratory issues, allergic reactions, and even lung infections.
How can I prevent mould from growing on my cannabis plants?
Maintain low humidity during the final 4 weeks of bloom, ensure proper air circulation, prune plants regularly, and use organic mould preventatives.

