




White mould on cannabis is a fungal disease caused primarily by Sclerotinia sclerotiorum. It can infect stems, roots, and lower branches, eventually causing entire plants to wilt and die if left untreated. The disease often starts subtly, with a wilted branch, a pale lesion near the soil line, or white cotton-like growth on the stem. Because these symptoms can resemble overwatering, root rot, or Botrytis, it's easy to misdiagnose the problem in its early stages.
One of the reasons I take white mould seriously is that, once it infects the stem, it can restrict water and nutrient movement while producing hard black survival structures called sclerotia. These can persist in soil or plant debris and lead to future outbreaks.
In this guide, you'll learn how to diagnose white mould on cannabis, distinguish it from similar diseases, prevent it from spreading, and protect future crops.
Key Takeaways
- White mould on cannabis is usually caused by Sclerotinia sclerotiorum and most commonly affects stems, roots, and the crown of the plant.
- Early signs include white cotton-like growth, stem lesions, sudden wilting, and black sclerotia, making early diagnosis essential to limit crop losses.
- Severely infected cannabis plants are rarely recoverable, so removing infected plants quickly helps prevent the fungus from spreading.
- High humidity, poor airflow, and prolonged moisture around the base of the plant create the ideal conditions for Sclerotinia to develop.
- The best defense against white mould is prevention through proper sanitation, good air circulation, careful watering practices, and regular plant inspections.
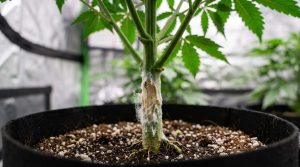
What Is White mould on Cannabis?
White mould on cannabis is a fungal disease caused primarily by Sclerotinia sclerotiorum, a soilborne pathogen capable of infecting hundreds of broadleaf plant species, including cannabis. Unlike surface moulds that remain on leaves or flowers, Sclerotinia invades the plant's internal tissues, where it disrupts the movement of water and nutrients. By the time you notice white fungal growth on the outside of a stem, the fungus has often been developing inside the plant for days.
In my experience, growers often assume the first signs are caused by overwatering cannabis plants or a nutrient problem because the plant begins to wilt while the growing medium is still moist.
The fungus typically attacks the lower portion of the plant where humidity is highest and airflow is poorest. It spreads through white, cotton-like fungal threads known as mycelium, while also producing hardened black survival structures called sclerotia. These structures allow the fungus to survive in soil and plant debris for several years, making prevention just as important as treatment.
| Term | What it means |
| Mycelium | White, cotton-like fungal growth that spreads across and inside plant tissue. |
| Sclerotia | Hard black survival structures that allow the fungus to persist in soil for years. |
| Crown | The area where the main stem meets the root system. |
| Vascular tissue | The internal tissue that transports water and nutrients throughout the plant. |
What causes white mould (Sclerotinia) in cannabis?
White mould develops when Sclerotinia sclerotiorum encounters the right environmental conditions. The fungus thrives in cool to moderate temperatures combined with prolonged moisture, making damp grow rooms and crowded outdoor gardens particularly vulnerable. Choosing mould-resistant strains cannot eliminate the risk, but it can provide an additional layer of protection when growing in humid or unpredictable conditions.
High humidity alone rarely causes white mould, but maintaining the correct grow room humidity dramatically reduces the risk of fungal diseases developing. Instead, infection usually occurs when several factors combine, allowing fungal spores or dormant sclerotia to colonise susceptible plant tissue.
The most common causes include:
| Risk factor | Why it increases infection |
| High humidity | Keeps stems and lower foliage damp for extended periods. |
| Poor airflow | Prevents moisture from evaporating around the lower canopy. |
| Overcrowded plants | Reduces air circulation and creates humid microclimates. |
| Wet growing media | Keeps the crown and lower stem consistently moist. |
| Plant wounds | Give the fungus an easy point of entry. |
| Dead plant debris | Provides organic material where the fungus can establish itself. |
| Contaminated soil or tools | Introduce Sclerotinia into an otherwise healthy grow. |
I've found sanitation is often overlooked until growers experience their first outbreak. Reusing dirty pots, bringing in infected clones, or leaving dead leaves beneath plants can all introduce or encourage the disease. Good hygiene is one of the simplest ways to reduce the risk before infection ever starts.
How Sclerotinia infects stems, roots, and lower plant tissue
White mould almost always begins at the base of the cannabis plant, where moisture lingers longest. The fungus commonly infects the lower stem, crown, or roots before gradually moving into healthy tissue.
Once inside the plant, Sclerotinia breaks down the vascular tissue responsible for transporting water and nutrients. As a result, the foliage above the infection begins to wilt even though the roots may still be sitting in moist growing media. This is one of the reasons the disease is frequently mistaken for watering issues during its early stages.
Depending on where the infection starts, white mould can affect different parts of the plant.
| Plant part | How Sclerotinia affects it |
| Stem | Weakens internal tissue, restricting water movement and reducing structural strength. |
| Root crown | Damages the junction between the roots and main stem, often leading to rapid plant decline. |
| Roots | Reduces the plant's ability to absorb water and nutrients efficiently. |
| Lower branches | Allows the fungus to spread upward into healthy stems and surrounding tissue. |
White mould on roots is usually harder to detect than white mould on a stem because the infection develops below the growing medium. By the time above-ground symptoms appear, the fungus may already have colonised the crown and root system. This is why I always inspect the base of the stem whenever I notice unexplained wilting, even if the soil still feels adequately moist.
We'll cover the symptoms that distinguish white mould from other cannabis diseases in the next section.
White mould vs bud rot (Botrytis): what’s the difference?
White mould and bud rot are both fungal diseases, but they usually affect different plant areas and produce different symptoms.
White mould caused by Sclerotinia commonly attacks stems, roots, the crown and lower plant tissue. It produces bright white, cotton-like mycelium and may later form hard black sclerotia inside or outside infected stems.
Bud rot is most commonly caused by Botrytis cinerea. It usually begins inside dense cannabis flowers, where dead pistils and trapped moisture allow the fungus to develop. Botrytis often appears grey, brown or dusty rather than bright white.
The main differences are:
| Feature | White Mold (Sclerotinia) | Bud Rot (Botrytis) |
| Primary location | Stems, roots, crown | Flowers and buds |
| Appearance | Bright white, cotton-like | Grey, brown, dusty |
| Structures | Black sclerotia present | No sclerotia |
| Damage pattern | Whole branches wilt | Individual buds collapse |
| Spread | Through stems and soil | Inside dense flowers |
You should treat both diseases seriously. Neither infected flower nor mouldy plant tissue is safe to consume.
How to Identify White mould on Cannabis Plants
Identifying white mould on cannabis early gives you the best chance of preventing it from spreading to healthy plants. While the disease often begins near the base of the stem or around the root crown, symptoms don't always appear where the infection starts. Instead, you may first notice a healthy-looking plant suddenly begin to wilt despite the growing medium still being moist.
When I'm inspecting a plant for suspected Sclerotinia, I don't rely on a single symptom. Instead, I examine the stem, crown, roots, and surrounding growing medium because white mould usually leaves several clues rather than just one.
| Plant Part | What to Look For |
| Stem | White cotton-like growth, water-soaked lesions, pale or tan cankers |
| Root crown | White fungal growth where the stem meets the roots |
| Roots | White mycelium, discoloration, poor vigor, reduced water uptake |
| Upper foliage | Sudden wilting despite moist soil |
| Growing media | Black sclerotia or white fungal growth around the stem base |
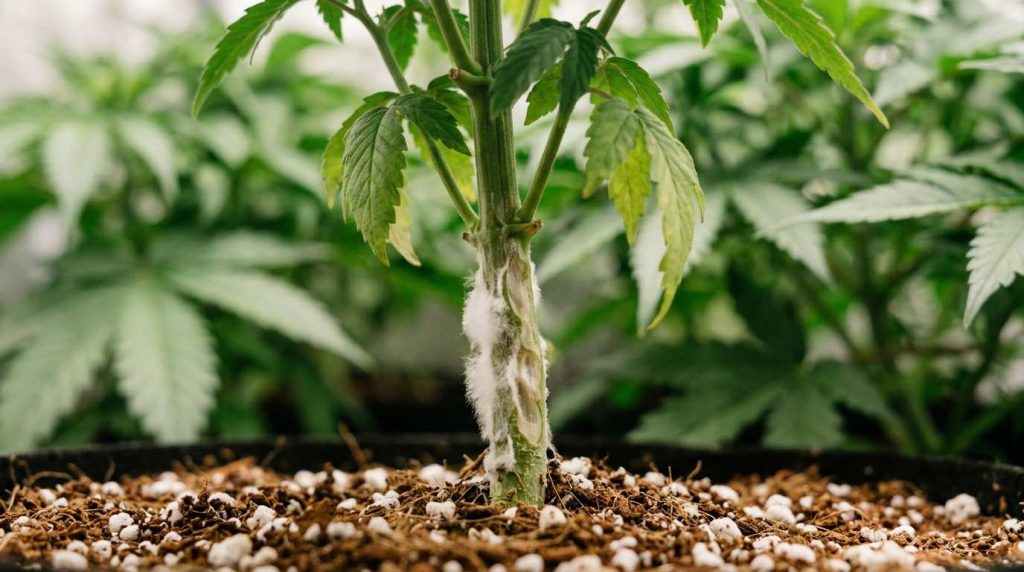
White mould on Stems: Early Warning Signs
The earliest sign of white mould on a stem is often a small, water-soaked lesion near the base of the plant. Over several days, the affected area becomes pale tan or light brown before developing the characteristic white, cotton-like fungal growth.
As the infection progresses, you may notice:
- White, fluffy mycelium on the stem.
- Soft, sunken lesions.
- Brown or grey stem cankers.
- Splitting or peeling outer stem tissue.
- Wilting above the infected area.
- Branches collapsing while the rest of the plant still appears healthy.
One of the first things I check is whether the stem feels firm. Healthy stems remain rigid, while infected tissue often becomes soft and compresses easily between your fingers. If the lesion completely surrounds the stem, it can girdle the plant, cutting off the movement of water and nutrients to everything above the infection.
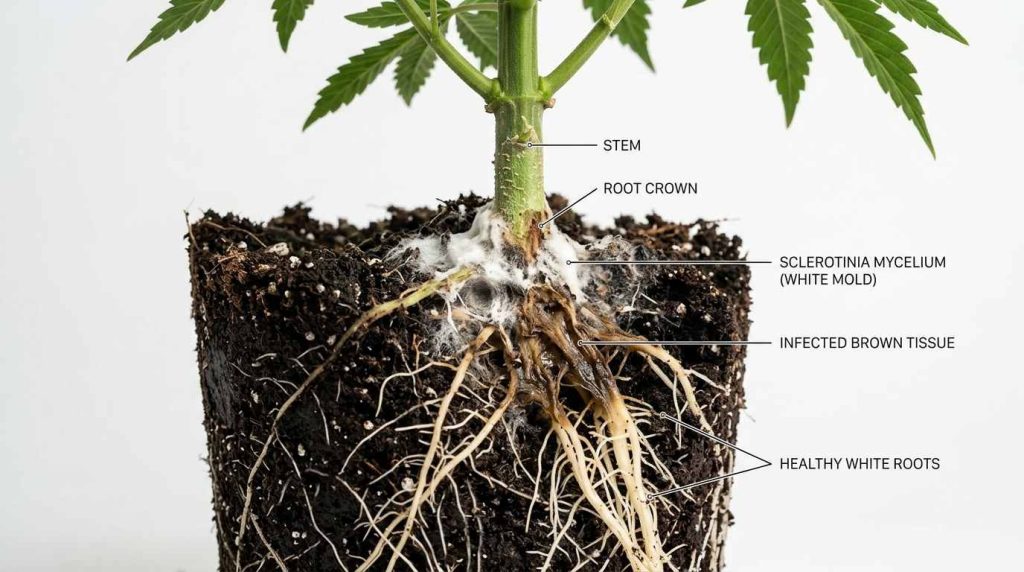
White mould on Roots and Around the Soil Line
White mould on roots is much harder to diagnose because most of the infection develops below the surface of the growing medium. In many cases, the first visible symptom is unexplained wilting even though the plant has been watered correctly.
Carefully inspect the crown and upper roots for:
| Healthy Roots | Roots Affected by White Mold |
| Firm and cream-colored | Soft, discolored, or decaying |
| Fresh earthy smell | Musty fungal odour |
| Strong anchorage | Plant feels loose in the pot |
| Clean crown | White fungal growth around the crown |
Unlike Pythium root rot, which usually produces slimy, dark roots with a strong foul odour, Sclerotinia often begins around the crown before spreading into the root system. If the stem base is infected, always inspect the roots as well because both areas are commonly affected together.
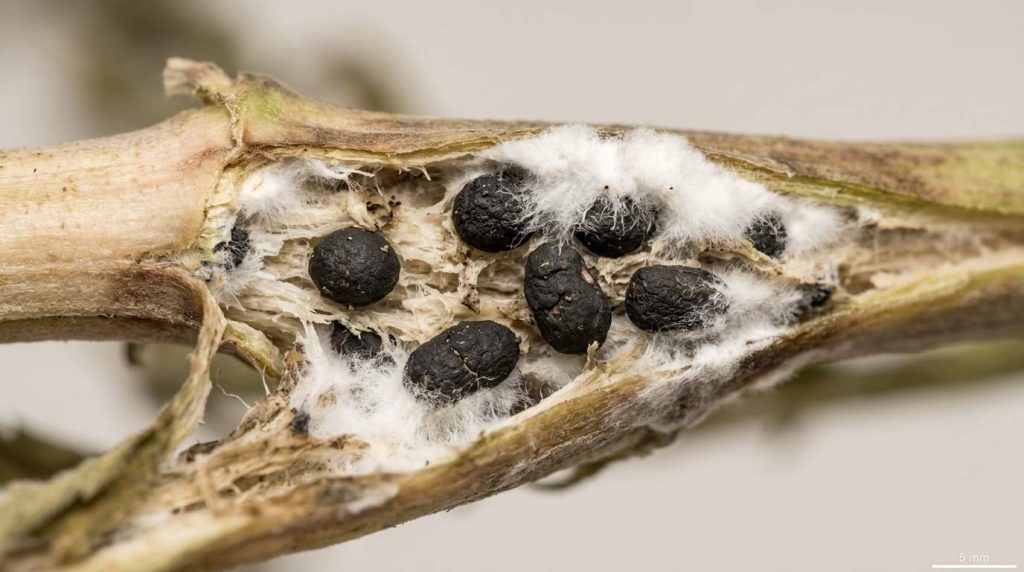
Black Sclerotia: The Defining Sign of Sclerotinia
One of the easiest ways to confirm Sclerotinia is by looking for black sclerotia. These hardened fungal structures are unique survival bodies that allow the fungus to remain dormant in soil and plant debris for several years.
They may be found:
- Inside hollow stems.
- Embedded in decaying stem tissue.
- Around the root crown.
- Mixed within contaminated growing media.
- Attached to dead plant debris.
They resemble small black seeds or irregular pellets and range from a few millimeters to over a centimeter in length. If I suspect Sclerotinia, I'll often cut open an infected stem. Finding black sclerotia inside the stem is one of the strongest indicators that the disease is white mould rather than another fungal infection.
Environmental Conditions That Accelerate White mould
White mould develops most rapidly when environmental conditions favor fungal growth. Although these conditions don't cause Sclerotinia on their own, they significantly increase the likelihood of spores germinating and infecting susceptible tissue.
| Environmental Condition | Risk Level |
| High humidity | High |
| Poor lower-canopy airflow | High |
| Crowded plants | High |
| Wet growing media for extended periods | High |
| Heavy dew or prolonged rainfall | Moderate to High |
| Humidity spikes during lights-off | Moderate |
| Dead leaves around the stem base | Moderate |
I've found that the highest-risk period indoors is shortly after the lights turn off. As temperatures drop, humidity rises and moisture condenses within dense foliage. If the lower canopy stays damp overnight, it creates the ideal environment for Sclerotinia to establish itself.
Knowing these warning signs makes it much easier to catch white mould before it spreads through the plant or into the rest of your grow. If you're seeing several symptoms at once, our guide to common cannabis plant problems can help rule out other causes.
How to Treat White mould on Cannabis: A Step-by-Step Guide
Treating white mould on cannabis requires immediate action. Once Sclerotinia sclerotiorum enters the stem or root crown, it cannot be cured because the fungus spreads through the plant's internal vascular tissue. Your goal is to contain the infection, protect healthy plants, and prevent the disease from spreading throughout your grow.
Over the years, I have found that growers lose more plants by waiting too long than by removing an infected plant early. If white mould is caught while it is limited to a small side branch, you may be able to save the plant. Once the infection reaches the main stem, crown, or roots, the chances of recovery are extremely low.
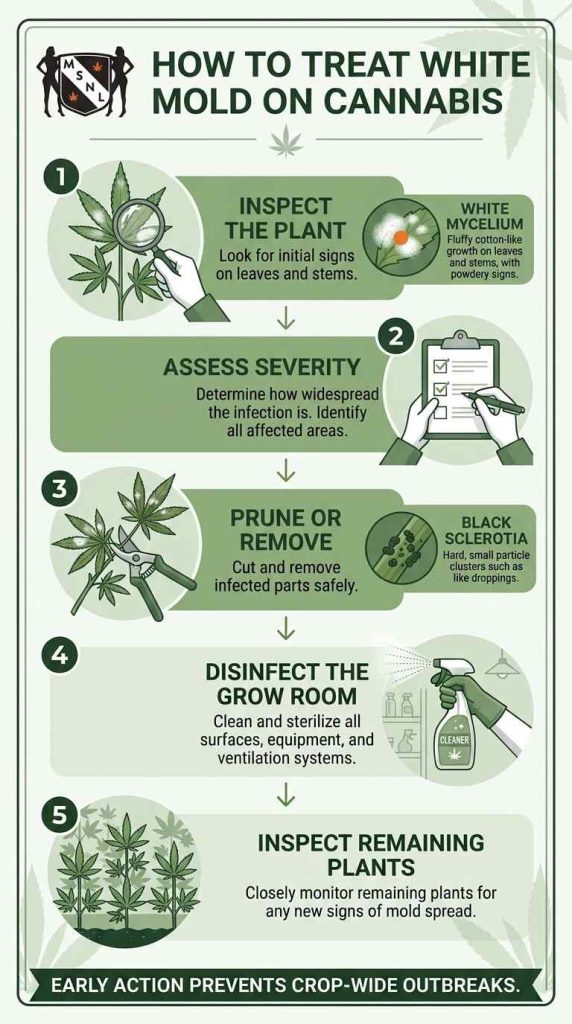
Step 1: Confirm That It Is White mould
Before taking any action, make sure the symptoms are caused by white mould and not another issue such as root rot, stem damage, or nutrient stress.
Look for the following signs:
| Symptom | Common With White Mold? |
| White cotton-like growth on the stem | Yes |
| Water-soaked or pale stem lesions | Yes |
| Black sclerotia inside or on the stem | Strong confirmation |
| Sudden wilting despite moist growing media | Yes |
| Slimy roots with a strong foul odour | Usually Pythium root rot |
If you carefully split open an infected stem and find hard black sclerotia inside, you can be confident that you are dealing with Sclerotinia.
Step 2: Decide Whether the Plant Can Be Saved
Once you have confirmed the disease, determine whether the infection is localized or has spread throughout the plant.
| Level of Infection | Recommended Action |
| Small lesion on one side branch | Prune the affected branch and monitor the plant |
| Small stem lesion with no wilting | Attempt recovery |
| Infection has reached the main stem | Remove the entire plant |
| Root crown is infected | Remove the entire plant |
| Roots are infected | Remove the entire plant |
| Multiple stems affected | Remove the entire plant |
| Severe wilting or stem collapse | Remove the entire plant immediately |
As a general rule, I do not try to save plants with crown or root infections. One infected plant is far easier to replace than an entire grow room.
Step 3: Remove Minor Infections
If the infection is confined to a small branch and the main stem remains healthy, you can attempt to remove the infected tissue.
Follow these steps:
- Sterilise your pruning shears with 70% isopropyl alcohol before making any cuts.
- Cut at least 2 to 4 inches below the visible lesion to remove tissue that may already be infected internally.
- Place the infected branch directly into a plastic bag without allowing it to touch healthy plants or the floor.
- Sterilise your pruning shears again before using them on another branch or plant.
- Continue inspecting the plant every day for the next 7 to 10 days.
I have successfully saved plants when the infection was limited to a single lower branch. However, if new lesions appear after pruning, I remove the plant immediately rather than attempting a second rescue.
Step 4: Remove Heavily Infected Plants
If the infection has spread beyond one branch or reached the main stem, root crown, or roots, remove the entire plant as soon as possible.
To reduce the risk of spreading spores:
- Place a plastic bag over the plant before moving it.
- Lift the plant carefully to avoid dropping contaminated leaves or growing media.
- Remove as much of the root ball as possible.
- Collect any fallen leaves, roots, or growing media around the pot.
- Dispose of the entire plant with household waste.
Never compost cannabis plants infected with white mould. Black sclerotia can survive in plant debris and soil for several years, creating a source of future infections.
Step 5: Clean and Disinfect the Grow Area
Removing the infected plant is only part of the job. Thoroughly cleaning the grow area helps prevent the fungus from spreading to healthy plants.
I always use the same cleaning process after dealing with white mould.
| Step | What to Do |
| Remove debris | Collect all leaves, roots, growing media, and plant material. |
| Wash surfaces | Clean pots, trays, floors, and equipment to remove dirt and organic matter. |
| Apply disinfectant | Use a horticultural disinfectant and allow the full contact time listed on the product label. |
| Dry the area | Allow all equipment and surfaces to dry completely before reusing them. |
Pay close attention to pruning tools, pots, trays, irrigation equipment, plant supports, grow tent walls, and the floor beneath the canopy.
One mistake I often see beginners make is spraying disinfectant onto dirty equipment. Organic matter protects fungal structures from the disinfectant, so always clean first and disinfect second.
Step 6: Monitor the Remaining Plants
The final step is inspecting the rest of your crop. White mould often spreads before symptoms become obvious, so checking nearby plants every day is well worth the effort.
Inspect neighboring plants for the next 7 to 14 days.
| Inspection Area | What to Look For |
| Stem base | White cotton-like growth or pale lesions |
| Root crown | Soft tissue or fungal growth |
| Lower branches | Water-soaked or tan cankers |
| Growing media | Black sclerotia or white fungal growth |
| Upper foliage | Sudden wilting or collapsing branches |
If you notice suspicious symptoms on another plant, isolate it immediately and repeat the inspection process.
Should You Use Fungicides?
Fungicides and biological products may help protect healthy plants from future infections, but they rarely eliminate white mould once the fungus has spread inside the stem. I consider them a preventative tool rather than a cure.
In my experience, the best way to stop white mould is to identify it early, remove infected tissue promptly, clean the grow area thoroughly, and continue monitoring the rest of the crop.
Never smoke, vape, or process cannabis flowers that show visible mould. If you're unsure whether your harvest is safe, learn what mouldy weed looks like before making that decision.
How to Prevent White mould on Cannabis: A Step-by-Step Guide
Preventing white mould on cannabis is much easier than trying to stop an outbreak after it starts. Once Sclerotinia sclerotiorum infects the stem or root crown, treatment options become very limited. The best approach is to create an environment where the fungus struggles to survive while inspecting your plants regularly so you can catch problems before they spread.
Over the years, I've found that white mould is rarely caused by a single mistake. Most outbreaks happen when several small issues occur at the same time, such as high humidity, poor airflow, overcrowded plants, and consistently wet growing media. Eliminating these risk factors dramatically reduces the chance of infection.
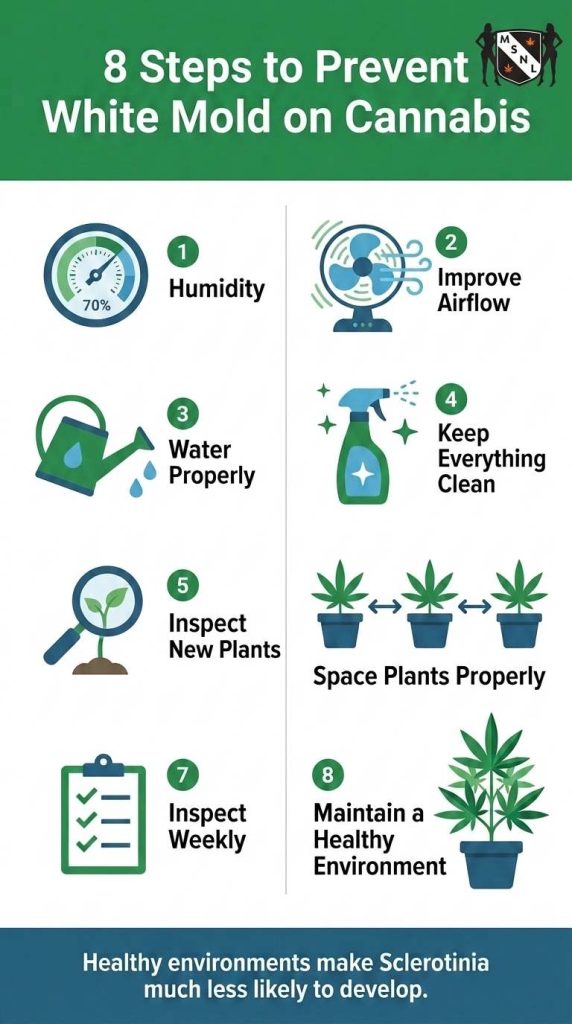
Step 1: Maintain the Right Humidity
Humidity is one of the biggest factors influencing white mould. When moisture remains on stems, leaves, or the surface of the growing medium for extended periods, Sclerotinia has a much better chance of establishing itself.
Monitor humidity with a digital hygrometer rather than guessing. Place one sensor at canopy height and, if possible, another near the lower canopy where moisture often builds up unnoticed.
Aim for these humidity ranges:
| Growth Stage | Recommended Relative Humidity |
| Seedlings | 65 to 75% |
| Vegetative growth | 45 to 60% |
| Early flowering | 40 to 50% |
| Late flowering | 35 to 45% |
Check humidity during both the light and dark periods. Maintaining the correct temperature and humidity for cannabis is one of the best ways to prevent fungal diseases. This is particularly important when growing indoor cannabis seeds, as enclosed rooms and grow tents can experience a 10 to 15 percent humidity increase after the lights turn off.
If you're growing in a small tent, placing the dehumidifier just outside the tent often works better than putting it inside because it removes moisture before fresh air enters the grow space.
Step 2: Improve Airflow Throughout the Entire Plant
Good airflow helps dry stems, leaves, and the surface of the growing medium before fungal spores have time to germinate. Many beginners position one fan above the canopy but overlook the lower branches, where white mould most commonly develops.
I prefer several gentle air currents instead of one powerful fan.
A simple airflow setup looks like this:
| Equipment | Purpose |
| Oscillating fan below the canopy | Keeps the stem base and lower branches dry |
| Oscillating fan above the canopy | Circulates warm air through the upper foliage |
| Exhaust fan | Removes warm, humid air from the grow space |
| Passive or active intake | Replaces stale air with fresh air |
Leaves should move gently rather than constantly shaking. If a fan is causing leaves to curl, dry out, or develop brown edges, reduce its speed or reposition it.
As plants become larger, remove overcrowded lower growth that blocks airflow. Always sterilise pruning tools before moving to another plant.
Step 3: Water Correctly
Poor watering habits are one of the most common causes of excess moisture around the stem base. Water only when the growing medium needs it rather than following a fixed schedule.
A simple routine is:
- Lift the pot before watering to judge its weight.
- Water slowly around the outer edge of the root zone instead of directly against the stem.
- Continue watering until a small amount of runoff appears.
- Empty runoff trays within 5 to 10 minutes.
- Wait until the pot feels noticeably lighter before watering again.
Avoid these common mistakes:
| Mistake | Better Practice |
| Watering every day | Water only when needed |
| Wetting the stem | Keep water away from the crown |
| Leaving pots in runoff | Empty trays promptly |
| Applying small amounts repeatedly | Water thoroughly, then allow the medium to dry appropriately |
| Overwatering during cool weather | Reduce irrigation when evaporation slows |
If you use drip irrigation, position emitters several inches away from the stem so water soaks the root zone instead of the crown.
Step 4: Keep Your Grow Room Clean
Good sanitation prevents Sclerotinia from entering your grow and stops fungal structures from surviving between crops.
After every harvest, I follow the same cleaning routine:
- Remove all plant material, roots, and growing media.
- Brush away loose soil and organic debris.
- Wash pots, trays, and equipment with warm water.
- Apply a horticultural disinfectant according to the manufacturer's instructions.
- Allow the disinfectant to remain on the surface for the recommended contact time.
- Let everything dry completely before reuse.
Pay particular attention to:
| Item | Recommendation |
| Pots and trays | Wash and disinfect |
| Pruning shears | Sterilise before and after every plant |
| Plant stakes | Clean thoroughly before reuse |
| Irrigation equipment | Flush and inspect regularly |
| Grow tent walls | Wipe down after every crop |
| Growing media | Never reuse media from infected plants |
One mistake I see frequently is disinfecting dirty equipment. Organic matter protects fungal structures, so always remove dirt and plant residue before applying any disinfectant.
Step 5: Prevent Contaminated Plants From Entering Your Grow
White mould can arrive with infected clones, contaminated soil, reused pots, or dirty tools.
Before introducing new plants, inspect:
- The stem base.
- The root crown.
- Lower branches.
- The growing medium.
- Any pruning wounds.
Whenever possible, keep new clones separate from your main grow for 7 to 10 days. During this time, inspect them daily for lesions, white fungal growth, wilting, or black sclerotia before placing them beside healthy plants.
Step 6: Give Plants Enough Space
Crowded plants trap humidity and reduce airflow, which is why pruning cannabis plants is an important part of disease prevention.
As your plants grow:
- Remove dead leaves promptly.
- Keep lower branches from resting on the growing medium.
- Support heavy branches before they split.
- Thin dense foliage where plants are touching.
- Leave enough room to inspect every stem without moving neighboring plants.
One habit I've developed over the years is making sure I can easily see the stem base of every plant. If the canopy is too dense to inspect properly, it's also dense enough to trap moisture.
Step 7: Inspect Plants Every Week
Routine inspections help you catch white mould before it spreads through the stem or roots. Becoming familiar with cannabis plant anatomy also makes it easier to spot subtle changes early.
I inspect plants from the bottom up using the same routine every time:
- Check the growing medium for excessive moisture or black sclerotia.
- Inspect the crown where the stem enters the growing medium.
- Examine the lower stem for pale lesions or white mycelium.
- Look under the lower branches for early fungal growth.
- Finish by checking the upper canopy for unexplained wilting.
| Inspection Area | What to Look For |
| Growing medium | Standing water, dead leaves, black sclerotia |
| Crown | White fungal growth or soft tissue |
| Stem | Pale lesions or cotton-like mycelium |
| Lower branches | Water-soaked cankers |
| Upper foliage | Wilting despite moist growing media |
Following the same inspection routine every week makes subtle changes much easier to spot before they become serious.
Step 8: Reduce the Risk Outdoors
Outdoor growers have less control over humidity, but several practices can greatly reduce the risk of white mould.
Choose a location with good sun exposure and natural airflow. Avoid low areas where water collects after rain and improve drainage with raised beds if necessary.
For outdoor grows:
- Space plants generously.
- Water early in the morning.
- Avoid overhead irrigation where possible.
- Keep mulch and wet debris away from the stem.
- Remove infected plants immediately.
- Rotate with non-host crops where practical.
If your garden has previously experienced Sclerotinia in vegetables, ornamentals, or other broadleaf crops, assume the soil may still contain viable sclerotia. Crop rotation helps reduce disease pressure over time, but because these survival structures can remain viable for several years, sanitation and regular inspections remain your most effective long-term defenses.
Preventing white mould on cannabis is all about consistency. Stable humidity, proper airflow, careful watering, clean equipment, regular inspections, and good plant spacing work together to make your grow far less inviting to Sclerotinia. No single practice eliminates the risk, but combining all of these steps gives you the best chance of growing healthy, disease-free plants.
Conclusion
White mould on cannabis can develop quickly, but it is much easier to manage when you know what to look for and act early. Learning to recognize the first signs of Sclerotinia, such as white cotton-like growth, stem lesions, sudden wilting, and black sclerotia, gives you the best chance of limiting the damage before the disease spreads through your grow.
In my experience, successful growers don't wait until symptoms become severe. They inspect plants regularly, maintain stable environmental conditions, and deal with small problems before they become major outbreaks. Good airflow, appropriate humidity, careful watering, and a clean grow space are all simple habits that dramatically reduce the risk of white mould.
While no grow is completely immune to fungal diseases, combining early detection with consistent preventative practices will help you protect your cannabis plants and produce healthier, more reliable harvests crop after crop.
Frequently Asked Questions
Can cannabis recover from white mould?
A cannabis plant can sometimes recover if white mould is caught early and the infection is limited to a small side branch. However, once Sclerotinia reaches the main stem, root crown, or roots, recovery is unlikely. Removing heavily infected plants is usually the best way to protect the rest of your crop.
Is white mould on cannabis harmful to humans?
Yes. Cannabis flowers affected by white mould should never be smoked, vaped, or processed into concentrates or edibles. Even if you remove the visible mould, fungal contamination may remain in surrounding plant tissue and could pose a health risk.
Does white mould stay in the soil?
Yes. Sclerotinia sclerotiorum produces hard black survival structures called sclerotia that can remain viable in soil and plant debris for several years. If a plant becomes infected, discard the growing media and thoroughly clean and disinfect pots, tools, and the grow area before starting another crop.
What environmental conditions cause white mould on cannabis?
White mould thrives in cool to moderate temperatures combined with prolonged moisture, high humidity, and poor airflow. Crowded plants, overwatering, wet growing media, and dead plant debris around the stem base all increase the risk of infection.
Can fungicides cure white mould on cannabis?
No. Fungicides may help protect healthy plants or reduce the spread of spores, but they cannot eliminate Sclerotinia once it has colonised the inside of a cannabis stem or root system. Early detection, removing infected tissue, and improving environmental conditions are the most effective ways to manage white mould.


